
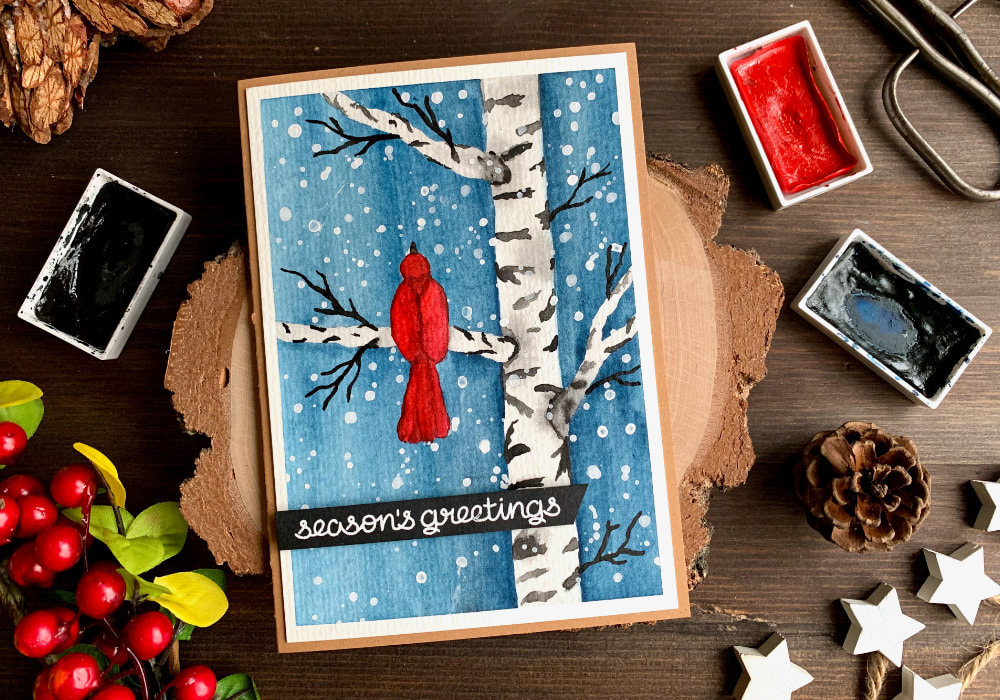
 I've been scrolling through Pinterest and I stumbled across various paintings with trees, snowy sky and a red bird and I really liked it, which inspired me to paint it myself and make a card. I did find it a little bit intimidating, as I still call myself an advanced beginner (I need to practice more often), therefore drawing and painting from scratch doesn't come easy to me. What helped me was doing a sketch. I started with a simple rough sketch in a notebook, then I tried it out on a watercolour card stock and loved the result. So let me share with you, how you can make this card yourself as well.  I taped my watercolour card stock onto a board using a washi, to prevent warping. I took a HP pencil and started drawing the scene. First I drew the trunk of the tree, which are just two straight-ish lines (you don't want ruler-straight lines) and then I drew in three thicker branches. You can draw only one branch, the one where the bird is sitting. This is completely up to you. To draw the bird, first I erased the a section on the branch, and then I drew the body, which is an oval shape, sort of an egg shape. Then I drew a circle for the head (not a perfect circle) and it was slightly overlapping the body. I also drew the beak in a simple A-shape at the top. To draw the feathers at the bottom, I actually looked up a cardinal bird, and tried to copy that. I drew three feathers at the bottom and I drew them in to a sort of paper fan shape. Lastly I drew in the wings across the body, with the right one overlapping the left one.  After I was happy with the look of the drawing I applied a masking fluid over the branches and the bird, just to make the painting of the sky easier. If you do not have a masking fluid, you just need to be careful painting around the images. I used a dark blue paint and I applied two coats of the paint, doing the wet on dry technique. The watercolour card stock I was using is quite cheap, so I didn't want to abuse it with too much water. I dried the panel between each coat. Next I painted the birch tree and I started with the trunk. I decided to paint a birch tree, but if that's too complicated for you, you can paint the tree with only brown paint.  I didn't want it to be perfect white, or the same as the card stock, so I used very diluted black paint and painted the trunk. I did this on the branches later as well. While the paint was still wet, I added small amounts of the black paint here and there, just to add a few grey spots across the trunk. This is completely optional. I dried it with my heat tool and then I painted the black streaks that you get on birch trees. For those I used a very small brush in the size 0 and I applied the black paint, creating those streaks. I painted them randomly, left and right, some coming from behind. If you would like to see more examples on how to draw birch trees, on YouTube you can find a lot of tutorials. Once I was happy with the look, I let it dry and then I removed the masking fluid from two of the branches and repeated the process. First the diluted black, applied it across the branches and then I painted the black streaks.  I dried the branches and next I painted in a little branches using only the black paint. Some of those were attached to the branches and some to the trunk. If you watched my video, you know that I forgot this step and had to do it at the end. You can skip this step if you want. I was contemplating painting the branch where the bird is sitting, but in the end I decided to wait. I was going to do a white splatter to represent the snow and I didn't want any white paint on the bird, so I painted it after I did the splatter. And talking about the splatter, that's what I did next. I took a little bit of gouache, you can also use acrylic paint and mixed it with water. I dipped my brush in the paint and tapping on it with my finger over the watercolour panel I created the splatter. I also used the tip of the brush and directly adding some dots over the sky. 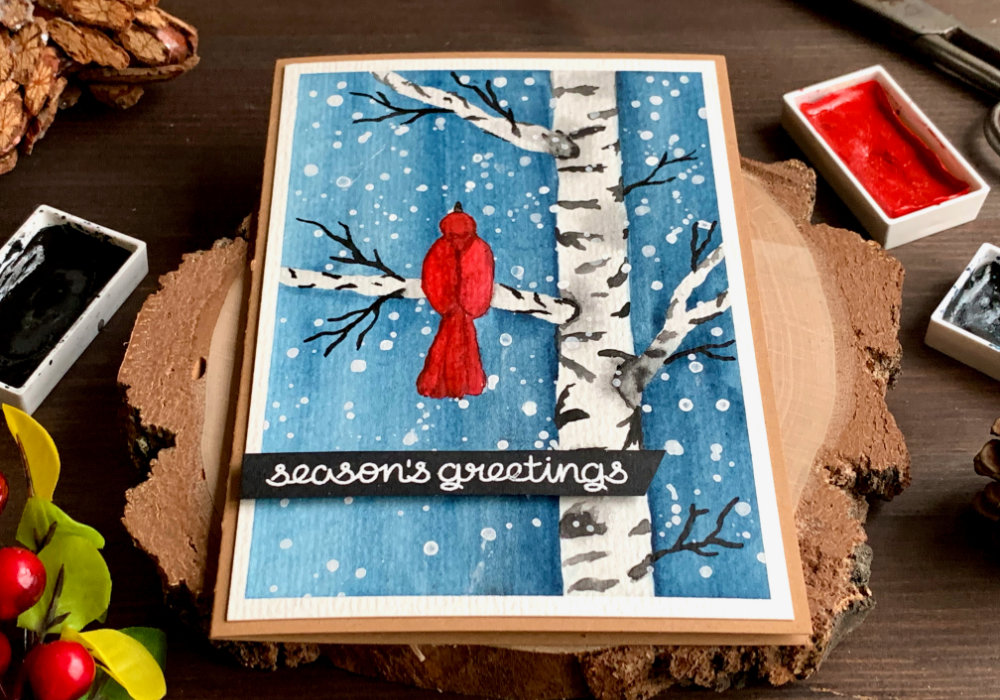 Creating splatter is for me often hit and miss. Sometimes I have no problems creating it, other times I cannot get the paint off the brush, or the splatter goes everywhere else, but not onto the painting. So if you struggle with splatter, you are not alone. To make the splatter, I use different size brushes, depending how big I want the splatter to be. Also the consistency between the gouache and water and the dampness of the brush is important. If it’s too think it won’t get off the brush and if it’s too watery, it will be too light. You really need to play with it to get a feel for it. After the panel was dry, I removed the masking fluid from the last branch and the bird. I first painted the branch, the same way I did the others and then I painted the bird. I used a bright red paint and red diluted with a little bit of brown. I first applied a base layer using the red paint, covering the whole bird and then I used the red-brown paint to sort of contour the lines that I drew. I wanted to create some shadows and a little bit of depth. And while the red-brown was still wet, I applied a second coat of the red, which was also more saturated and I blended those colours together, so it looks more natural. For some spots I went back with the red-brown, which I also used for some places like at the top and bottom between the wings, where it naturally would be darker. Lastly I painted the beak using a dark brown paint.  I put the piece on the side to dry and in the mean time I worked on the greeting. The greeting is optional, this card looks great without it as well, so if you do not have any products to create a greeting, just leave it without it. You can write the greeting yourself, either using a black card stock and a white gel pen or a white card stock and a black pen. Since I'm a card maker with quite a few stamp sets, I decided to use a stamp with a "season's greetings" sentiment. I stamped it on a black card stock, which I treated with an anti-static powder and I used the Versamark ink for the stamping. Then I sprinkled the powder over it and melted it with my heat tool. I cut the sentiment into a banner and one side I cut at an angle. I also trimmed the panel, just slightly. I wanted the card base to be visible, plus when the panel is smaller than the card base, I find it easier to adhere.  Lastly I adhered the watercolour card stock onto a card base that I made out of craft card stock. You can also buy card bases already pre-made, with envelopes. To adhere the panel, I used a simple double-sided tape. And for the greeting I used foam squares, so it's a little bit raised. I hope you will try making this card yourself. Make sure you check out my video on YouTube and give it a Like as well. The list of product is down below, where you can also find a few blog posts that I think you might enjoy. And if you have any questions, just drop me a line. VIDEO TUTORIALWatch the video below or on my YouTube Channel. PRODUCTS USEDCLICK HERE TO SEE TO THE LIST OF PRODUCTS
Tritart, Watercolour Card Stock 300 gsm
AmazonDE Kuretake, Gansai Tambi, Watercolour Paints 36 Set AmazonDE | AmazonUK Blue Squid Brush Set AmazonDE | AmazonUK Daler Rowney Watercolour Brushes 4, 6, 10 AmazonDE | AmazonUK Faber Castell, HB Graphite Pencil AmazonDE | AmazonUK Staedtler, Eraser AmazonDE | AmazonUK Schmincke, Masking Fluid AmazonDE | AmazonUK Pebeo, Gouache, Permanent White AmazonDE | AmazonUK Lawn Fawn, Home For The Holidays (sentiment) StempelKücheDE | SevenHillsCraftsUK papermilldirect, Black Card Plain 240gsm papermilldirectUK Tsukineko Versamark Watermark Ink Pad AmazonDE | AmazonUK Stampendous, Embossing Powder, White AmazonDE | AmazonUK EK Susccess, Anti-Static Powder Tool AmazonDE | AmazonUK Joy Crafts, Kraft Paper,A4 300gsm/140lb (card base) KreativbuntDE | AmazonUK Absofine, A4 Recycled Kraft Paper 320gsm (card base) AmazonDE | AmazonUK Papermania, A6 Card Bases + Envelopes, Craft AmazonDE | AmazonUK Sellotape Double Sided Tape AmazonDE | AmazonUK Dovecraft, Foam Squares AmazonDE | AmazonUK Tesa, Precission Sensitive Maskint Tape AmazonDE | AmazonUK Docrafts Papermania, Heat Tool AmazonDE | AmazonUK Fiscars, Guillotine A5 AmazonDE | AmazonUK Tonic Studios, Guillotine A4 AmazonDE | AmazonUK EK Success, Scissors AmazonDE | AmazonUK My Sweet Petunia, Mini MISTI Stamping Tool StempelmühleDE | BumbleberrysUK Papermania, Stamp Block AmazonDE | AmazonUK Crafting Mat, Black AmazonDE | AmazonUK Here you can find the products I used to make this card. Please note that the products are just a guide, you don't need the exact products or brands. For most of the products I include links to the shops where you can purchase these items if available. As I live in Europe, I provide links to UK and German stores. These are not affiliate links and every product I used for this card, I purchased myself. YOU MIGHT ALSO LIKEPIN MEDid you like the card? I would love, if you pinned it to your board on Pinterest! 
0 Comments
Leave a Reply. |
FOLLOW ME
SEE MORE


CATEGORIES
All
Stamping Die Cutting Using Stencil Heat Embossing Embossing or Texture Paste Distress Inks Nuvo Products Stamping & Colouring Stamping With Solid Stamps Watercolouring Watercolour Pencils Waterbased Markers Pencil Colouring Alcohol Markers Altenew Markers Zig Brush Markers Easy Backgrounds Stamped Backgrounds Small Stamp Ideas Simple Cards Complex Cards Cardmaking For Beginners All
Painting With Acrylics Painting With Gouache Painting With Watercolours Drawing With Fineliner Minimal Supplies Cards Christmas & Holiday
Love & Valentine Mother's Day Father's Day Halloween Spring Cards Summer Cards Autumn/Fall Cards Winter Cards Cards For Children Cards For Women Cards For Men Thank You Cards Sympathy Cards Get Well Soon Cards Floral & Leav Cards Rainbow Colours Messy Watercolouring Modern Art Inspirations Geometric Patterns Landscape Painting Acrylics
Gouache Watercolours Watercolour Pencils Waterbased Markers Distress Inks Alcohol Markers Colouring Pencils No Stamps No Dies Cards
Cardmaking On A Budget Let’s Colour Quick Cards Fun Masculine Cards Background Ideas Distress Ink Combinations |

 RSS Feed
