
Simple Watercolour Backgrounds Patterns For Christmas Cards | Holiday Card Series 2020 + VIDEO31/10/2020 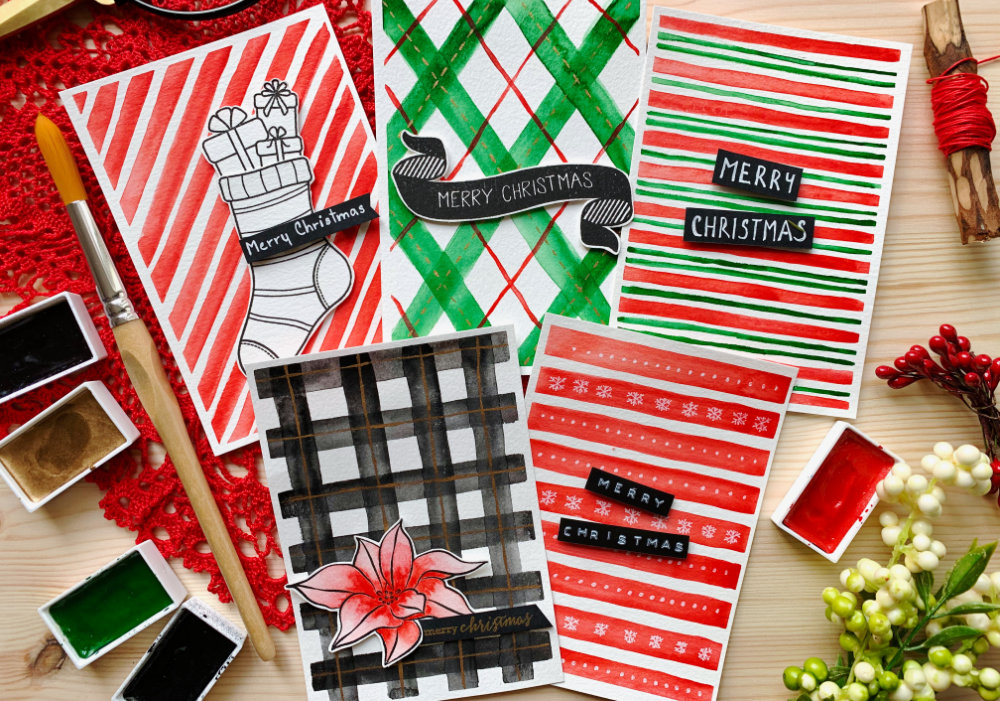
In the cardmaking world everything is all about using stamps, dies and other fancy supplies. These are not the most cheapest things and not everyone either can afford them or has an easy access to them, me included. Therefore I started making cards, where I don’t use any stamps (well except of sentiments) or dies. And of course I could not leave these Holiday card series without such cards, so if you would like to make cards for your friends and family yourself, completely from scratch, without any expensive supplies, this is definitely for you.
All you will need for these cards are watercolours, few brushes and watercolour paper. Also, these cards are for beginners. While I’ve been cardmaking for few years now, my watercolouring skills are at very basic level. That means, if I can make these cards, you should be able too. Except of these supplies, I also used a painters tape (washi tape will work as well) to secure the card stock, which helps to eliminate warping. I secured the card stock on top of a cork board, but you can also use a cutting board, book or craft mat. Especially if you don’t want to be sticking anything on top of your desk. Then I also used two jars for water (one for clean, one for dirty water) and a paper towel to soak up excess water. 
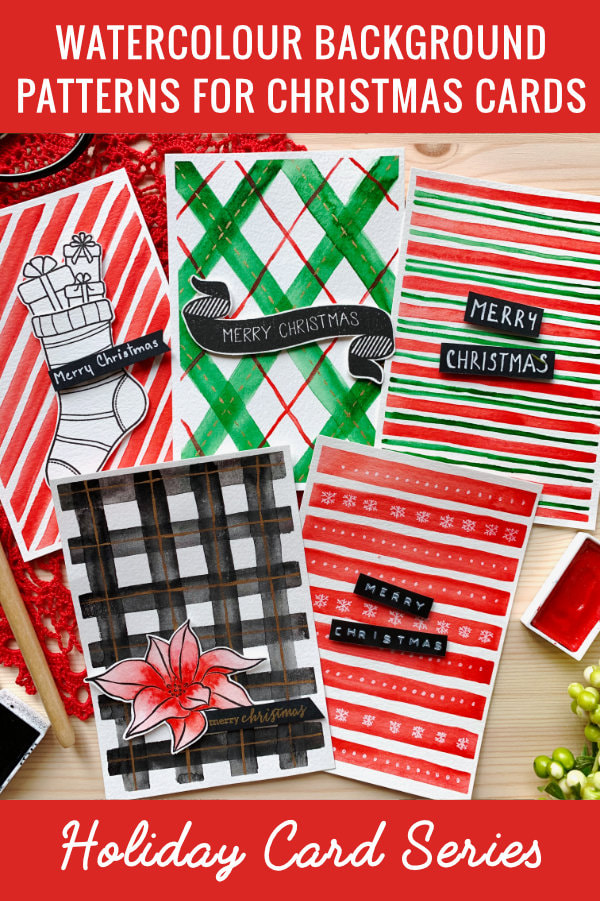
I’m starting very simple. For this blog post I am making five easy Christmas watercolour background patterns. There are way more options what you can do and so many colours you can use, but for the purpose of this blog post, I restricted myself to only five designs and few colours.
The watercolour stock I’m using is cold pressed, 300 gsm, which is the weight of the card stock. This is the best weight for watercolouring. I cut my card stock into A6 panels, using my paper trimmer and then I adhere them on top of a card base. If you don’t have a paper trimmer then you could get watercolour card stock in the size A5 and when you fold it you will get an A6 card. It is little bit wasteful, but this way you won’t need a card base. Just be careful when folding the card stock, as it is a thick card stock. STRIPED PATTERNS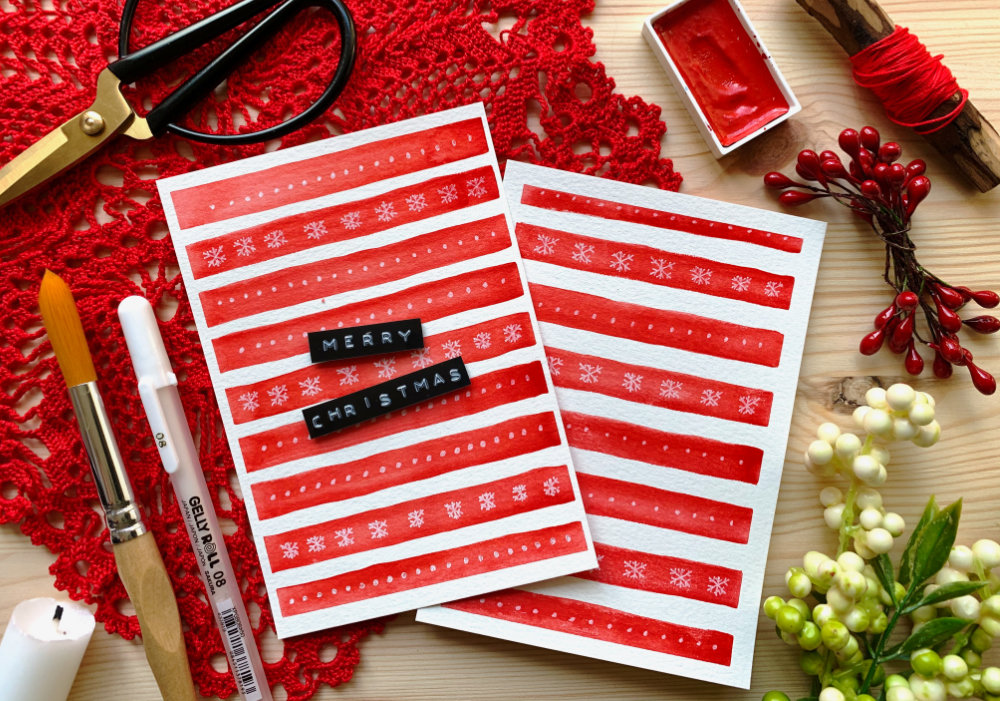
HORIZONTAL STRIPES
The first design is extremely simple. I used a flat brush in the size 6 (it’s about 1 cm wide), if you don’t have a flat brush you can use a round brush. And I painted horizontal stripes across the whole watercolour panel. I picked red paint, to start very festive. Once the panel was dry I thought why not to add few little details across the red lines. I usually don’t do such things, as it never comes to my mind, but luckily this time it did. I took a white gel pen and I drew dots and snowflakes. There are plenty things you can draw, like lines, dashes, hearts, Christmas trees and so on. Plus you can use different colour gel pen, like silver or gold. Also I had to learn how to draw a snowflake and after some research I found a simple way of drawing it. Make sure you watch my video to see it. First I drew a straight vertical line and then two diagonal lines on each side crossing the vertical line in the middle. Then on each of the lines I drew Vs. On the striped watercolour panel, I only painted one V on each line, since the snowflakes were very small. But if you are painting a bigger snowflake you can add more. 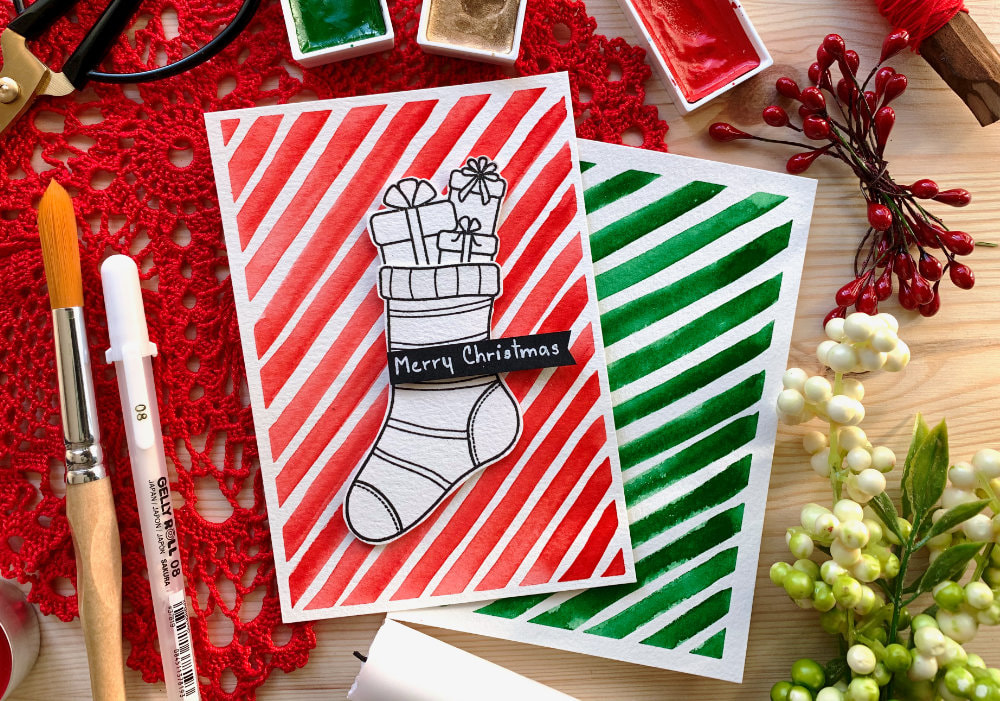
DIAGONAL STRIPES
The next background is similar to the first one. Here I did diagonal stripes using a round brush. I found using a round brush was much easier on diagonal stripes than the flat brush. Also the gaps between the stripes were smaller. I was picking the colour directly from the pan with the paint, because I wanted the colours to be super vibrant. I only added few drops of water to activate it. If you want the colours to be lighter, just use a palette or a plate and dilute the paints with more water. And if your colours are not vibrant enough, or you didn’t have enough paint on your brush, you can always come back and add a second layer. I had to do this quite often as I didn’t add enough water to the pan. 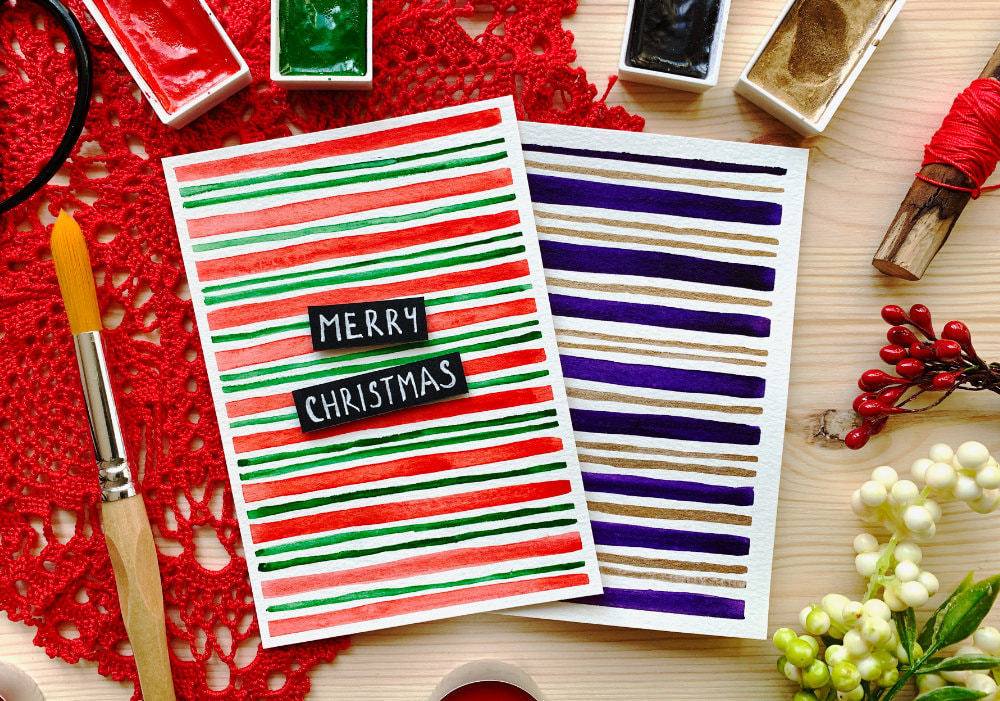
STRIPES WITH DIFFERENT WIDTHS
Another option you have when painting the stripes, is to make the lines in different widths or thicknesses (not sure which term is correct). I did lines in two different colours, purple and gold on the panel in the video and on my trial panel I used the traditional red and green. The thicker lines I painted purple and I used a round brush in the size 10, which I used on the diagonal stripes. The thinner lines I painted gold, I thought it complimented the purple quite nicely and I used a brush in the size 4. The way I picked the brushes was simple, I took a scrap piece of paper and I swatches the brush. If the look was fitting for the background I wanted to make, I used it and if not I picked another brush. Also as I was painting the golden lines I decided to alternate between two and one golden line, to make it little bit different PLAID PATTERNS
For the last two patterns I painted simple plaid backgrounds. At least I think this is plaid, if not let me know in the comments. However, I googled it and it says plaid is a pattern formed from criss-crossing lines of varying widths in one, two or three colours. So I guess this is a correct term.
Little tip: since I was painting over the painted lines, I would recommend letting the lines to dry before adding another layer. This might be obvious if you are painting directly over the lines, like I did on the red stripy background, but here I mean the same lines that you draw the opposite directions (horizontal, vertical etc.). Even though they were painted using the same colour, they still were mixing, which was little bit annoying. 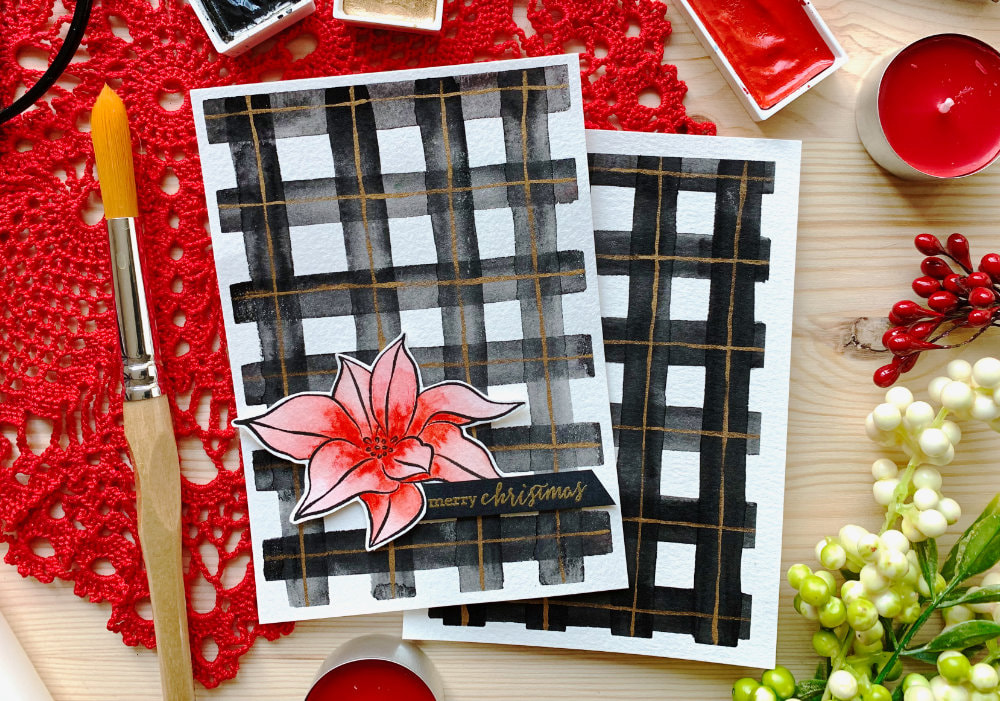
SIMPLE SQUARE PLAID
The first background is the most easy one. I took the flat brush again and black paint and I painted first the horizontal lines. Let it dry. And then I painted the vertical lines. Technically I painted all the lines horizontally, as I moved the watercolour panel that way. But since I was making a side-folding vertical card, I’m referring to the lines as you would see them on the finished card. I left bigger space between the lines then on the background with the red stripes. Because after painting the lines the other direction, I wanted the white squares to be about 1.5 cm big. I made few of these backgrounds, I even had to re-film it because my head was in the view. Some of the backgrounds turned out pretty, but the one I did in the video looked weird. On one side I had the line at the boarder and on the other side there was not enough space to paint the line. And when I removed the painters tape, it just didn’t look right. Here I would recommend starting in the middle working your way outwards. Either painting the line in the middle or leaving a white space in the middle, to create the squares. Once the paint was dry, I came back and painted thin lines across the black lines, using a gold paint. I used a smallest brush I have in the size 0. You don’t have to do this, but I think the golden lines do add a little bit of interest to the background. 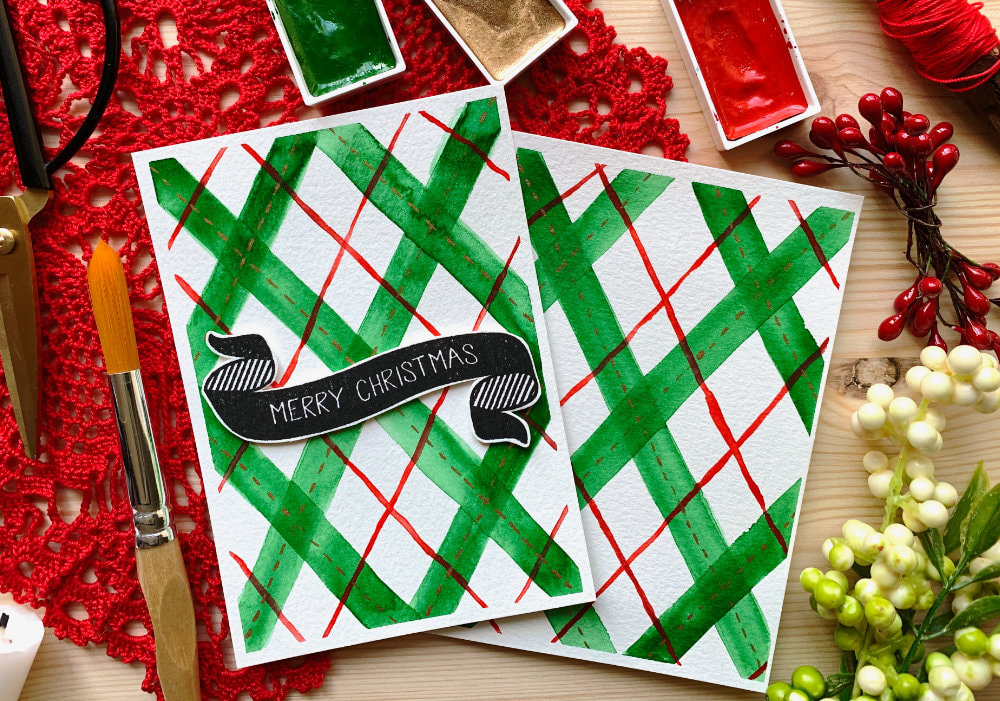
DIAGONAL PLAID
For the last pattern I created diagonal plaid, using very traditional Christmas colours - green, red and gold. I started with the widest lines in green, using the flat brush. I started by painting the line in the middle form top left corner to the bottom right corner. To paint the side lines was little bit more tricky, because the lines are diagonal and I wanted them to be on the same angle, otherwise it just looked weird. So I took my ruler and used it as a guide. I put the ruler next to the middle line and moved it up or down to have the correct angel. And then I painted the side lines. You could also use a pencil and lightly draw a line, but I am not trying to make a perfect line, I just wanted the angle to be the same on all lines. After the first green lines were dry, I came back and painted the green lines the opposite direction from top right to the bottom left corner. Once the lines were dry, I used the red paint and a brush in the size 1 and I drew thinner red lines between the green lines. And lastly, I took the gold paint and the brush in the size 0 and I painted dashed lines across the green lines. As you can see there are plenty of options. By using different colours, different brushes and different type of lines, each of these pattern can look different and unique. 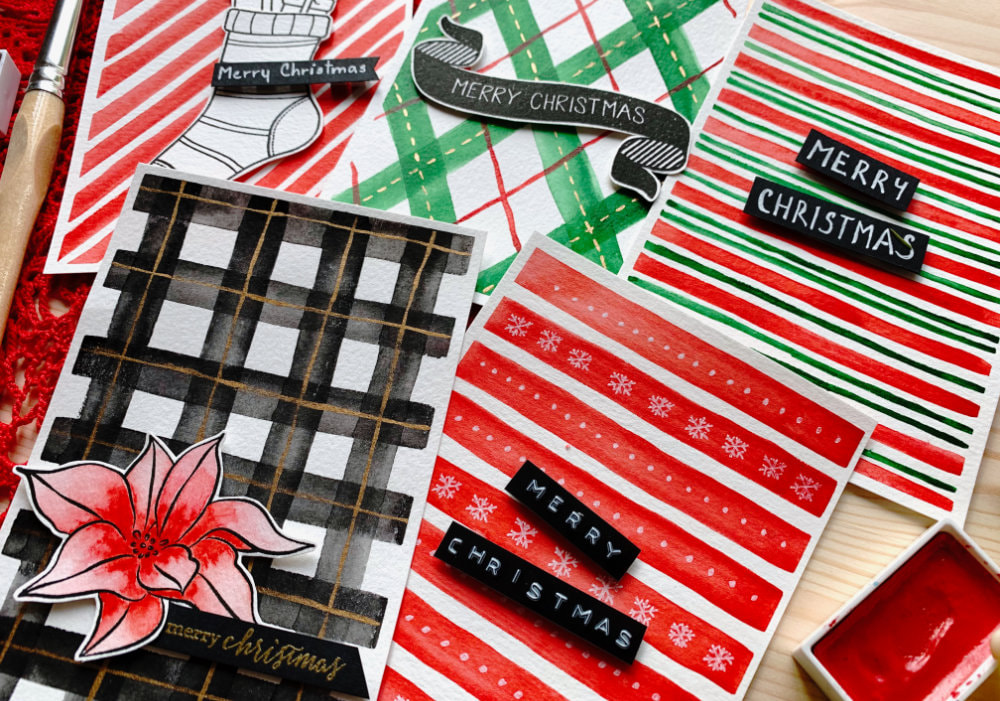
TRANSFORMING THE BACKGROUNDS INTO CARDS
So now all the backgrounds are done. What do you with them? How do you transform them into cards? Let me show you few examples. These can be used interchangeably, they are not specific to the particular background.
And so I don’t have to repeat this for each of the examples, I used a foam tape on all of the pieces I adhered on top of the panels. This just gives it little bit more dimension. 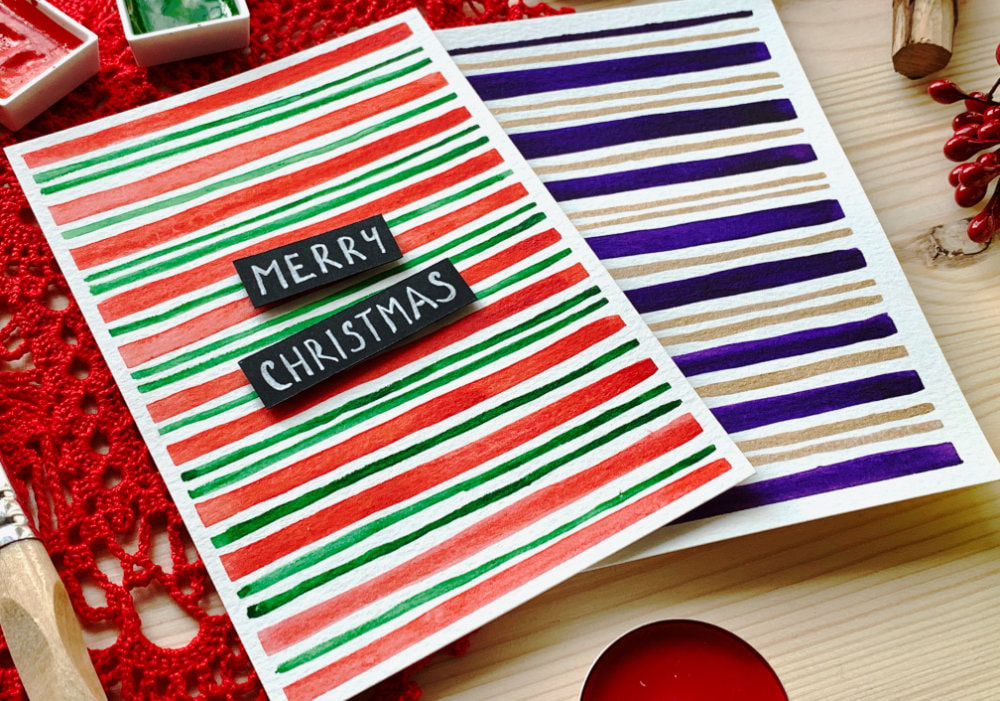
WRITE YOUR OWN SENTIMENT
First example is the most obvious and that is writing your own sentiment. Often for me this is not an options, while my handwriting is not all bad, it’s not constant and it looks all over the place. Especially if I write directly on top of the card, because I don’t want to ruin it. But since the backgrounds are pretty vibrant and busy, if I wrote directly on top of the background the words would probably get lost. So I decided to create a label and when I create a label, if I make a mistake, it’s easier to re-do, then if I wrote directly on top of the card. Plus when using labels, I go for typed-style font then script or calligraphy-style font , which is easier to do. I wrote Merry Christmas in all caps using a black card stock and the white gel pen. If you don’t have a black card stock, you could paint a piece of a watercolour card stock black. I cut the sentiment into two pieces so it covers a larger area and I adhered it on top of the panel little bit at an angle. 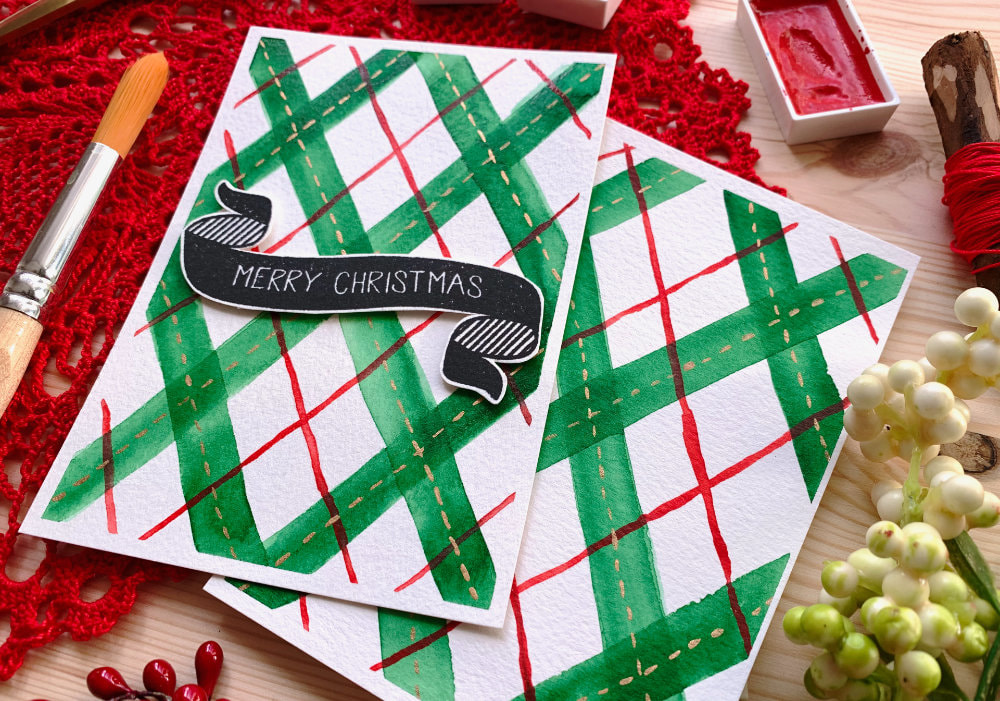
STAMP A SENTIMENT OR USE DIES
If you are a card maker then this is very normal to do, but not everyone owns stamps and even less people own die-cutting machines. However, these supplies make it so easy and beautiful. Especially when you use dies and you layer it. I don’t have a die cutting machine at the moment, therefore I could not create an example for you, but I did use a stamp with a sentiment. I used a Merry Christmas stamp with a banner from the stamp set Noel by Avery Elle and I stamped it with a black ink . I cut it out using my scissors and adhered it on top of the panel. 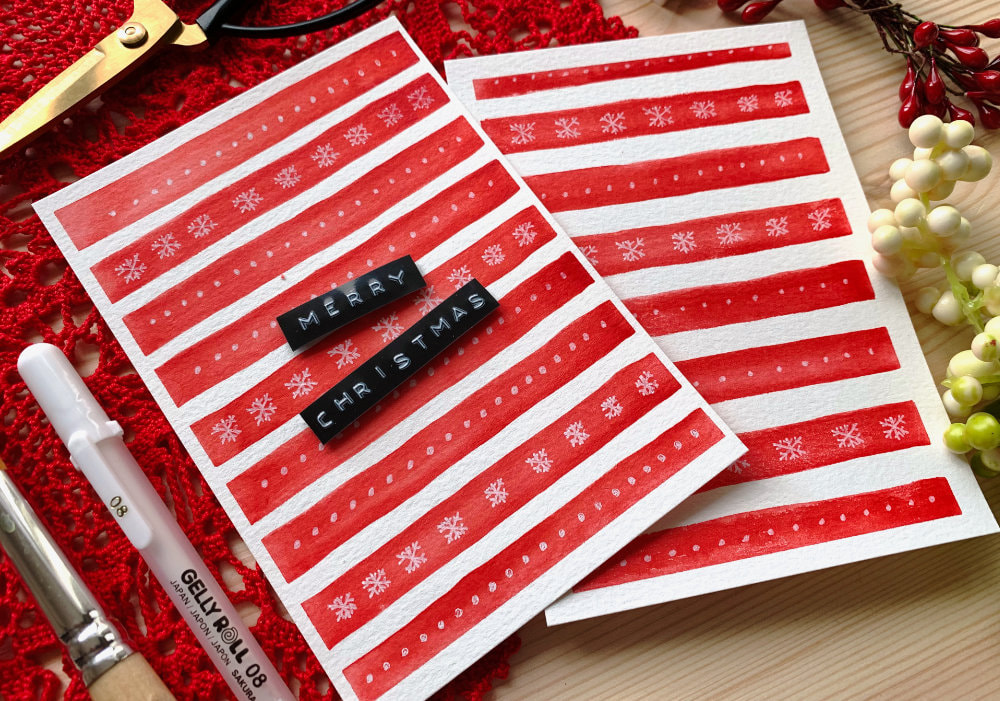
USING A LABEL MAKER OR A PRINTER
In one of my previous videos I mentioned that to create a sentiment, you could use a label maker that embosses. So the last time we went to a bigger city, I decided to buy it. This is a perfect, inexpensive option if you don’t want to write your own sentiments and don’t have or don’t want to invest into stamps or dies. I created a Merry Christmas label and I adhered it on top of the panel the same way as I did with the handwritten sentiment. As I was using a foam tape I decided to use a piece of a black card stock on the back of the labels to make them more stable. But you don’t have to do this, you can adhere it directly on top of the panels. You could also use a printer. Again I don’t have a printer, so I cannot show you any examples. The best is to print on a thicker card stock and create a label. I thought even printing on a vellum would be great, but I’m not sure if it would work. 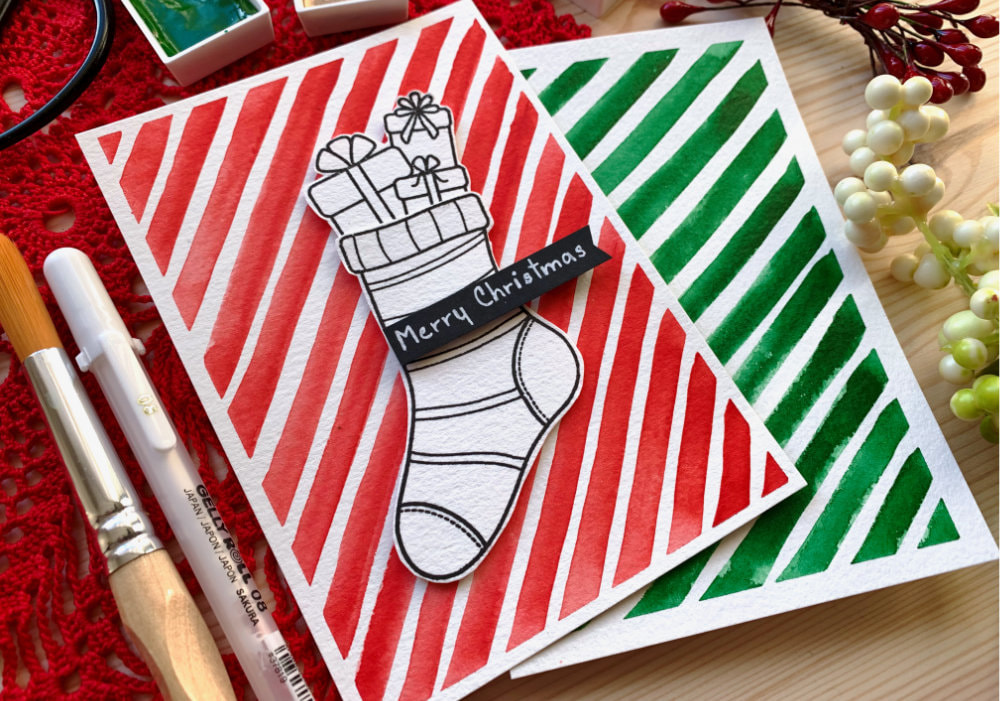
STAMPING DIE CUTTING OR PRINTING SHAPES OR IMAGES
The next option is to add stamped, die cut or printed images or shapes. For my first example I used a stamp with a stocking. The stamp set is called Sweets & Treats by Create A Smile. I stamped it with a black ink and I cut it out using scissors. I didn’t colour it as the background was colourful enough. And the sentiment I wrote by hand with the white gel pen on a piece of a black card stock. For my second example I did the same, I stamped a poinsettia and this time I coloured it. Since I used black for the background, adding little bit of colour did not overwhelmed it. The stamp is from the Elsa’s Flora stamp set by Winnie & Walter. Just as for the sentiments, you could use a printer and print out your images. If your printer doesn’t print on a thicker card stock, you could print the image on a normal paper and trace the image onto the watercolour card stock. If you don’t know how to do it, you can check out this video here. And of course you could use dies, especially if you have standalone dies. The snowflakes I used on my previous card would work perfectly for example. 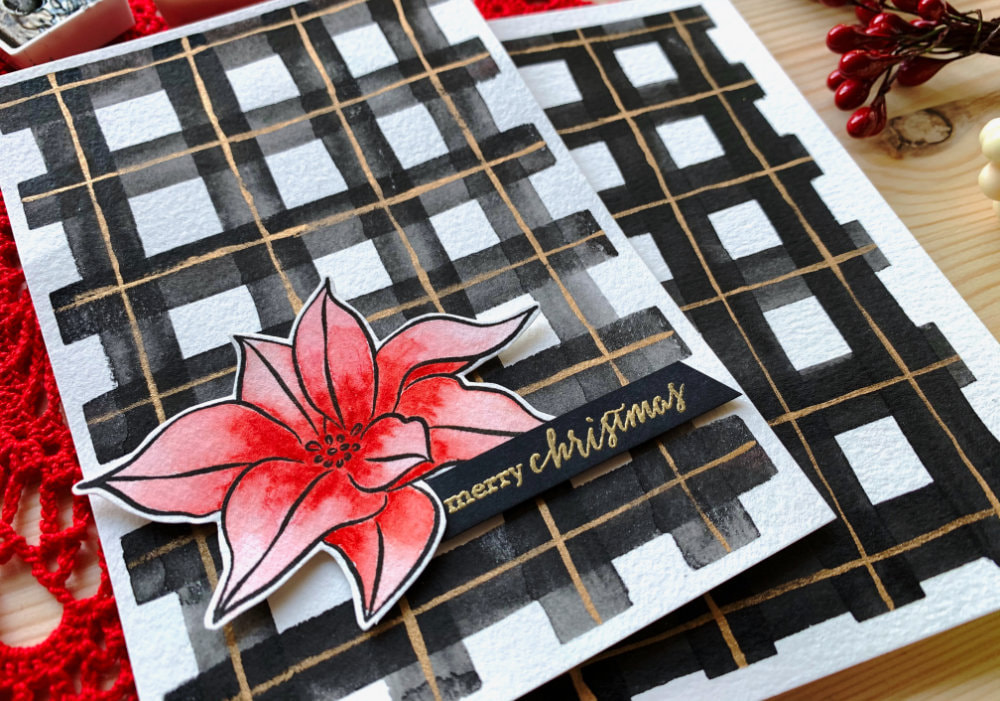
Wow! This block post is long! I hope you enjoyed theses cards and I hope you will try something similar yourself. Thank you for visiting, have a wonderful day and happy crafting and if you have any questions, do not hesitate and drop me a line.
VIDEO TUTORIAL
Watch the video below or on my YouTube Channel.
PRODUCTS USED
Disclaimer: I’m currently not using any affiliate links. These links are just to help you find the products. The list includes alternatives to what I was using and while I haven't used some of them, I only recommend brands I trust.
Canson XL, Watercolour Cardstock , 300gsm/140lb
AmazonDE | AmazonUK Kuretake, Gansai Tambi, Watercolour Paints 36 Set AmazonDE | AmazonUK Winsor & Newton, Flat Watercolour Brushes AmazonDE | AmazonUK Daler Rowney Watercolour Brushes AmazonDE | AmazonUK Daler Rowney Small Watercolour Brushes AmazonDE | AmazonUK Uniball Signo Gel Pen, White AmazonDE | AmazonUK Sakura Gelly Roll Pen, White AmazonDE | AmazonUK Dymo Embossing Label Maker AmazonDE | AmazonUK papermilldirect, Black Card Plain 240gsm papermilldirectUK Avery Elle, Noel Stamp Set (N.A) Create A Smile, Sweets & Treats Stamp Set CreateASmileDE Winnie & Walter, In Bloom: Elsa’s Flora Stamp Set SevenHillsCrafts Tsukineko, Versafine Ink pad, Onyx Black AmazonDE | AmazonUK Tsukineko Versamark Watermark Ink Pad AmazonDE | AmazonUK WOW! Embossing Powder, Metallic Gold AmazonDE | AmazonUK Joy Crafts, Kraft Paper,A4 300gsm/140lb (card base) KreativbuntDE | AmazonUK Color Copy , White Paper, A4 300gsm/140lb (card base) AmazonDE | AmazonUK Papermania, A6 Card Bases + Envelopes, Craft AmazonDE | AmazonUK Papermania, A6 Card Bases + Envelopes, White AmazonDE | AmazonUK Dovecraft, Foam Squares AmazonDE | AmazonUK Sellotape Double Sided Tape AmazonDE | AmazonUK Docrafts Papermania, Heat Tool AmazonDE | AmazonUK EK Susccess, Anti-Static Powder Tool AmazonDE | AmazonUK Tonic Studios, Guillotine A4 AmazonDE | AmazonUK EK Success, Scissors AmazonDE | AmazonUK My Sweet Petunia, Mini MISTI Stamping Tool StempelmühleDE | BumbleberrysUK Papermania, Stamp Block AmazonDE | AmazonUK Crafting Mat, Black AmazonDE | AmazonUK CHECK OUT MY OTHER CHRISTMAS CARD VIDEOSPIN ME
Did you like the card? I would love, if you pinned it to your board on Pinterest!
0 Comments
Leave a Reply. |
FOLLOW ME
SEE MORE


CATEGORIES
All
Stamping Die Cutting Using Stencil Heat Embossing Embossing or Texture Paste Distress Inks Nuvo Products Stamping & Colouring Stamping With Solid Stamps Watercolouring Watercolour Pencils Waterbased Markers Pencil Colouring Alcohol Markers Altenew Markers Zig Brush Markers Easy Backgrounds Stamped Backgrounds Small Stamp Ideas Simple Cards Complex Cards Cardmaking For Beginners All
Painting With Acrylics Painting With Gouache Painting With Watercolours Drawing With Fineliner Minimal Supplies Cards Christmas & Holiday
Love & Valentine Mother's Day Father's Day Halloween Spring Cards Summer Cards Autumn/Fall Cards Winter Cards Cards For Children Cards For Women Cards For Men Thank You Cards Sympathy Cards Get Well Soon Cards Floral & Leav Cards Rainbow Colours Messy Watercolouring Modern Art Inspirations Geometric Patterns Landscape Painting Acrylics
Gouache Watercolours Watercolour Pencils Waterbased Markers Distress Inks Alcohol Markers Colouring Pencils No Stamps No Dies Cards
Cardmaking On A Budget Let’s Colour Quick Cards Fun Masculine Cards Background Ideas Distress Ink Combinations |
 RSS Feed
