
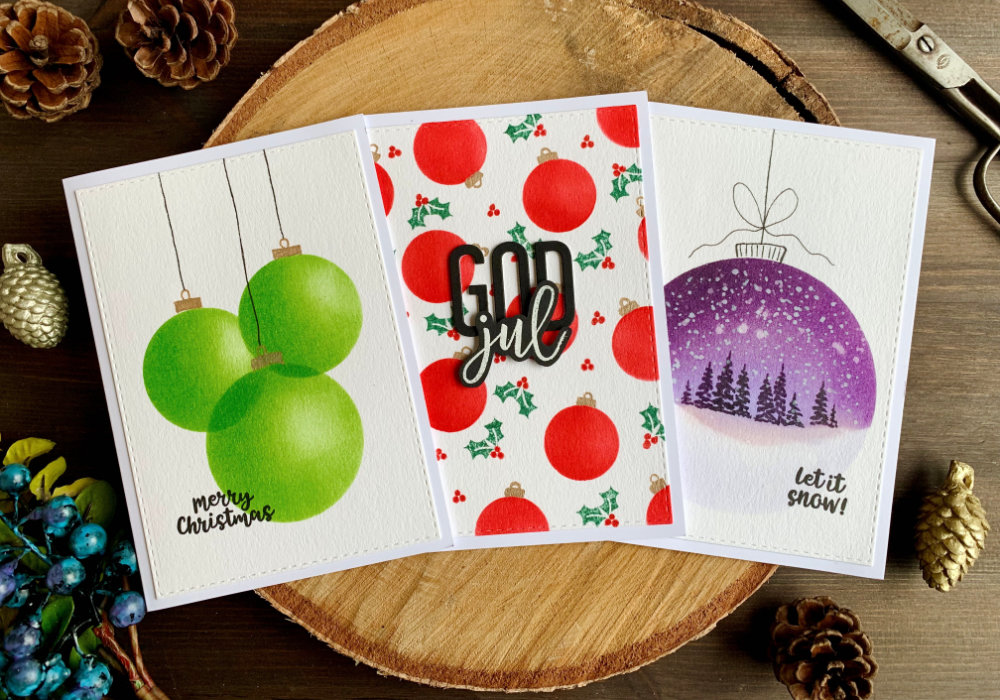
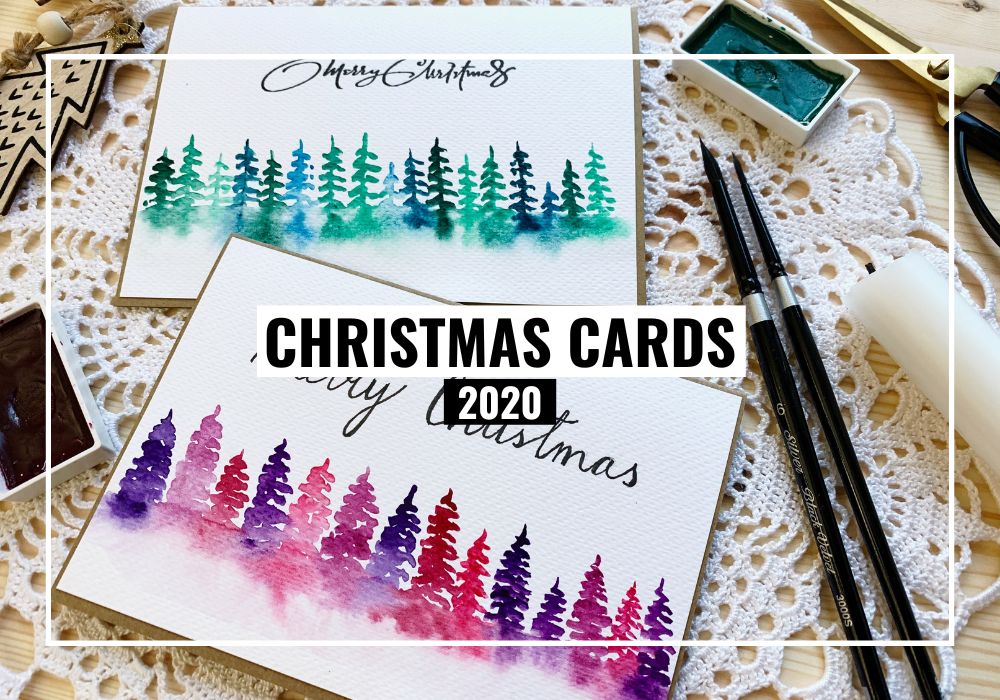
 I follow a few watercolour artists on social media and I've been seeing videos with Christmas baubles, where the artist puts the paint on the edges of a cup and stamps it on to the card stock and uses the paint around the circle to spread it around. This is a great quick idea for Christmas cards. I was really tempted to create something like that, but this is the second year I've been seeing videos with this technique, some artist doing this on repeat. For me it just became boring ! I didn’t want to make another video, I didn't want to be part of it. However I still wanted to create something with Crhistmas baubles and I thought, I could use Distress inks and create something similar. I liked the look with the overlapping, slightly transparent baubles and that's how my first idea started. And I could not leave it at just one card, I came up with two additional ideas and here they are. 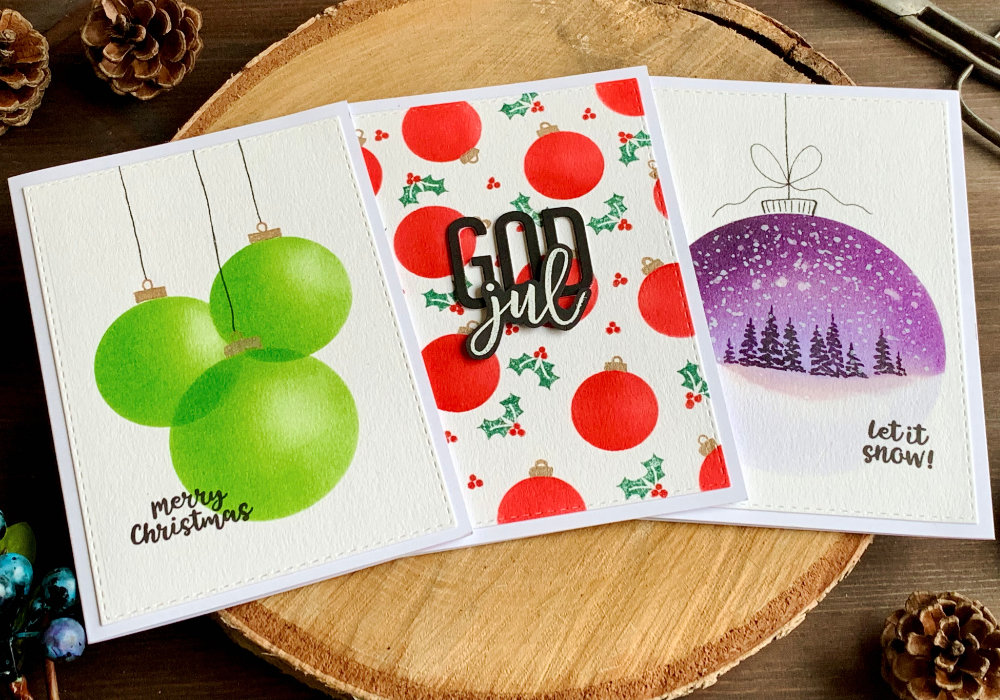 SUPPLIES To create these backgrounds you need blendable inks, I'm using Distress inks. A circle stencil or a die to create your own. You also need a card stock that you like using for blending. The colours and how you decide to finish up the cards that is completely up to you. I also used a washi to hold the stencil in place. The washi has a very low tack, to prevent any damage to the card stock when removed. I also use the washi to enlarge the stencil, so I don't go over and mess up the card. MAKE YOUR OWN CIRCLE STENCIL I do not have a store-bought stencil, but they are easy to create if you have circle dies. That's what I did. I picked the size that fit the design and the size of the card. Normally I use an acetate, but for this one I used a card stock. You can use what ever suits you. And I die cut the circles. For one I used a punch, because I didn't have small enough die. OVERLAPPING CHRISTMAS BAUBLES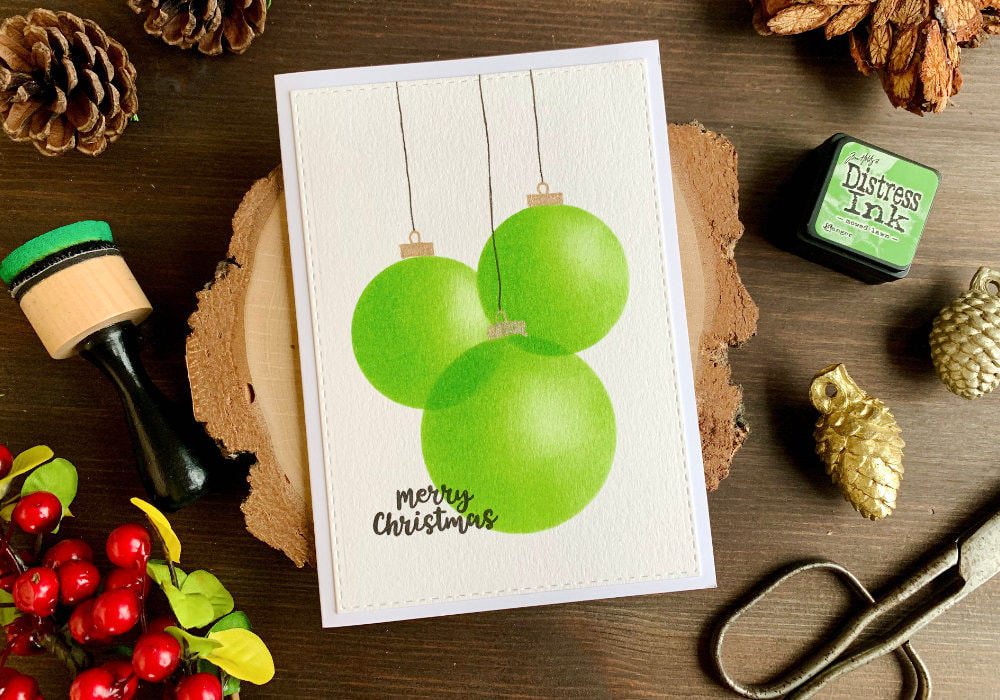 The idea for this card was to create bubbles that are overlapping. I decided to make three baubles, but you can make less or more. For this card I used two sizes of circles, one slightly bigger than the other ones. I placed the stencil with the bigger circle on top of the card stock. This one I wanted to be in the front and I placed it in the bottom of the card stock, slightly to the right. And then the two smaller baubles I placed on top, overlapping each other. I used a green ink (Mowed Lawn) and as I was blending I was trying to create a hightlight at the top right corner of each circle and I was applying darker shade on the left side. However this is not a must. I just wanted to create more depth and dimension. 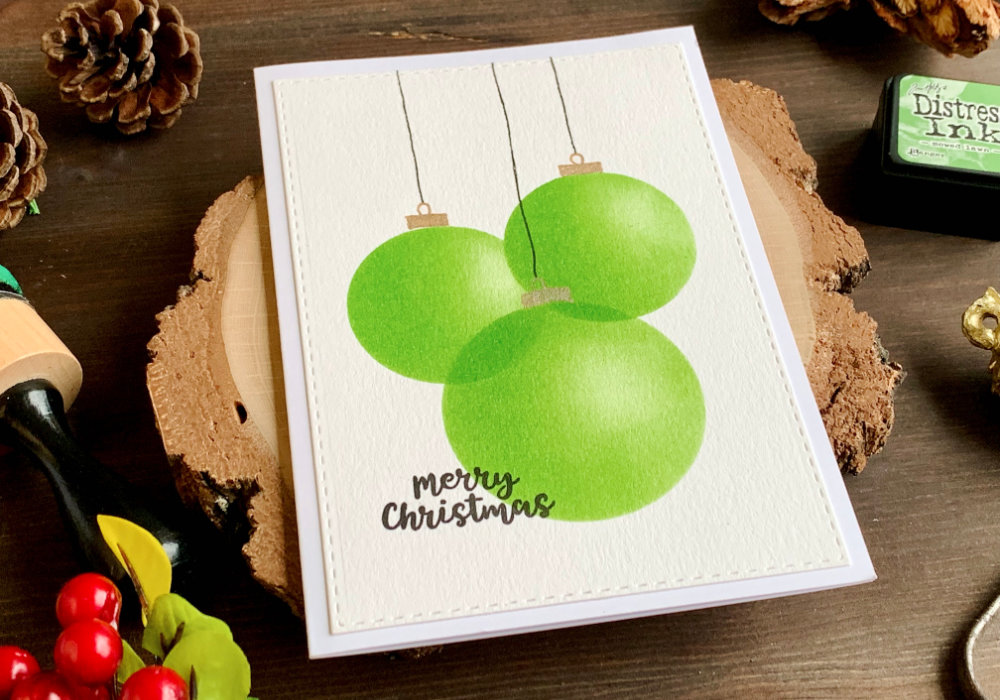 After I was done blending I added the tops with the loops (not sure if there is a name for it) and the strings. The tops with the loops I drew with a golden gel pen. I first drew rectangular shapes on top of each circle. Don't worry if they are not perfect, my weren't either and it's part of the whole look. Then I drew the loops on top and lastly I drew the lines for the strings, touching the loops. The strings I drew with a black fine-line. I was dreading this, as drawing straight lines is not my thing. I always mess it up, but I didn't want to use a ruler and they turned out quite well. For the greeting I used a Merry Christmas sentiment stamp and I stamped it with a black ink. I placed it at the bottom of the card, slightly going over the bottom bauble. I like this look, it doesn't work all the time, but here it looks quite good. BACKGROUND FILLED WITH CHRISTMAS BAUBLES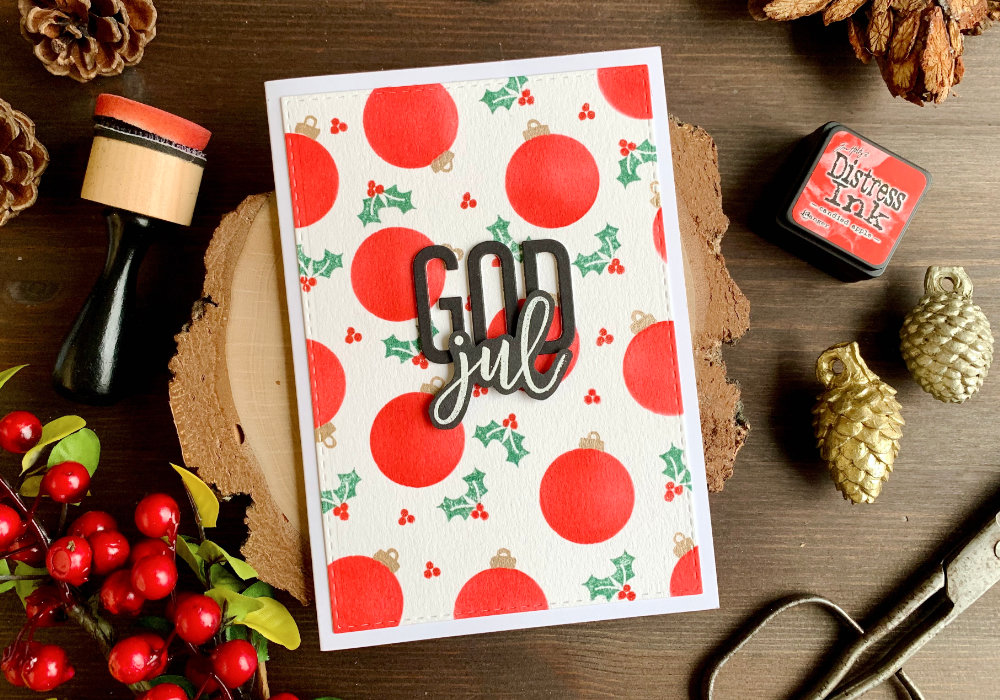 This card was inspired by another card I saw on a blog hop. The card was made by Suzy Plantamura and you can see the card here. She used baubles from a stamp set from Avery Elle and created a background. And this card popped to my mind, when I was thinking what else I could create with Distress inks and a stencil. To create the stencil I used a circle punch (1" in diameter) as I didn't have a smaller die. And I just filled the background with circles. Here I used a red ink (Festive Berries). I also tried to use more ink on one side, but it is not that visible. I knew I will be adding the tops with the loops and I was going to add them facing different directions. And I also knew I will be stamping smaller images in between the baubles. Therefore I needed to have enough space between the circles and I needed to spread them out. 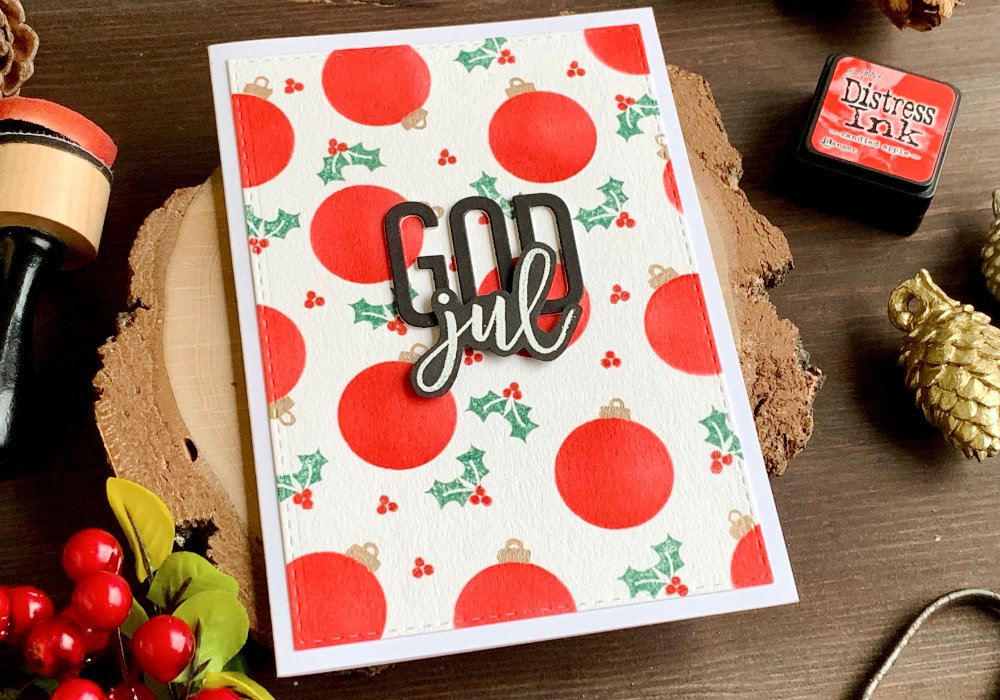 This might have been easier if I were using an acetate, through a solid card stock it was difficult to picture the spacing. To help me to visualize the placement of the next bauble, I used the punched out circle and I placed it on to the card stock to see where it would look good and then I used the stencil. Since I was creating a continuous pattern it was important to add some circles along the edges, so it doesn't look empty. After I was done blending, I drew the tops with the loops, again I used a gold gel pen and I paced them in various directions. 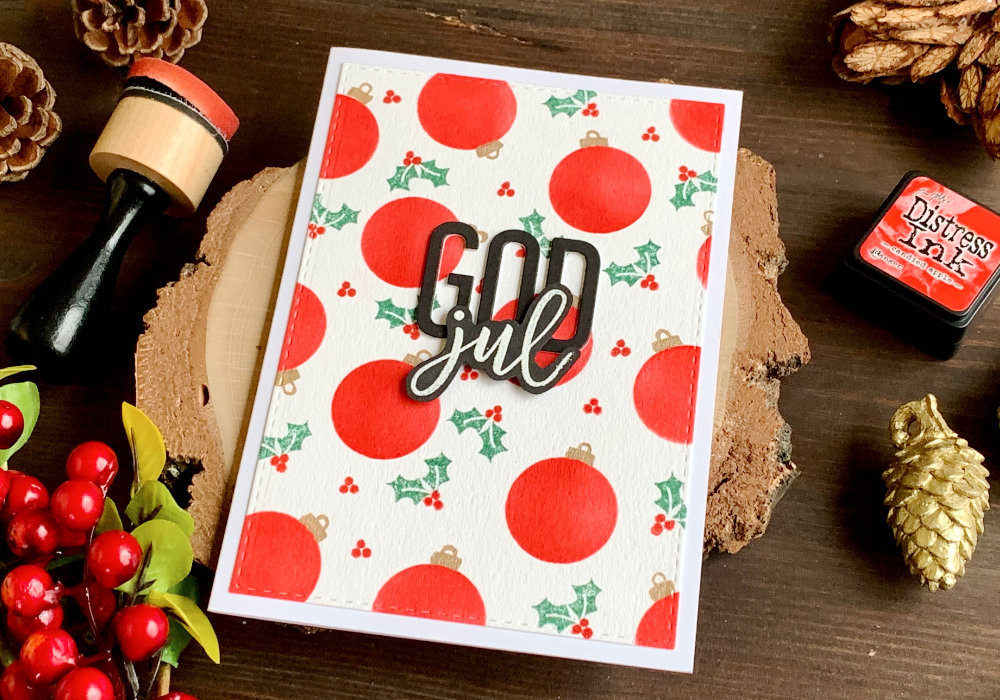 The card from Suzi contains various images between the baubles. She used snowflakes and a holly. This is part of the stamp set she used. I didn't care about the snowflakes, but I liked the holly, especially the green. I thought the background needed additional colour for contrast. So I looked through my Christmas stamps and lucky I found one stamp set that had solid stamps with holly leaves. I don't have that many Christmas stamps, so I was quite surprised that I had this stamp. Otherwise I would have painted them myself, or just added a cluster of dots. I used the Distress inks for stamping. They are not the best for that, but here it worked quite well. For the greeting I wanted to use the Swedish God Jul and because I don't have any stamps or dies with this greeting, I used letter dies for the word God. I die cut two out of a white card stock and one out of a black card stock and glued them together and then on top of the card. For the word Jul I used individual letter stamps and heat embossed it in white. Then I cut it out with my scissors and adhered it on top of the card using a foam tape. CHRISTMAS BAUBLE WITH A LANDSCAPE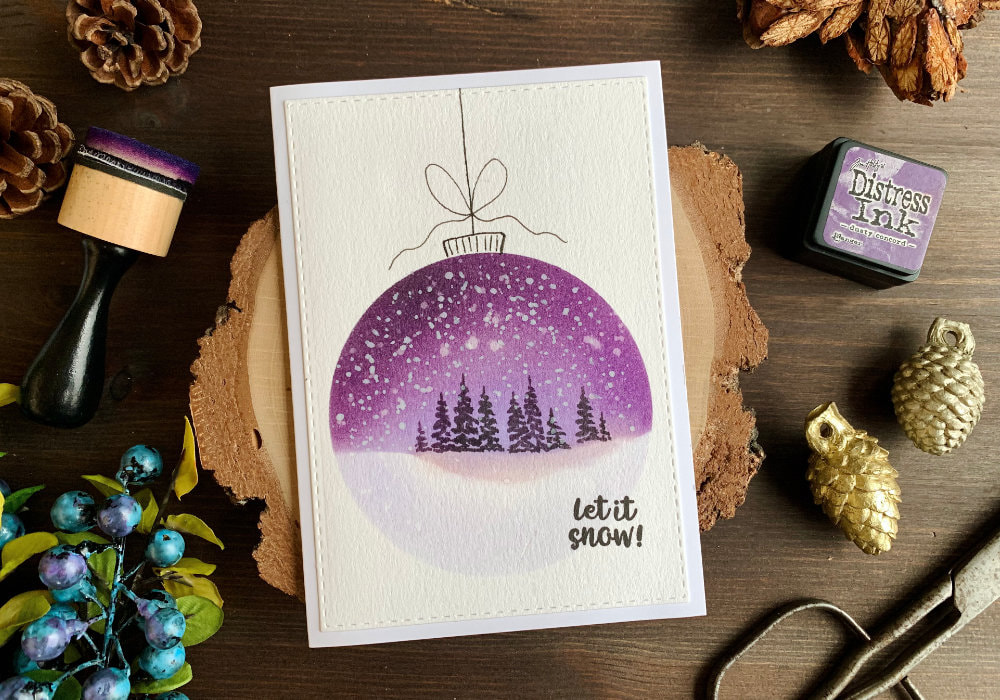 Two years ago I made cards with Christmas baubles where I painted a simple landscape with fir trees. You can see those cards here. For those cards I used watercolours and I thought I could create something similar with Distress inks. I used the biggest circle die for the stencil that I could fit onto my card stock. I placed the stencil at the bottom part of my card stock, so I can still fit the string above it and I secured it with a washi. The idea for this card is to create a night sky and then a snowy ground. And for that I needed something to separate the ground from the sky. I needed a stencil. If you have a stencil for the ground, you can use that, but I don't, so I needed to create it myself. And the easiest way to create a stencil is to use a piece of paper or a masking paper. If you don't mind a straight line for the ground, just place it onto the card stock like that, but I wanted to create an uneven, slightly hilly ground. So what I did is I teared up the paper, which created uneaven ground. 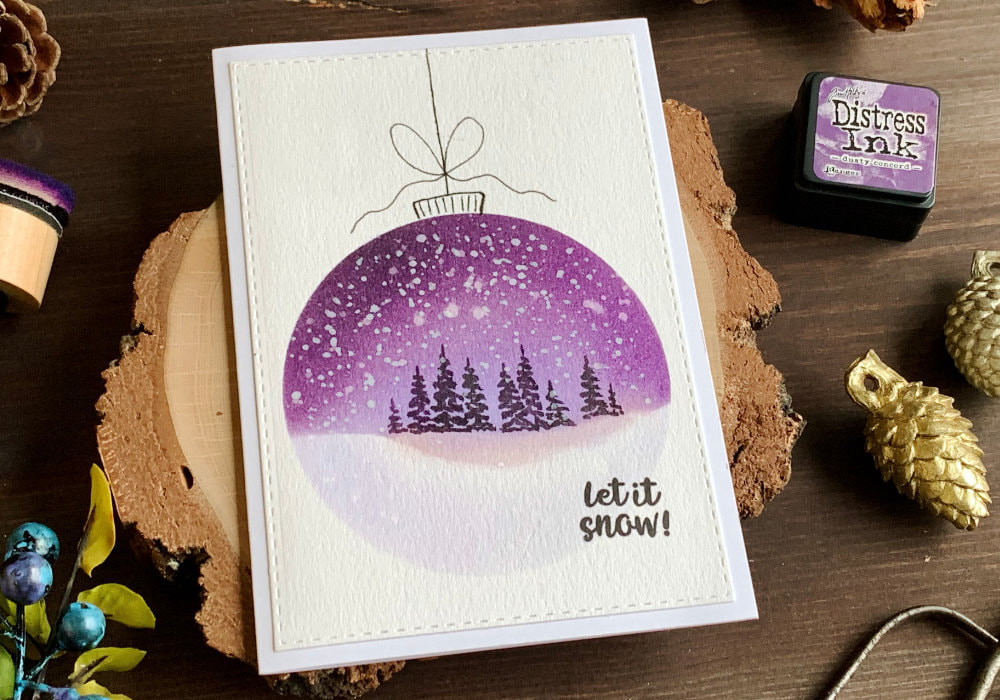 I placed the paper over the circle stencil, slightly lower than the middle, as I needed more space at the top than the bottom. The inks I used are Shaded Lilac, Dusty Concord and Black Soot. As I was blending I was creating a gradient. The Shaded Lilac I used in the area where I wanted the trees to be, so you can actually see them. Then I used the Dusty Concord and I used it for the top of the circle and the sides. Lastly I used the Black Soot and I applied it only at the top. I was switching between the inks and blending them together, until I was happy with the look. Next I worked on the ground. The idea was to use the Shaded Lilac and create a shadow below the place where the trees will be and then a very light application of the colour for the rest of the bottom part of the circle. Well... it didn't turned out as I wanted. 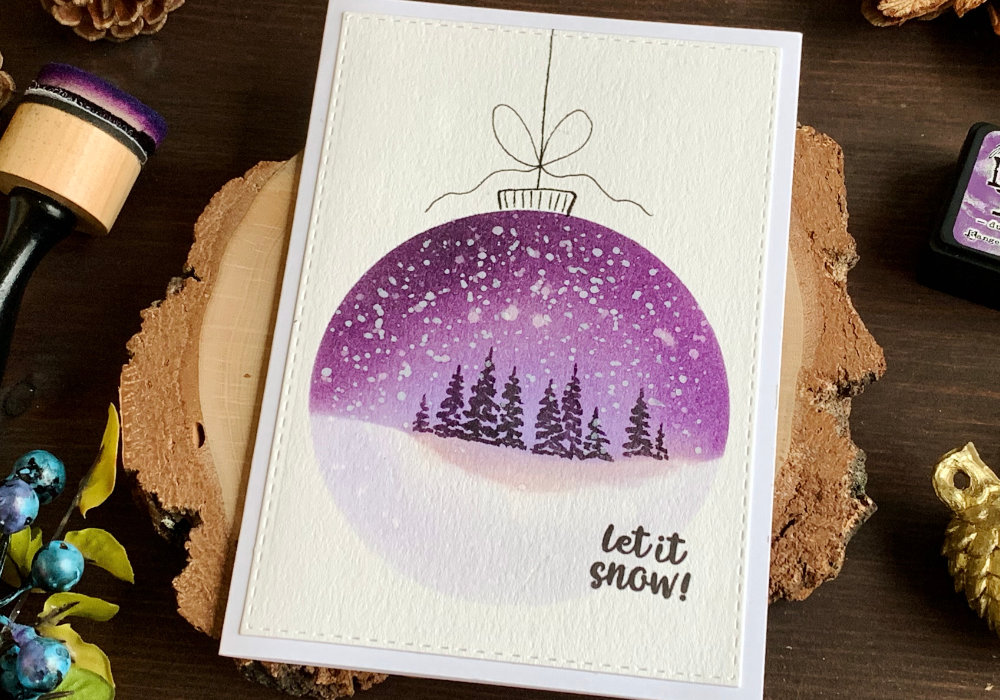 I used a smaller brush for the shadow, but the problem was I clean the brush a few hours before and it was sill slightly wet and it wasn't fully clean either. So that's why there is a pink below the trees, this was not planned. But it didn't ruined the card, so that's most important. I finished up the ground with light application of the Shaded Lilac and moved on to the painting of the trees. Actually before you paint the trees you can add some splatter over the sky to create a snowy background. Just sprinkle clean water over the sky and soak it up with a paper towel. I did this later in the video, but it is better to add it at this point, before you paint the trees. To paint the trees, I squished the Black Soot and a little bit of Dusty Concord onto a slick surface and with a very tiny damp brush I picked up the ink and painted the trees. I didn't want to add too much water, as I wanted the inks to be really saturated. You could also use normal watercolours if you prefer. 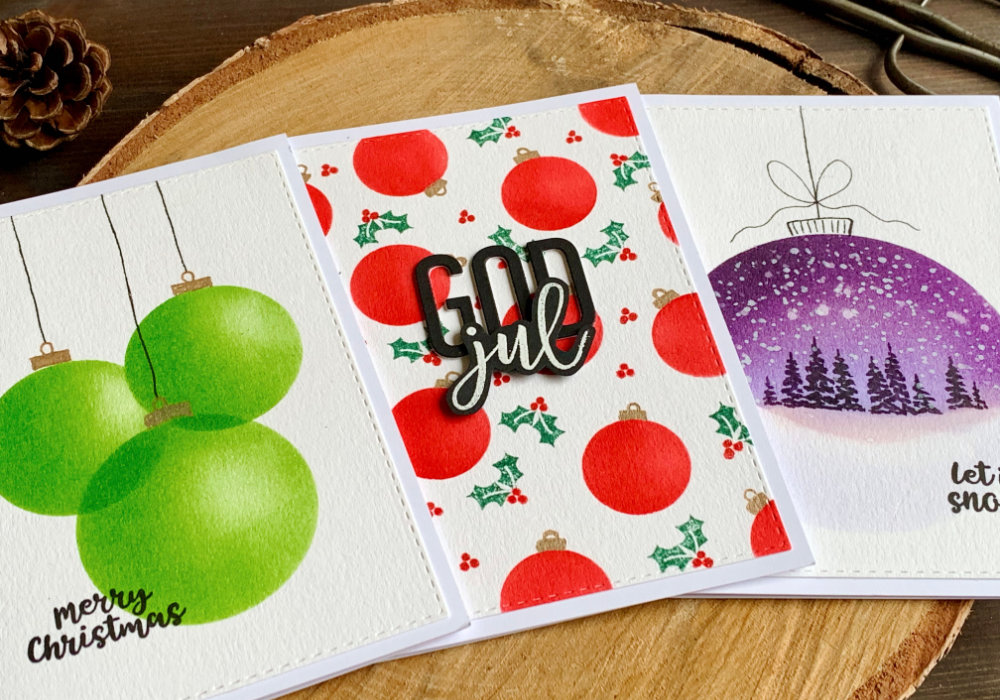 The way I paint such trees is: I start at the top with a very short straight line and I go down in a zig zag motion, creating wobbely lines for the brunches and forming an A-shape as I am moving downwards. I painted the trees in different heights. I didn’t have any plan on how many I want to paint , I painted how many I was able to fit along the shaded part. I also wanted to add some white snow across the sky, so I covered the parts of the card where I don't want any snow and I sprinkled some white gouache over the sky. I let it dry and then I drew the top with the loop and the string. I used here a black fine liner. For the top I drew a rectangular with a few straight lines. And now I realized that I forgot the loop. I don't think it matters. For the string I drew first a straight line and I thought it would be nice to draw a bow. Here I just drew two loops on each side and wavy lines on both sides. 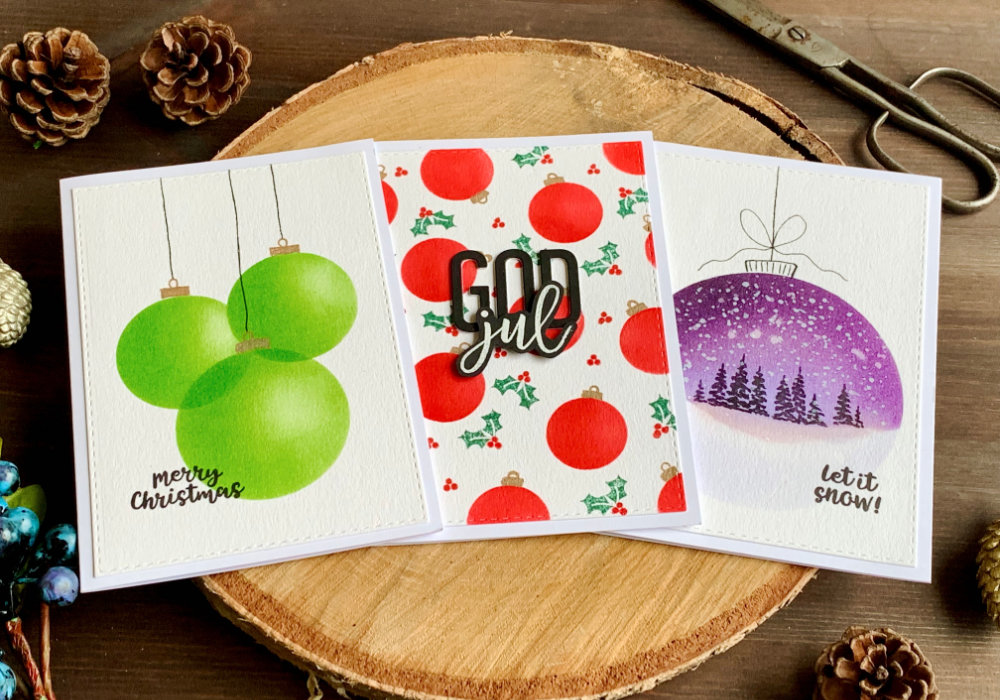 Lastly I stamped the greeting at the bottom of the panel. Here I used the words Let it snow! And I stamped it with a black ink. All of the backgrounds I die cut with a stitched rectangular die and adhered them on top of a white card bases. And that's it. I hope you will try making these cards yourself. It was really fun to create. Make sure you check out my video on YouTube and give it a Like as well. The list of product is down below, where you can also find a few blog posts that I think you might enjoy. And if you have any questions, just drop me a line. VIDEO TUTORIALWatch the video below or on my YouTube Channel. YOU MIGHT ALSO LIKEPIN MEDid you like the card? I would love, if you pinned it to your board on Pinterest! 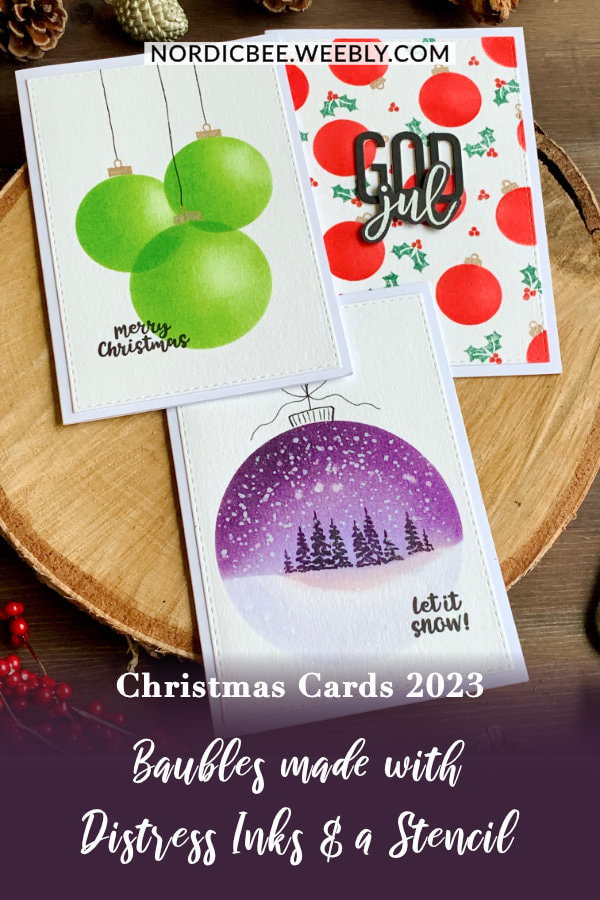
0 Comments
Leave a Reply. |
FOLLOW ME
SEE MORE


CATEGORIES
All
Stamping Die Cutting Using Stencil Heat Embossing Embossing or Texture Paste Distress Inks Nuvo Products Stamping & Colouring Stamping With Solid Stamps Watercolouring Watercolour Pencils Waterbased Markers Pencil Colouring Alcohol Markers Altenew Markers Zig Brush Markers Easy Backgrounds Stamped Backgrounds Small Stamp Ideas Simple Cards Complex Cards Cardmaking For Beginners All
Painting With Acrylics Painting With Gouache Painting With Watercolours Drawing With Fineliner Minimal Supplies Cards Christmas & Holiday
Love & Valentine Mother's Day Father's Day Halloween Spring Cards Summer Cards Autumn/Fall Cards Winter Cards Cards For Children Cards For Women Cards For Men Thank You Cards Sympathy Cards Get Well Soon Cards Floral & Leav Cards Rainbow Colours Messy Watercolouring Modern Art Inspirations Geometric Patterns Landscape Painting Acrylics
Gouache Watercolours Watercolour Pencils Waterbased Markers Distress Inks Alcohol Markers Colouring Pencils No Stamps No Dies Cards
Cardmaking On A Budget Let’s Colour Quick Cards Fun Masculine Cards Background Ideas Distress Ink Combinations |
 RSS Feed
