

I'm adding a new sub-section to my Quick Cards Series and that is Watercolour Fun. Here I'm going to share quick and easy cards, where I paint simple images using watercolours. The Quick Card Series are part of my short videos that I share on Instagram Reels and YouTube Shorts. So if you do not want to miss them make sure you follow me on those platforms, especially on Instagram, because to see the short videos on YouTube, you either need to watch YouTube Shorts on regular bases or to my videos, they will not show on your feed (at least so I heard).
For today's card I decided to paint a watermelon, which I already painted last year for my main video that you can see here. This time I painted a quarter slice, using the wet on wet technique. I started with clean water and I created a shape of the melon, a triangle with a curved bottom, only using water. You can also use a pencil to draw the shape, if you are not conformable to do this freehand, but trust me it's easy. I also left enough space to add the sentiment, but this is completely optional. 
Then I added the paint, I wanted the colours to be vibrant, so I used the paint directly from the pan, but if you would like to have a lighter look, you can always dilute them with little bit of water on your palette. Starting with the red, I applied the colour at the tip of the wet shape and let it do its thing first, to see how far it will spread, but then I added more of the paint here and there. Since melon has a white gap between the red and green part, I needed to stop applying the colour about 2 cm from the bottom. Also you don't want the green and red to be mixing as these are complementary colours and when mixed they create muddy colours.
Next I used the green and added it to the bottom. I like to apply it right at the edge of the wet curved part and then with a clean brush I pushed the colour up. Just tiny bit. The trick here is to be careful with the water. You want to use enough water for the colour to spread around, but no too much to avoid the mixing of the colours. If you think you used too much water, use a paper towel to soak it up. 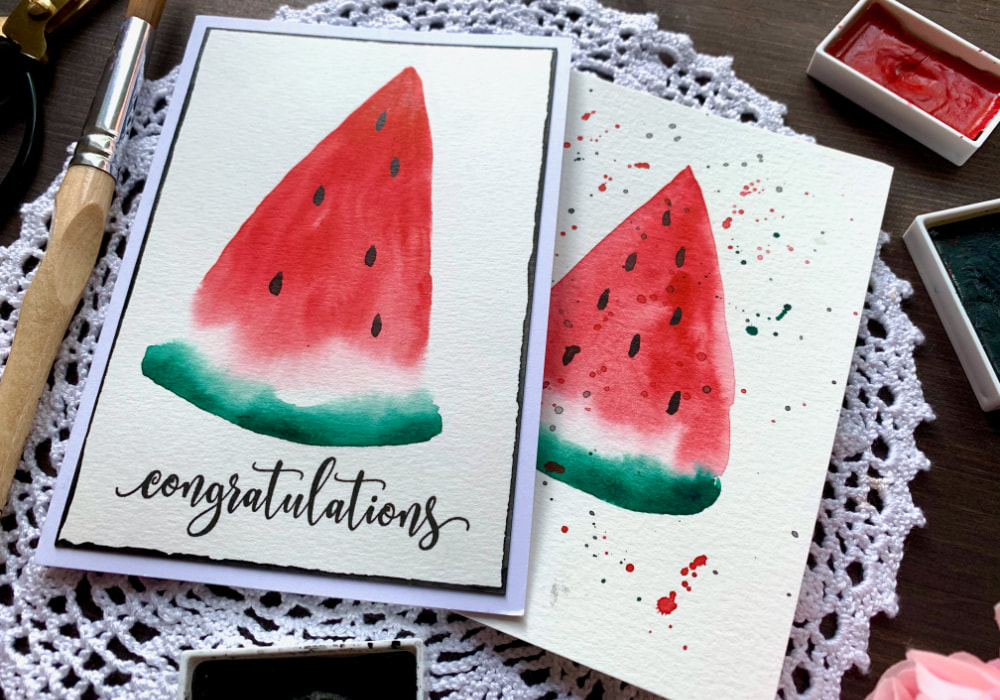
After the piece was dry, I used a black paint to paint the seeds. I also used the black to cover the edges of the panel to create sort of a frame. As you can see in the photos, I was thinking about adding a splatter, but as I did that on my original cards from last year, although it was very tempting, I kept it clean. However, it was looking little bit empty, with too much of a white space and therefore I painted the edges black.
I let the piece dry and then I stamped the sentiment - Congratulations - right below the melon. And lastly I adhered the panel on top of a white card base. You can see a quick video of me making this card on my YouTube channel or Instagram and make sure you subscribe/follow. QUICK TUTORIALYOU MIGHT ALSO LIKEPIN ME
Did you like the card? I would love, if you pinned it to your board on Pinterest!

0 Comments
Leave a Reply. |
FOLLOW ME
SEE MORE


CATEGORIES
All
Stamping Die Cutting Using Stencil Heat Embossing Embossing or Texture Paste Distress Inks Nuvo Products Stamping & Colouring Stamping With Solid Stamps Watercolouring Watercolour Pencils Waterbased Markers Pencil Colouring Alcohol Markers Altenew Markers Zig Brush Markers Easy Backgrounds Stamped Backgrounds Small Stamp Ideas Simple Cards Complex Cards Cardmaking For Beginners All
Painting With Acrylics Painting With Gouache Painting With Watercolours Drawing With Fineliner Minimal Supplies Cards Christmas & Holiday
Love & Valentine Mother's Day Father's Day Halloween Spring Cards Summer Cards Autumn/Fall Cards Winter Cards Cards For Children Cards For Women Cards For Men Thank You Cards Sympathy Cards Get Well Soon Cards Floral & Leav Cards Rainbow Colours Messy Watercolouring Modern Art Inspirations Geometric Patterns Landscape Painting Acrylics
Gouache Watercolours Watercolour Pencils Waterbased Markers Distress Inks Alcohol Markers Colouring Pencils No Stamps No Dies Cards
Cardmaking On A Budget Let’s Colour Quick Cards Fun Masculine Cards Background Ideas Distress Ink Combinations |
 RSS Feed
