

Few months ago I saw a video on the YouTube Channel Let’s Make Art, where they used a very interesting layering watercolour technique, they called it Hide and Seek. Better description would be layering watercolour around the negative spaces of the images and painting the background, working from lightest the darkest colour.
I really liked this technique and was waiting for a project to finally try it out and this card for Valentine’s Day, was the best opportunity to do it, as the shapes are not difficult to paint around. There is easier way to do this especially on this card and I will talk about it later in the blog post, but I wanted to try out this technique. The supplies for this painting are very simple. All you need are watercolours, round brushes and watercolour card stock. You will also need a jar or two with clean water and a paper towel. The main brush I used was a size 10 round brush, which was very good in between brush, not too big so it’s not difficult to go around the images, but big enough so it doesn’t take too long to fill bigger parts of the background. 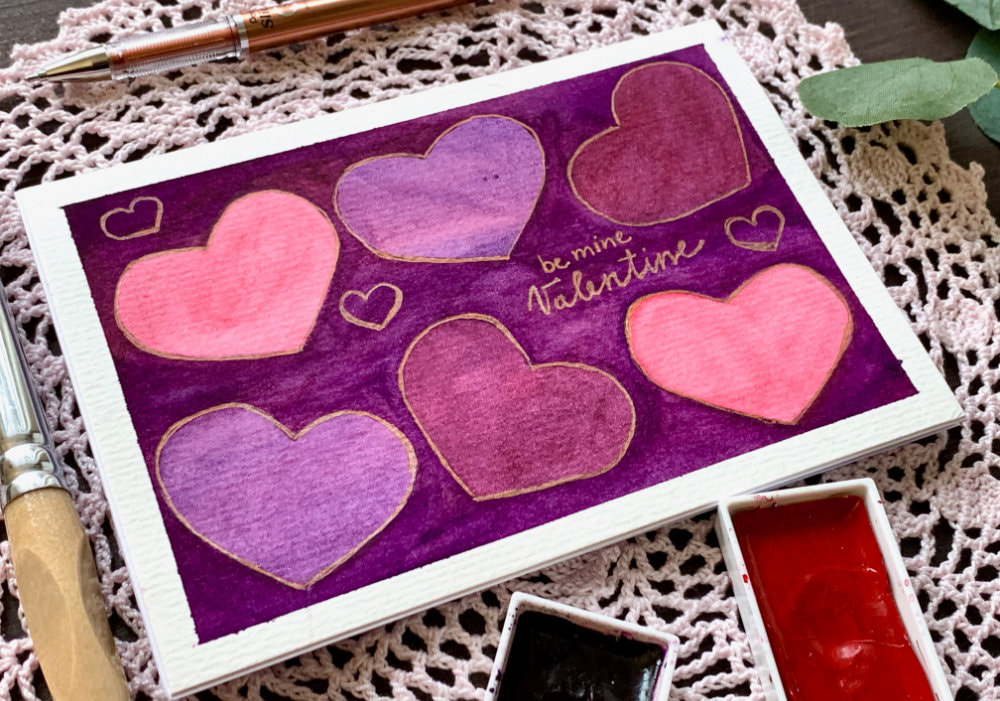
I also used a new watercolour card stock that I bought recently. Don’t worry, it’s nothing expensive. It’s 300 gsm, cold press paper, with a very nice texture. I wanted to try out other brands that show up on Amazon when you search for a watercolour card stock. And so far I like this card stock, it does take water quite well. I never used the fancy 100% cotton watercolour paper, so I cannot give that comparison, but it’s better then Canson XL. I just find that Canson XL doesn’t absorb water very well and I would not recommend it for this project. However if that’s all you have, go for it. I would be using this card stock, if I didn’t have anything else.
Other thing I would recommend is taping your card stock onto a board using a painters tape or washi tape. Since the project requires multiple layers of watercolour, the paper will most likely warp and having the watercolour panel taped onto a board, will help. My card will have six hearts, with two hearts painted with the same colour, that means I will be applying of four layers of different colour. Starting painting, the first layer should be the lightest colour, I painted the whole background with a light pink. 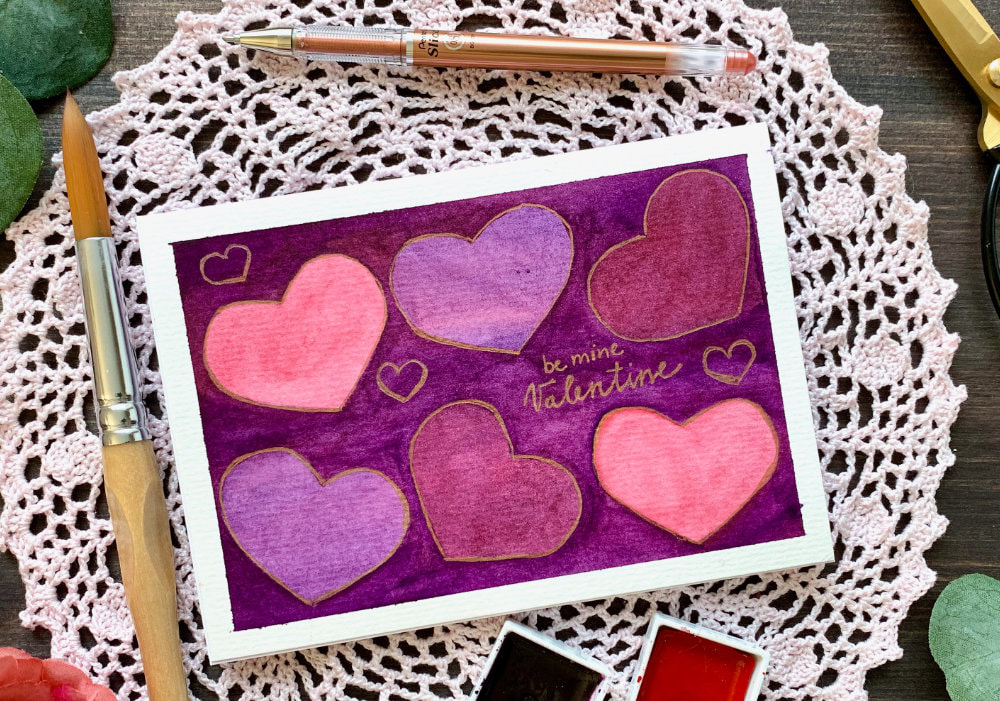
After it dried, I drew two of the hearts. I used a stencil to draw the heart, which I made myself. You don’t need to use a stencil, I just wanted the hearts to be the same size and shape. You don’t even need to use a pencil to draw the hearts, you can use your brush to paint the contour of a heart and fill the rest of the background. You can also paint the hearts in different sizes and shapes.
Once I decided on the placement of the hearts and drew them, I used my next paint and I carefully painted around the hearts and filled the background with the colour. And I repeated the process for all the layers. I didn’t have any big problems painting, but there were two things I struggled with little bit. First of all painting around the hearts and staying outside of the lines was a little tricky. And after applying the third layer of the colour, I found it difficult to see the pencil lines and at one point I started painting across the heart. Luckily I noticed right away and I was able to soak up the colour using a paper towel. Then I re-applied the purple that I picked up from the heart and continued painting the background. If you have troubles seeing the hearts, just use your paint and paint around the hearts first and then fill the background. I found some of the hearts were too light after the paint dried, therefore I applied another layer of the colour I used for the heart. 
You can actually do this from the start, if you thin this technique is little bit too finicky for you. This is the easier way I mention at the beginning of this blog post. Draw your hearts, paint them with your desired colour and then paint the background. Much easier, right? Well, hearts might be somewhat too simple and not interesting enough for this technique, but I really wanted to try out this technique. I would recommend to watch the video I watched, it is really an interesting technique. Next I was thinking about what to do with the sentiment. Shall I heat emboss it? Shall I use a label? I wasn’t sure, but then I looked at a jar on my desk where I keep my tools and pens and I saw a bronze gel pen I bought some time ago and never used it, well until now. I thought it would fit perfectly with the card and I can give the writing my own sentiment a try. I wrote “Be Mine Valentine” and it didn’t go well, the word Valentine was crooked. I prefer not to write my own sentiments on the cards. I don’t dislike my handwriting, but it’s not as neat as I would like, I’m definitely not a calligraphy artist, therefore I find using stamps much convenient. But hey, I did try. Since I was using the gel pen I also outlined the hearts and I drew three smaller hearts in between the large hearts as well. I think it gives it a very nice look, almost like heat embossing, which you also can do if you have an embossing pen. You can also add some embellishments if you want, but I kept the card very simple. Lastly I adhered the panel on top of a white card base using a double sided tape. VIDEO TUTORIAL
Watch the video below or on my YouTube Channel.
PRODUCTS USED
Disclaimer: I’m currently not using any affiliate links. These links are just to help you find the products. The list includes alternatives to what I was using and while I haven't used some of them, I only recommend brands I trust.
Kuretake, Gansai Tambi, Watercolour Paints 36 Set
AmazonDE | AmazonUK Daler Rowney Watercolour Brushes 4, 6, 10 AmazonDE | AmazonUK Tritart, Watercolour Card Stock 300 gsm AmazonDE Canson Bristol Card Stock 250gsm AmazonDE | AmazonUK Pentel Slicci Metallic Gel Pens AmazonDE | AmazonUK Sellotape Double Sided Tape AmazonDE | AmazonUK Tonic Studios, Guillotine A4 AmazonDE | AmazonUK Crafting Mat, Black AmazonDE | AmazonUK YOU MIGHT ALSO LIKEPIN ME
Did you like the card? I would love, if you pinned it to your board on Pinterest!

0 Comments
Leave a Reply. |
FOLLOW ME
SEE MORE


CATEGORIES
All
Stamping Die Cutting Using Stencil Heat Embossing Embossing or Texture Paste Distress Inks Nuvo Products Stamping & Colouring Stamping With Solid Stamps Watercolouring Watercolour Pencils Waterbased Markers Pencil Colouring Alcohol Markers Altenew Markers Zig Brush Markers Easy Backgrounds Stamped Backgrounds Small Stamp Ideas Simple Cards Complex Cards Cardmaking For Beginners All
Painting With Acrylics Painting With Gouache Painting With Watercolours Drawing With Fineliner Minimal Supplies Cards Christmas & Holiday
Love & Valentine Mother's Day Father's Day Halloween Spring Cards Summer Cards Autumn/Fall Cards Winter Cards Cards For Children Cards For Women Cards For Men Thank You Cards Sympathy Cards Get Well Soon Cards Floral & Leav Cards Rainbow Colours Messy Watercolouring Modern Art Inspirations Geometric Patterns Landscape Painting Acrylics
Gouache Watercolours Watercolour Pencils Waterbased Markers Distress Inks Alcohol Markers Colouring Pencils No Stamps No Dies Cards
Cardmaking On A Budget Let’s Colour Quick Cards Fun Masculine Cards Background Ideas Distress Ink Combinations |
 RSS Feed
