
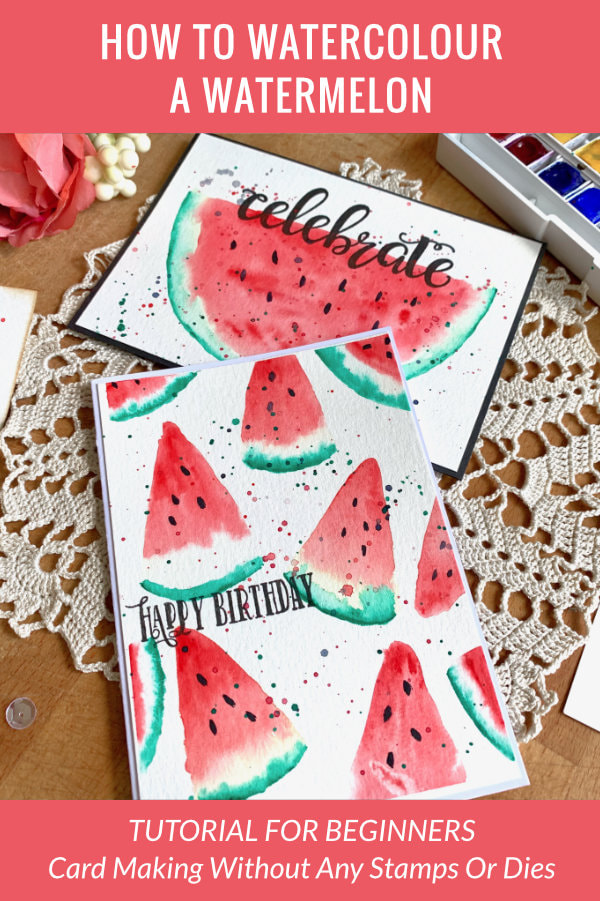
How To Watercolour A Watermelon Tutorial For Beginners - Card Making With Minimal Supplies + VIDEO6/8/2020 
For my first card after a half a year not crafting, I decided to add to my collection "No Stamps No Dies" series. These series are aimed at beginner, simply because I’m a beginner myself or people who do not want to be investing into expensive supplies that are specific to card making. And I can tell you I had fun making these cards! I love using stamps, but this way I just feel little bit more creative.
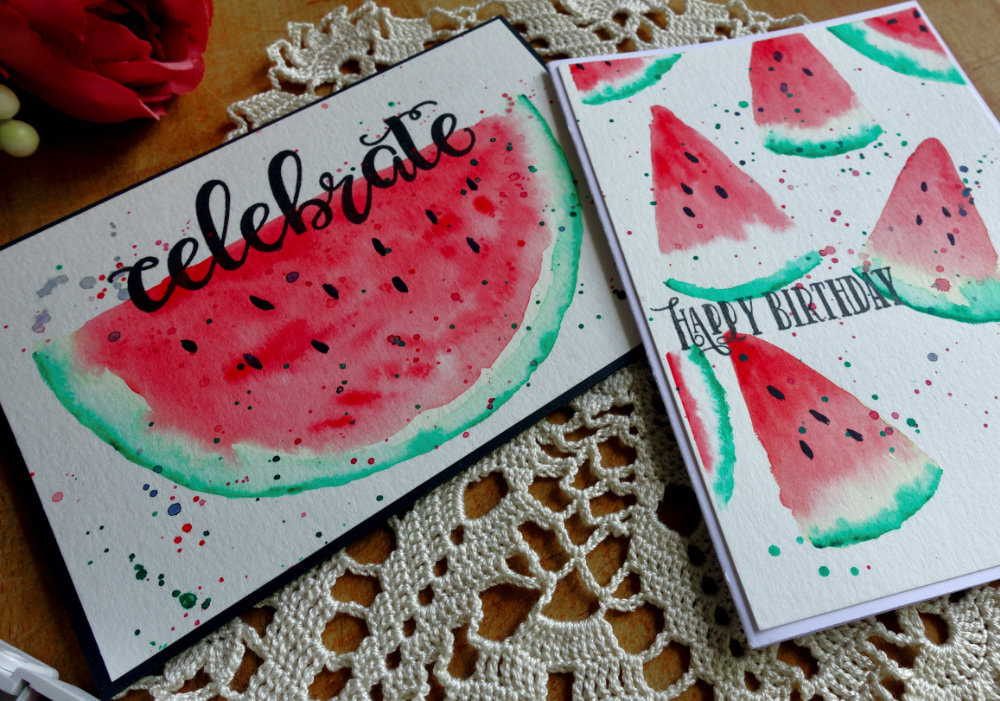
I decided to make two cards, or two version of the watermelon. You don’t have to create a card, but I’m a card maker, that’s what I do. Originally in my thoughts I was only thinking of a half slice. I have a book, with an example of how to paint a watermelon and I thought they showed a half slice, but it turned out to be a quarter slice. Therefore, after I was done with the half of the melon, I thought why not to try the quarter slice and create a background. And I find the quarter slice to be slightly easier to paint. QUICK TIPS
The first thing I would advice is to do a practice run. I know, this should be obvious to do, but I myself often fail to practice. And when I paint without practice I feel like I failed, because it doesn’t look good. Well, when I painted few practice pieces, they didn’t look the best, but because this was a practice run, I didn’t feel disappointed.
As I said I am a beginner, I’m just learning and I can confirm, taking at least one sheet of watercolour paper and have a practice run is very helpful.
I’m going to do the wet on wet technique that means you wet the brush and paper. And with the practice, I like to get the feel of how the colours spread in the water and how much water I need to apply. Especially, because water control is something I’m not good at. Even if you are doing the wet on dry technique. That means, without wetting the paper first. You want to get the feel of it as well. And in this case, since we are watercolouring a watermelon that has a white bit between the red and green, you will not want the colours to be mixing too much. All you need to understand is when to stop adding the colour, more specifically the red, so it doesn’t float into the green. And having a practice run will help you with that. QUICK OVERVIEW OF THE WATERCOLOURING SUPPLIES

For the half of melon I’m using a compass, to draw the shape, but you can use a plate or something similar.
Since I’m making this into a card, I have a card base and an adhesive. I pre-cut and pre-scored my card bases. If you don’t want to make a card base, you can buy those already made, you can usually get them as a pack with envelopes. Or you can get an A5 watercolour pad and fold it in half, but be careful when folding, as it is a thick card stock. HOW TO WATERCOLOUR A WATERMELON
I’m going to paint the two images - the half slice and the quarter slice - slightly differently. This worked for me, but you can do the same process on both images, if you feel that works for you.
I first taped the watercolour paper onto a wooden/cork board to prevent warping. If you don’t have such a thing and your paper warps, just try putting it into a heavy book over the night, or so. I did not mix my colours on a palette with water to dilute, I only added water to the pans and dipped my brush into the pan and directly applied to the painting. I just wanted my colours to be vibrant. After both pieces were dry I added splatter. Just mixed the colours I was using with little bit of water, dabbed my brush in it and tapped the brush on my finger to create the splatter. For bigger droplets use a bigger brush and for smaller, a smaller brush. 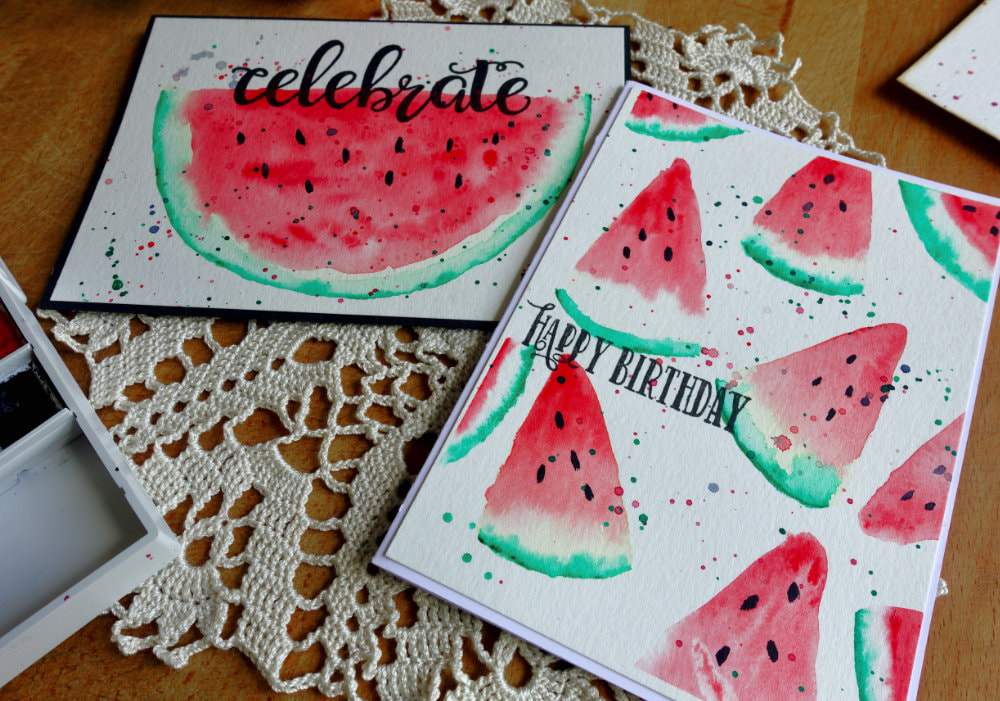
PAINTING THE HALF SLICE
When I painted the half a slice, I tried starting with the red and then the green, but I didn’t get good results. The colours were mixing too much and the white part was hardly showing. Therefore I decided to start with the green. I first drew the outline for the green part, so I can easily see, where I need to add water. And then I applied the water along the edge of the outline, using a smaller brush. I didn’t want the line to be too thick, about one centimetre. Then I went in with the green and initially I applied it only to the edge but as it wasn’t seeping into the water, I helped it with a clean brush. You can leave it to dry completely before adding the red, if you don’t want the colours to be mixing at all. I applied the red right away, but the green part was almost dry anyway. I went in with a clean water first, this time using a bigger brush and I applied it on the inside of the melon, leaving a tiny gap next to the green without any water. The red did manage to mix with the green part, but not too much. I just didn’t want it to be mixing too much and covering the whole white part. After I applied the clean water, I went in with the red. And I made sure to leave a gab about 1 cm to 5 mm wide between the green part and the red part, because it will spread out by itself and again I didn’t want it to mix with the green. You can also leave a bigger gap if you don’t want the colours to be mixing at all. Also when I was applying the red to the bottom of the watermelon, I made my brush little bit more wet, as the bottom part was little bit dry. 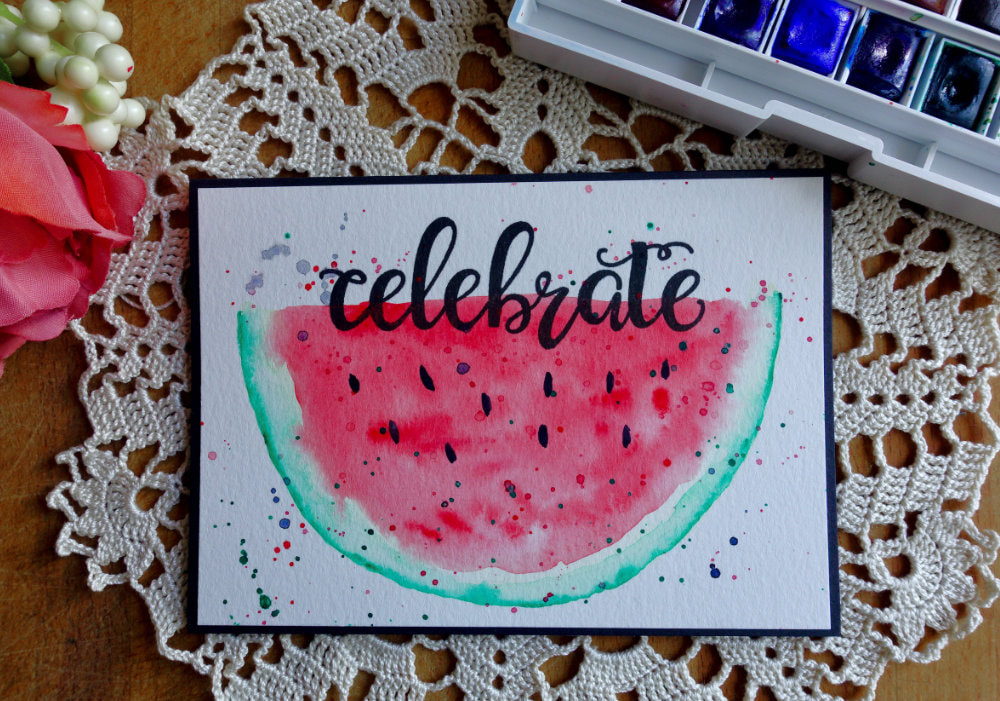
I only used red, but you can use pinks or purples, or you can mix those colours together. That’s up to you.
Once I was happy with the look, I let the piece to dry. You can also use a heat gun or a hair dryer to speed up the process. I prefer air drying, I did try drying it with my heat gun, but I lost patience. It’s really funny, that I don’t mind waiting for it to air dry, but I’m impatient, with the heat gun. When the piece was dry, I took a smaller brush and painted the seeds. I painted them randomly without any specific pattern. The colour I used for the seeds was grey, but you can also use black, or mix black with some brown.
PAINTING THE QUARTER SLICES
For the quarter slices I decided to paint a background. You don’t have to do that, you can paint one big piece, but because I did that with the half slice, I thought creating a background will be a fun thing to do. This time I didn’t use any sketched outline, I went directly with the water. I applied the water to the whole quarter slice, creating a triangle shape with rounded bottom. I started with the red first, applying the colour from the top to bottom. To avoid the colours mixing. Making sure I get the white part as well, I stopped applying the red about 1.5 cm to 2 cm from the bottom. When the water is pooling or I saw the colour is spreading too far, I just used a paper towel and dabbed it off. 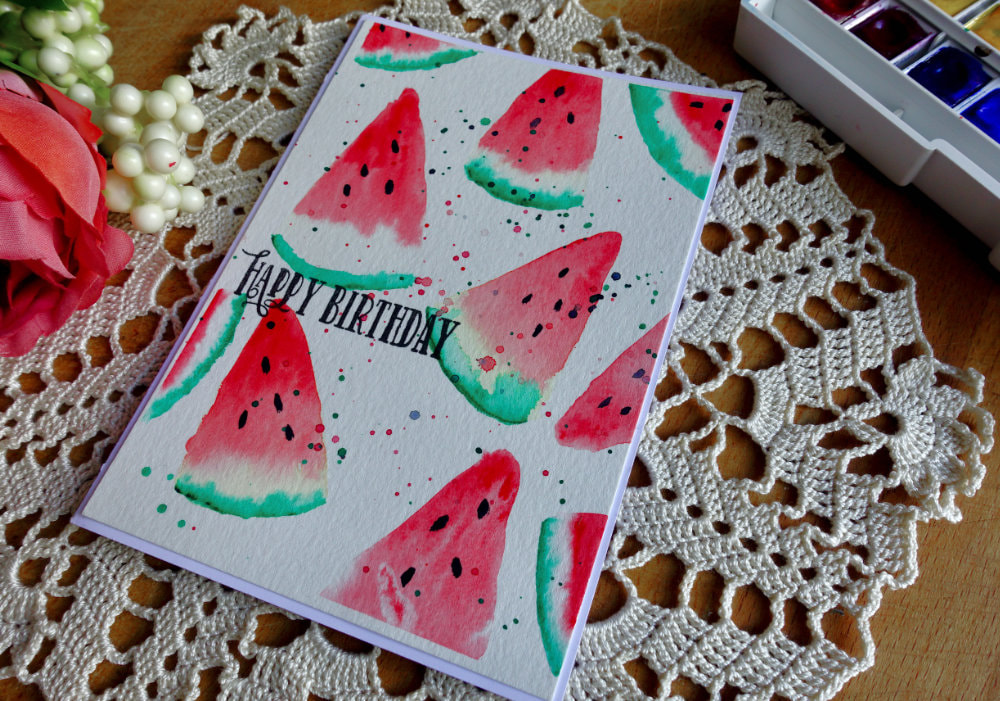
I repeated this process on all of the quarter slices of the melon on the background.
I thought it looked good, I started taking of the washi tape and then I realized, there are too many white spaces. So, I put the washi back and painted few more pieces along the edges. Once I was happy with the look, I let it dry and then I painted in the seeds. FINISHING THE CARD
You can adhere the panels on top of the card base as they are, without any sentiment. A card does not always need to have a sentiment.
If you can handletter or you are happy with your own handwriting, then you can write your own sentiment. You can also use a printer or a label maker, like the one from Dymo that embosses. Well, I definitely cannot handletter. If I watch someone make a card, where they also handletter, I just skip it. My handwriting is not the best either and I don’t have a printer or label maker. However, what I do have are stamps. I know these cards are part of the "No Stamps No Dies" series, but that is mainly about main image. Adding a sentiment is optional. 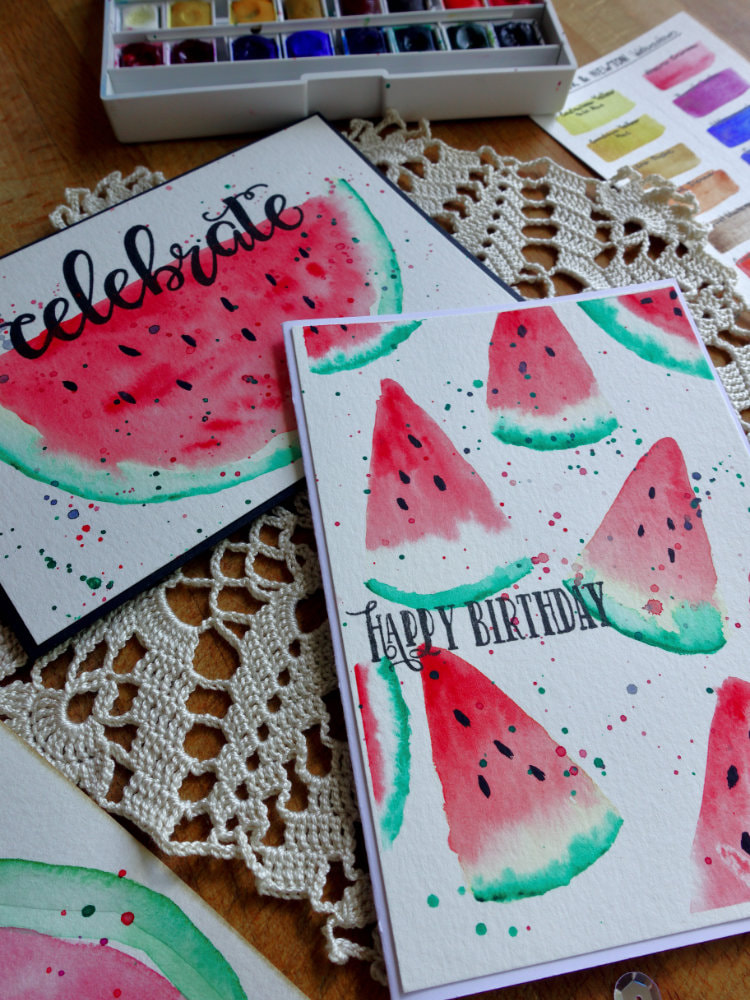
For the card with the half a melon, I wanted to use something bold and I picked up a stamp set from Avery Elle called “Big Greetings” and I used the “Congratulations” stamp. I had to use my stamping tool, simply because the stamp is big and when stamping on watercolour card stock, most likely I will not get a good coverage. Whit a stamping tool I am able to re-stamp.
For the panel with the background I used a smaller stamp from Clearly Besotted, sadly this one is no longer available. I just looked for a stamp that was smaller, but not too small and with bold letters. And to stamp it, I used an acrylic block. The ink I used in both cases is the Versafine ink in Onyx black. Lastly I adhered the panels on top of my card bases, using double sided adhesive. You can also use liquid glue. For the card bases I used a heavy weight card stock. This finishes the project, I hope you enjoy the cards as well as the video! As usual, if you have any questions, do not hesitate to drop me a line. Have an awesome day and thanks for stopping by! VIDEO TUTORIAL
Watch the video below or on my YouTube Channel.
PRODUCTS USED
Winsor & Newton, Cotman Watercolor Palette | AmazonDE | AmazonUK
Daler Rowney Watercolour Brushes | AmazonDE | AmazonUK Canson XL, Watercolour Cardstock , 300gsm/140lb | AmazonDE | AmazonUK Color Copy , White Paper, A4 300gsm/140lb (card base) | AmazonDE | AmazonUK *Black Card Stock For Cardbase | AmazonDE | AmazonUK *Papermania, Blank Card and Envelope A6 Pack of 50 White | AmazonDE| AmazonUK (If you don’t want to make a card base) Sellotape Double Sided Tape | AmazonDE | AmazonUK Avery Elle, Big Greetings Stamp Set | MennysShopDE | SevenHillsCraftsUK Clearly Besotted, All Occassion Sentiments (No Longer Available) | ClearlyBesotted *Clearly Besotted, Saying Stuff | ClearlyBesotted My Sweet Petunia, Mini MISTI Stamping Tool | StempelmühleDE | BumbleberrysUK Tsukineko, Versafine Ink pad, Onyx Black | AmazonDE | AmazonUK Papermania, Stamp Block | AmazonDE | AmazonUK Crafting mat, black | AmazonDE | AmazonUK Fiscars, Guillotine A5 | AmazonDE | AmazonUK OTHER SUPPLIES: Jars with water, paper towel, pencil & ereaser and compass (optional). YOU MIGHT ALSO LIKEPIN ME
Did you like the card? I would love, if you pinned it to your board on Pinterest!
0 Comments
Leave a Reply. |
FOLLOW ME
SEE MORE


CATEGORIES
All
Stamping Die Cutting Using Stencil Heat Embossing Embossing or Texture Paste Distress Inks Nuvo Products Stamping & Colouring Stamping With Solid Stamps Watercolouring Watercolour Pencils Waterbased Markers Pencil Colouring Alcohol Markers Altenew Markers Zig Brush Markers Easy Backgrounds Stamped Backgrounds Small Stamp Ideas Simple Cards Complex Cards Cardmaking For Beginners All
Painting With Acrylics Painting With Gouache Painting With Watercolours Drawing With Fineliner Minimal Supplies Cards Christmas & Holiday
Love & Valentine Mother's Day Father's Day Halloween Spring Cards Summer Cards Autumn/Fall Cards Winter Cards Cards For Children Cards For Women Cards For Men Thank You Cards Sympathy Cards Get Well Soon Cards Floral & Leav Cards Rainbow Colours Messy Watercolouring Modern Art Inspirations Geometric Patterns Landscape Painting Acrylics
Gouache Watercolours Watercolour Pencils Waterbased Markers Distress Inks Alcohol Markers Colouring Pencils No Stamps No Dies Cards
Cardmaking On A Budget Let’s Colour Quick Cards Fun Masculine Cards Background Ideas Distress Ink Combinations |
 RSS Feed
