
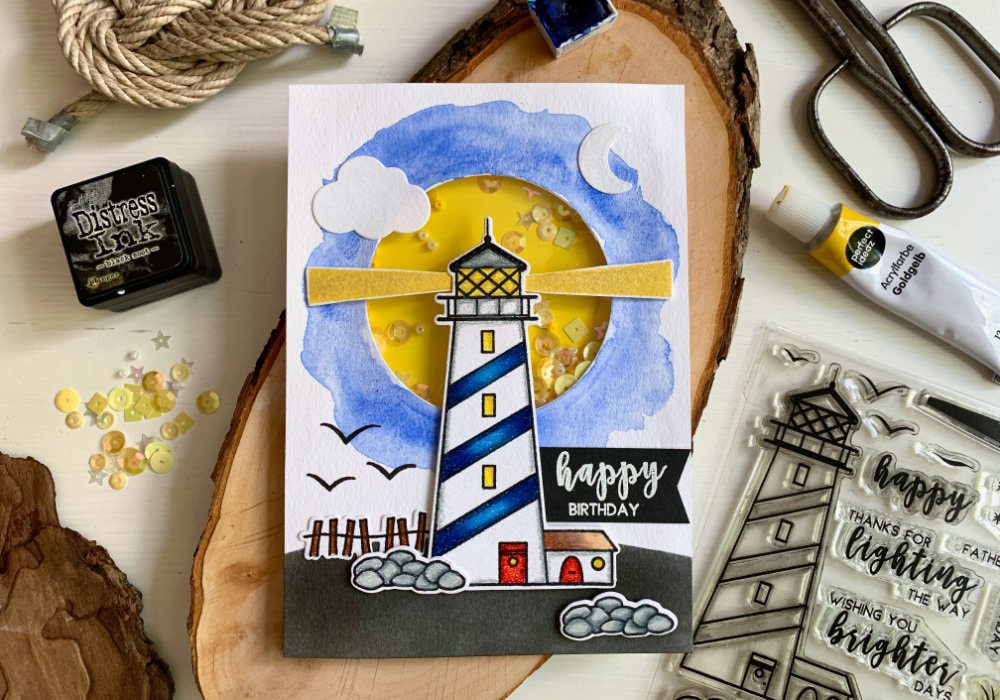
 Today I am re-making a card that I made a few years ago for my old blog. You can see that blog post here. This is one of my favourite cards and because I did not make a video for the original card, I thought I will make it again and share it with you on this blog. The stamp set I'm using is quite old and might not be available anymore, at least I could not find it in the online stores where I usually shop. The stamp set is the Shine Bright by Avery Elle and I absolutely love the look of it. I also bought the coordinating dies for it, which I don't do too often, because they are too expensive and often unnecessary. Also this card I made as a shaker card, which is en element I wanted to repeat and therefore I waited until I finally have my die-cutting machine with me. My die-cutting machine was in a storage for the past two years.  I called this mixed media card, which you can say about many of my cards. I always mix mediums for the focal element and background, but for this card I used a lot of colouring supplies. I used inks for the stamping, colouring pencils to colour the lighthouse, I used watercolours for the sky, black Distress ink for the ground and for the background behind the shaker window I used an acrylic paint. To make the card I started with the backgrounds as they needed a drying time. First I painted the yellow background behind the shaker card, using an acrylic paint. I simply applied it with a flat brush, I didn't apply it over the whole background, just the part where the shaker window will be. Then I painted the sky, I put a blue paint around the die-cut circle in a messy way. I could have used watercolours for the ground, but as I called this card a mixed media card I used Black Soot Distress ink. From the time I made my original card I still had a stencil that I created from two Post-It notes that I stacked together and cut in a shape of a hill. I placed it on the panel with the die-cut circle and using a blending tool I applied the Distress ink.  While the background was drying I stamped and coloured the lighthouse as well as the other images from the stamp set. I used the Prisma pencils, blues for the stripes on the lighthouse, greys for the sides of the lighthouse to create a dimension, I also used the greys for the pile of stones, reds for the doors, yellows for the windows, browns for the roof and the fence and black for the top of the lighthouse. I mentioned in my video that I was disappointed with my description on my old blog post for the original card, especially about what exact colours of the pencils I used. While these blog posts and videos of my cards I make are to give inspiration to others, I also use them to see how I made them if I re-make a card in the future. Personally, it annoys me, when I see a card and the creator doesn't mention what products they used and how they made it. So just in case, if you would like to know the exact colours of the Prisma pencils I used, here they are: - Blues: PC901, PC906, PC904 - Browns: PC945, PC943, PC997 - Yellows: PC942, PC916 - Reds: PC924, PC922 - Greys: PC935, PC1065, PC1063, PC1060  After I finished colouring I stamped a few birds from the stamp set on the left bottom part of the panel and I also stamped the greeting. Here however I made a mistake, which I only noticed when I was working on the voiceover for the video. I stamped the word Birthday above the word happy, to me visually it fits better. I fixed it for the finished card, but if you want to see the mistake, check out the video. I ended up creating a banner using a black card stock where I heat embossed the greeting (in a right order) with a white embossing powder and I adhered it over the stamped greeting, directly onto the panel tacking it behind the lighthouse. Note, I did this at the end after the lighthouse was adhered. Next using a liquid glue, I adhered the acetate, on the back of the panel with the circle. While the glue was drying, I adhered the rays of light at the top of the lighthouse, at the back using a liquid glue and the same I did with the stones, which I attached at the bottom left of the lighthouse. I also adhered the double-sided foam tape on the back of the lighthouse, including the images that I attached to it and the second pile of stones.  Once the glue on the acetate was dry I adhered the fence using a liquid glue, then the lighthouse. I wanted the rays of light to be more or less in the middle of the window. And then I also adhered two items that I die-cut, a moon that is from the stamp set with the lighthouse and a cloud that is from an older stamp set by Clearly Besotted. Lastly I attached two layers of the double-sided foam tape on the back of the panel. I did not put the tape directly around the circle, if you watch the video you will see that I created a square. The most important when attaching the tape is to make it tight, so there are no gaps for the sequins to escape and to place the bottom tape closer to the circle, so when you stand or hold the card, you can still see a pile of sequins and beads. 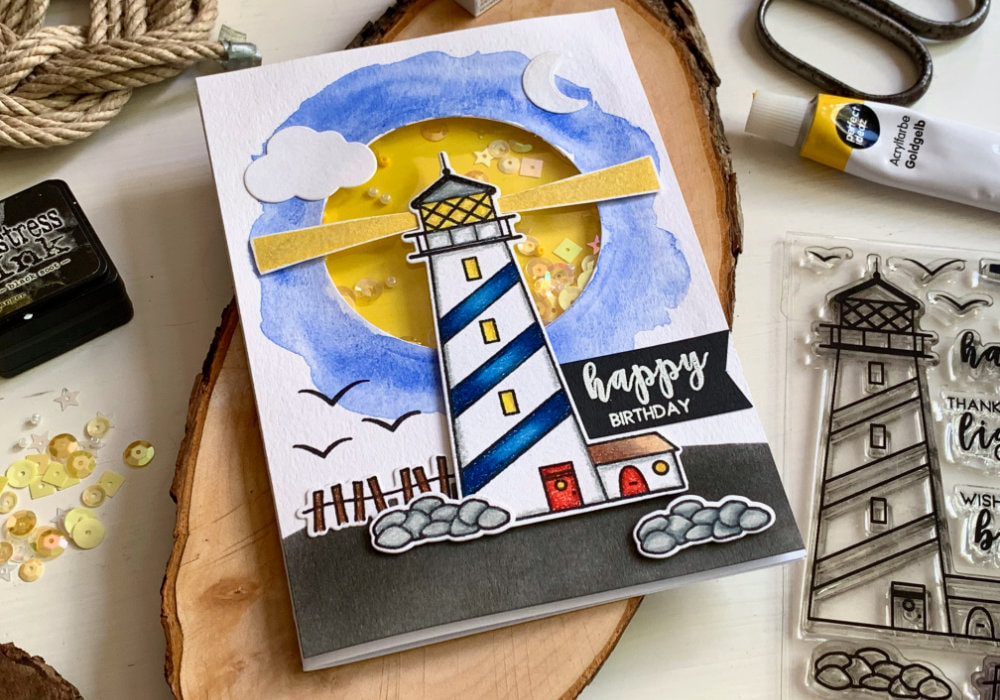 One more thing I did is I used the Wink Of Stella glitter pen and put some glitter over the rays of light and moon, which I forgot to mention in the video. That is all, the card is finished. I hope you will try making this card yourself. Make sure you check out my video on YouTube and give it a Like as well. The list of product is down below, where you can also find a few blog posts that I think you might enjoy. And if you have any questions, just drop me a line. VIDEO TUTORIALWatch the video below or on my YouTube Channel. PRODUCTS USEDCLICK HERE TO SEE TO THE LIST OF PRODUCTS
Avery Elle, Shine Bright Stamp Set + Dies
Tsukineko, Versafine Ink pad, Onyx Black AmazonDE | AmazonUK Sizzix, Framelits Circles Set AmazonDE | AmazonUK papermilldirect, White Card Plain 250gsm papermilldirectUK perfekt ideaz, Acrylic Paints, Gold Yellow AmazonSE Blue Squid Brush Set AmazonDE | AmazonUK Winsor & Newton, Cotman Watercolor Palette AmazonDE | AmazonUK Pentel, Water Brush Pen Set AmazonDE| AmazonUK Tim Holtz Distress Mini Ink, Kit 3 (Black Soot) danipeussDE | CraftStashUK Blending Tool (purchased from a make up section in a discount store) Sanford Prismacolor Premier Colored Pencils, Pack of 72 AmazonDE | AmazonUK Crafter's Companion Acetate AmazonDE | AmazonUK Lucy’s Cards, Raindrops *Alternative Lucy's Cards, Canary Sequin Mix LucysShopUK Rayher, 2.6mm Beads, Yellow & Beige papermilldirect, Black Card Plain 240gsm papermilldirectUK Tsukineko Versamark Watermark Ink Pad AmazonDE | AmazonUK Stampendous, Embossing Powder, White AmazonDE | AmazonUK Docrafts Papermania, Heat Tool AmazonDE | AmazonUK EK Susccess, Anti-Static Powder Tool AmazonDE | AmazonUK Color Copy , White Paper, A4 300gsm/140lb (card base) AmazonDE | AmazonUK Papermania, A6 Card Bases + Envelopes, White AmazonDE | AmazonUK Stick It!, Double Sided Foam Tape AmazonDE | AmazonUK UHU, Liquid Glue AmazonDE | AmazonUK Post-It, Full Adhesive Notes AmazonDE | AmazonUK Fiscars, Guillotine A5 AmazonDE | AmazonUK Tonic Studios, Guillotine A4 AmazonDE | AmazonUK EK Success, Scissors AmazonDE | AmazonUK My Sweet Petunia, Mini MISTI Stamping Tool StempelmühleDE | BumbleberrysUK Papermania, Stamp Block AmazonDE | AmazonUK Crafting Mat, Black AmazonDE | AmazonUK Disclaimer: Here you can find the products I used to make this card. Please note that the products are just a guide, you don't need the exact products or brands. For most of the products I include links to the shops where you can purchase these items if available. As I live in Europe, I provide links to UK and German stores. These are not affiliate links and every products I used for this card I purchased myself. YOU MIGHT ALSO LIKEPIN MEDid you like the card? I would love, if you pinned it to your board on Pinterest! 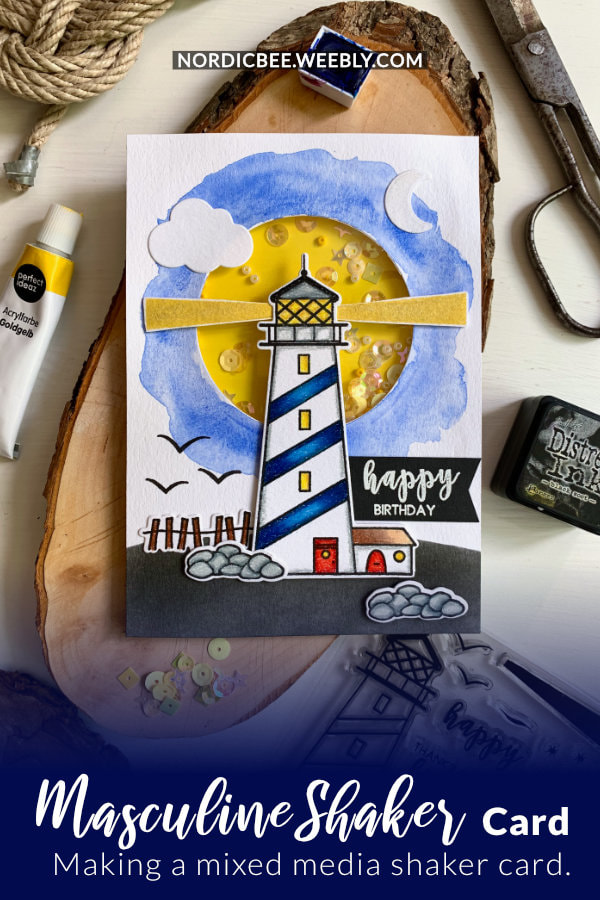
0 Comments
Leave a Reply. |
FOLLOW ME
SEE MORE


CATEGORIES
All
Stamping Die Cutting Using Stencil Heat Embossing Embossing or Texture Paste Distress Inks Nuvo Products Stamping & Colouring Stamping With Solid Stamps Watercolouring Watercolour Pencils Waterbased Markers Pencil Colouring Alcohol Markers Altenew Markers Zig Brush Markers Easy Backgrounds Stamped Backgrounds Small Stamp Ideas Simple Cards Complex Cards Cardmaking For Beginners All
Painting With Acrylics Painting With Gouache Painting With Watercolours Drawing With Fineliner Minimal Supplies Cards Christmas & Holiday
Love & Valentine Mother's Day Father's Day Halloween Spring Cards Summer Cards Autumn/Fall Cards Winter Cards Cards For Children Cards For Women Cards For Men Thank You Cards Sympathy Cards Get Well Soon Cards Floral & Leav Cards Rainbow Colours Messy Watercolouring Modern Art Inspirations Geometric Patterns Landscape Painting Acrylics
Gouache Watercolours Watercolour Pencils Waterbased Markers Distress Inks Alcohol Markers Colouring Pencils No Stamps No Dies Cards
Cardmaking On A Budget Let’s Colour Quick Cards Fun Masculine Cards Background Ideas Distress Ink Combinations |
 RSS Feed
