
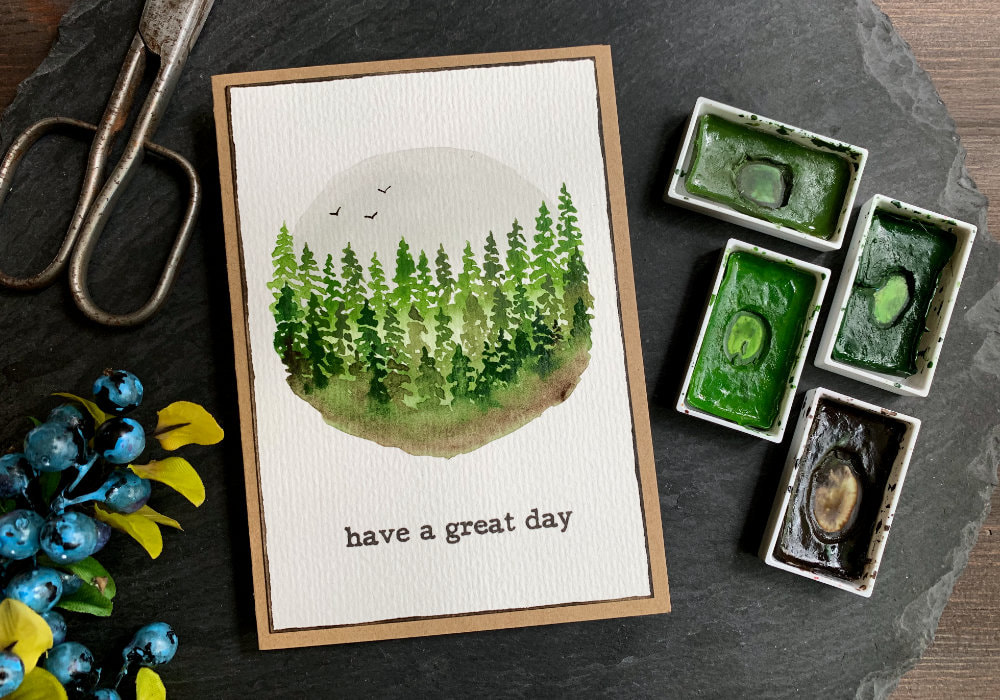
 Before I start with Valentine's day cards - I think it's way too soon - I wanted to make one or two winter cards first. I like to make cards corresponding with the current season we are in. For this card I decided to paint a loose watercolour forest, it's very simple, budget friendly and perfect for beginners. And I'm not going to deny it, it could be used as Christmas card as well. To paint the trees, you will need watercolour supplies: watercolour paints, paper and brushes. I used two brush sizes, a bigger for the background and a smaller for the trees. You will also need a card base for the card, an adhesive to adhere it and a greeting - a stamp or you write it yourself. However the greeting is optional.  I secured the watercolour panel onto a board using a washi and then I started painting. First, I applied a clean water over the whole card stock and then doing the wet on wet technique, using the green paint, I painted in a few tree shapes. I placed them where I wanted the actual trees to be. This are just blotches of colour and they will create sort of a misty background. While the background was still wet, I splattered mainly a blue paint, but also some of the green over the background. I let the panel dry and then I painted in the trees, using a smaller brush. I painted a top row first and then the bottom row. I placed them - more or less - over the blotches of the background shapes that I painted at the beginning.  I painted trees like these before and I think they look different every time. The trees here are my favourite so far. I tried to be less controlling and also try not to create an A-shape. To paint the tree, I started with a straight line and then I painted the branches going from side to side, in a zig zag motion, doing short strokes. After I finished the first row of the trees, I used a clean damp brush and applied a little bit of water below the trees to spread the colour underneath them, which created a ground. Once the piece was dry, I painted the row of the trees below, repeating the same process. When the second row of the trees was dry, I added more splatter using the blue and green paints and then I removed the washi.  Next I adhered the panel on top of a card base using a double sided tape. The card base I made out of a craft card stock. Lastly I adhered a greeting that says Congratulations. The greeting I pre-made, I stamped it on top of a black card stock and heat embossed it in white. Then I cut it into a banner, but the banner was too thick, so I used my scissors and cut around the letters. I hope you will try making this card yourself. Make sure you check out my video on YouTube and give it a Like as well. The list of product is down below, where you can also find a few blog posts that I think you might enjoy. And if you have any questions, just drop me a line. WATCH A QUICK VIDEOWatch the video below or on my YouTube Channel. YOU MIGHT ALSO LIKEPIN MEDid you like the card? I would love, if you pinned it to your board on Pinterest! 
0 Comments
Leave a Reply. |
FOLLOW ME
SEE MORE


CATEGORIES
All
Stamping Die Cutting Using Stencil Heat Embossing Embossing or Texture Paste Distress Inks Nuvo Products Stamping & Colouring Stamping With Solid Stamps Watercolouring Watercolour Pencils Waterbased Markers Pencil Colouring Alcohol Markers Altenew Markers Zig Brush Markers Easy Backgrounds Stamped Backgrounds Small Stamp Ideas Simple Cards Complex Cards Cardmaking For Beginners All
Painting With Acrylics Painting With Gouache Painting With Watercolours Drawing With Fineliner Minimal Supplies Cards Christmas & Holiday
Love & Valentine Mother's Day Father's Day Halloween Spring Cards Summer Cards Autumn/Fall Cards Winter Cards Cards For Children Cards For Women Cards For Men Thank You Cards Sympathy Cards Get Well Soon Cards Floral & Leav Cards Rainbow Colours Messy Watercolouring Modern Art Inspirations Geometric Patterns Landscape Painting Acrylics
Gouache Watercolours Watercolour Pencils Waterbased Markers Distress Inks Alcohol Markers Colouring Pencils No Stamps No Dies Cards
Cardmaking On A Budget Let’s Colour Quick Cards Fun Masculine Cards Background Ideas Distress Ink Combinations |
 RSS Feed
