
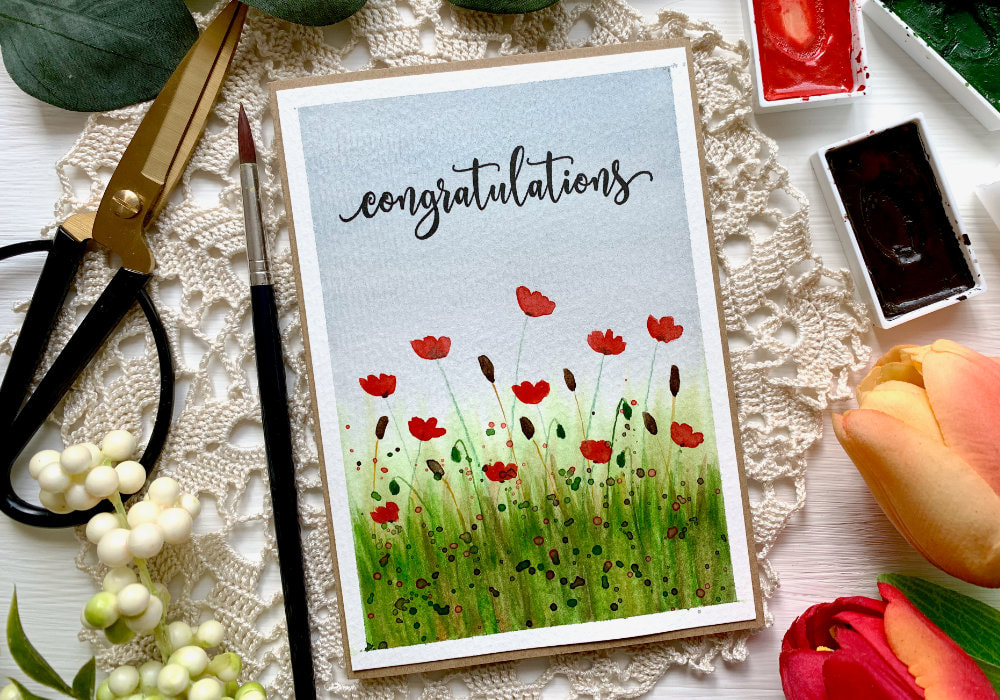
I have a stamp set with poppies, which I wasn’t ready to use yet, even though it’s quite old and I should finally use it. However, I wanted to paint something myself and poppies sounded as a great idea. I remembered a video I saw on YouTube, where the person painted poppies. So I watched the video again, but also searched for other tutorials for inspiration and two videos caught my attention. One is from the channel MarenaART that you can see here and the other form the channel Karen Rice Watercolour Channel that you can see here.
They both used the same photo as a reference, but they created two different paintings. I didn’t follow the videos exactly, I just watched them once before I started painting and tried to recreate what I remembered. I didn’t have the photo opened for a reference, which I should have. What caught my eye, was the grey sky, which is crazy, I hate grey skies. I prefer long winter nights over grey skies, but here I loved it and I wanted to recreate it. This is a watercolour painting that means you need the typical watercolour supplies. Watercolours (red and greens, I also added brown and yellow, but that is optional), watercolour brushes (the size that works best for you), watercolour card stock, painters tape (or washi), a jar or two with water and paper towel. I also used a green watercolour pencil (you can use a normal colouring pencil) the reason for it I will share with you in a bit. 
I secured the card stock onto a board with the painters tape. Because I’m doing here the wet on wet technique, I would highly recommend that you do that too, as the paper can warp quite a lot.
I first applied generous amount of clean water across the whole paper, but not to the amount that it’s pooling, just that it’s shiny. Then I started applying the colours, black and blue, I wanted the sky to be grey, but still to have some hints of blue. I added the colour in small amounts as I didn’t want the sky to be too dark, it was suppose to be a day scene, not a night scene. And after I passed the middle of the panel, I started fading it into white. Again I’m doing the wet on wet technique, which will create a blurry effect and it will look like the grass is in the background, out of focus. I picked a round brush and did quick vertical strokes, starting with a brighter green and adding a dark green, brown and yellow. When I was happy with the look, I used my heat tool to dry it. Next I worked on the flowers and other foliage and I started with the stems. This is where I used the watercolour pencil. You see, I don’t have the right brush for the stems. In one of the tutorials, she used a thin long bristle brush and in the other video she used some kind of tool, no idea what it was. Well, I don’t have either, I only have a small short bristle brush and it worked few times other times the stems were too thick. It would have probably worked if I was painting something bigger then an A6 panel, but I’m making an A6 card and I needed the lines to be very thin. And even if I had the right tools, who know if I would be successful, because my hand shakes every time I want to paint a line and I’m rather heavy handed. 
If you have such a brush, give it a try, because the idea is to do quick strokes and paint them fast one after the other. It’s way better then going slow and having to decide where to place the stems, which is what I had to do.
That’s why I used the watercolour pencil, much easier to sharpen a pencil to create thin lines. So I drew few lines where the red poppies will be, but for the rest I used the tiny short bristle brush. Using similar shade of the green as the watercolour pencil, I painted few unopened poppies. Since the whole thing is the same colour, I painted it all together - the stem with the bud. The next stems I added is for an unidentified plant. This is why I should have used a reference photo. I wanted to paint a cattail, which has green stem and leafs and a brown top. However, in my head I got it mixed probably, because the reference photo the two ladies used included grains, and I painted the stems yellow, but the tops I painted brown. You could say it is some kind of hybrid of cattail and grains. After I painted the stems, I painted in the flowers and the cattail tops. For the cattail I used a dark brown and just did a simple straight stroke. For the poppies I used red. They are not suppose to be realistic. I painted the petals quickly, painting three or four arches that are slightly wider. I also tried not to make the arches too neat. Then I added little dot of dark brown to the bottom of the flower, I’ve seen others doing something similar and I liked it, but you don’t have to do this. 
Next I added additional plants to fill up the gaps and lastly I added additional grass. For the grass I used the same colours I used for the grass in the background and I did here the wet on dry technique. Again doing quick vertical strokes, filling up the bottom part of the panel. I’m not sure if this was done in the tutorials, but my reason to add the second layer of grass was mainly to cover up the stems, they were just too distracting, some where too thick and the grass covered it up. I think it created a pretty cool look.
The very last step, but completely optional, I just cannot resist, I added splatter to the bottom part of the painting, only over the grass. I covered the top of the painting with a paper towel and then with a round brush I splattered the green, red and brown colours over the grass. After the piece was dry, before putting the card together, I cut down the panel on all sides by 2mm using my paper trimmer. The reason for this is, because I used an A6 size card stock for the painting and I’m using an A6 size card base, the panel is always slightly bigger around the fold of the card base. I also find it more difficult to adhere. Therefore I use my paper trimmer and decrease the size of the panel by 4mm on the top and the bottom. It is easier to adhere and it creates a nice frame. 
Since I’m making a card, I like to add a sentiment, but this is again a step that is completely optional. As a card maker, I have a lot of stamps and I picked a sentiment that says Congratulations and I stamped it at the top of the panel using a black ink.
And lastly I adhered the panel on top of a card base that I pre-cut and pre-scored using a craft card stock. I hope you like the card, make sure you watch the video and if you have any questions, do not hesitate to drop me a comment. VIDEO TUTORIAL
Watch the video below or on my YouTube Channel.
PRODUCTS USED
Disclaimer: I’m currently not using any affiliate links. These links are just to help you find the products. The list includes alternatives to what I was using and while I haven't used some of them, I only recommend brands I trust. Please note that you can use supplies that you already have or can afford.
Tritart, Watercolour Card Stock 300 gsm
AmazonDE Kuretake, Gansai Tambi, Watercolour Paints 36 Set AmazonDE | AmazonUK Faber-Castell Water Colour Pencils (Pack of 24) AmazonDE | AmazonUK Blue Squid Brush Set AmazonDE | AmazonUK Daler Rowney Watercolour Brushes 4, 6, 10 AmazonDE | AmazonUK Daler Rowney Small Watercolour Brushes 1, 3, 10/0, 3/0 AmazonDE | AmazonUK Avery Elle, Magnolia Stamp Set MennysShopDE | SevenHillsCraftsUK Tsukineko, Versafine Ink pad, Onyx Black AmazonDE | AmazonUK My Sweet Petunia, Mini MISTI Stamping Tool StempelmühleDE | BumbleberrysUK Papermania, Stamp Block AmazonDE | AmazonUK Sellotape Double Sided Tape AmazonDE | AmazonUK Joy Crafts, Kraft Paper,A4 300gsm/140lb (card base) KreativbuntDE | AmazonUK Papermania, A6 Card Bases + Envelopes, Craft AmazonDE | AmazonUK Fiscars, Guillotine A5 AmazonDE | AmazonUK Crafting Mat, Black AmazonDE | AmazonUK YOU MIGHT ALSO LIKEPIN ME
Did you like the card? I would love, if you pinned it to your board on Pinterest!

0 Comments
Leave a Reply. |
FOLLOW ME
SEE MORE


CATEGORIES
All
Stamping Die Cutting Using Stencil Heat Embossing Embossing or Texture Paste Distress Inks Nuvo Products Stamping & Colouring Stamping With Solid Stamps Watercolouring Watercolour Pencils Waterbased Markers Pencil Colouring Alcohol Markers Altenew Markers Zig Brush Markers Easy Backgrounds Stamped Backgrounds Small Stamp Ideas Simple Cards Complex Cards Cardmaking For Beginners All
Painting With Acrylics Painting With Gouache Painting With Watercolours Drawing With Fineliner Minimal Supplies Cards Christmas & Holiday
Love & Valentine Mother's Day Father's Day Halloween Spring Cards Summer Cards Autumn/Fall Cards Winter Cards Cards For Children Cards For Women Cards For Men Thank You Cards Sympathy Cards Get Well Soon Cards Floral & Leav Cards Rainbow Colours Messy Watercolouring Modern Art Inspirations Geometric Patterns Landscape Painting Acrylics
Gouache Watercolours Watercolour Pencils Waterbased Markers Distress Inks Alcohol Markers Colouring Pencils No Stamps No Dies Cards
Cardmaking On A Budget Let’s Colour Quick Cards Fun Masculine Cards Background Ideas Distress Ink Combinations |
 RSS Feed
