
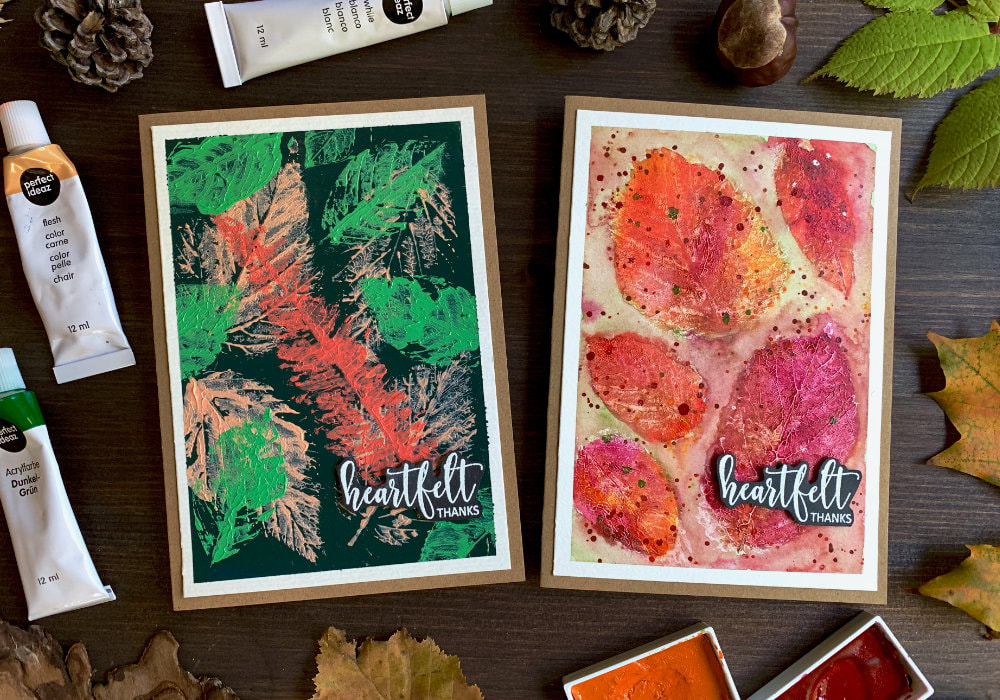
 With all the leaves falling of the trees I thought let's make an autumnal card with stamped leaves. Something you might remember from your childhood. To be honest, I didn't think it will go well. I thought this is going to be an utter messy disaster and I must say I was wrong. I love the results, especially on the second card, simply because that was just an experiment. Except of the leaves, the products you will need are acrylic paints, brushes and card stock. I used Canson XL mixed media, you can use also the watercolour version, which I used for the second card, where I also used watercolours.  On the day of crafting I went to the forest for a walk and picked (way too many) leaves. My plan was to make a few cards, but then I realized that with the set of acrylic paints I have, I would quickly run out and I wanted to keep some paints for future projects. If you want to make more cards, consider getting bigger tubes, especially the white and maybe black. It is really surprising how quickly you go through acrylic paints, compared to watercolours. STAMPING WITH LEAVES USING ONLY ACRYLIC PAINTS IN VAROUS COLOURS For my first card I did the typical leaf stamping, where I painted the background, which is optional and then I stamped the leaves in different colours. 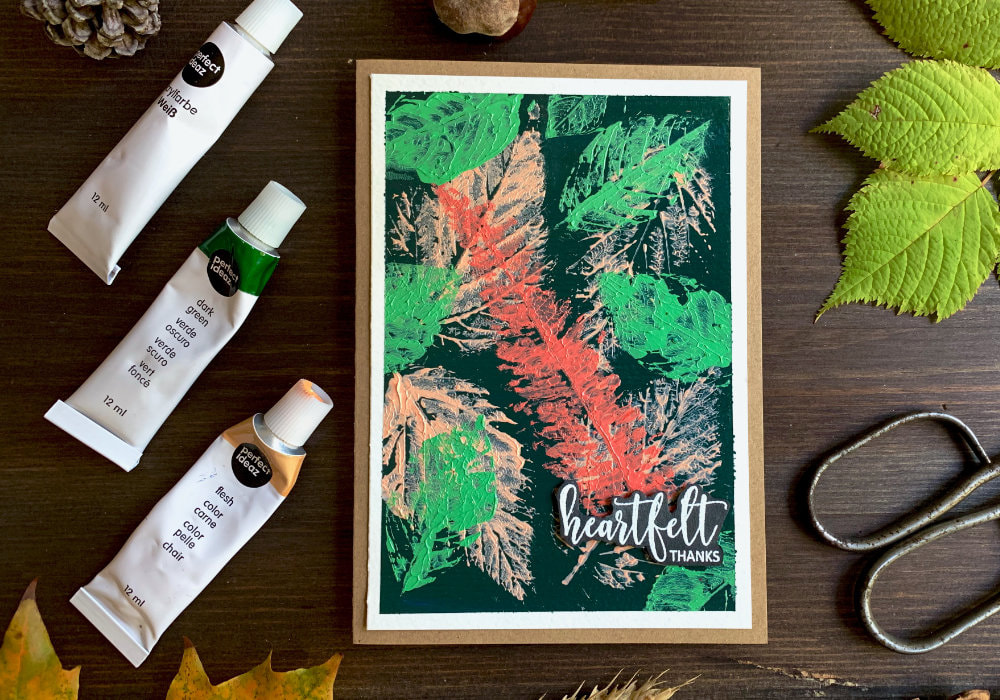 The background I painted in green. I mixed a dark green paint with a little bit of blue and black, which created a really nice shade of dark green. This was exactly what I wanted. I also was thinking making a background in the colour magenta, but I could not get the colour right. Mixing paints is really difficult. I secured my card stock onto a board using a washi tape and I covered the whole background with the green paint. When applying the paint I used a damp brush as I find the application much smoother. Not sure if this is something you suppose to do with acrylic paints, I just find it helpful. After the background was dry I started with the stamping of the leaves. I made four impressions, but I only used two leaves. I just re-stamped for the second impression, but you can use for each stamping different leaf, if you want. 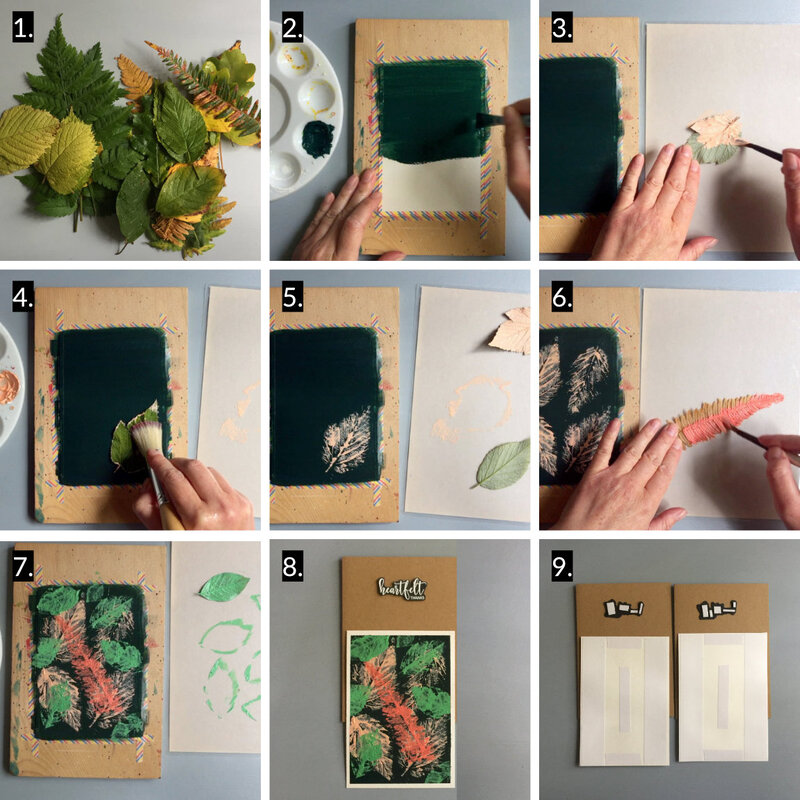 I wanted to use pastel colours and I mixed a beige or it is actually called flesh paint with a little bit of white. I applied the paint on the back of the leaf, making sure the leaf is fully covered. Then I flipped the leaf and pressed it onto the card stock. I was going to stamp only those peachy leaves, but it looked a little bit empty. So I decided to add additional layers. I picked a different leaf, it is from the plant called fern. I used the same beige paint, but this time I added a tiny bit of red to make it darker. And I repeated the process - I applied the paint all over the leaf and pressed it onto the card stock. This time I didn't get a good impression. With some leaves you can re-apply the colour and re-stamp, with this one it would be too difficult. In this case I took my brush, dipped it in the paint and painted in a few of the leaves. 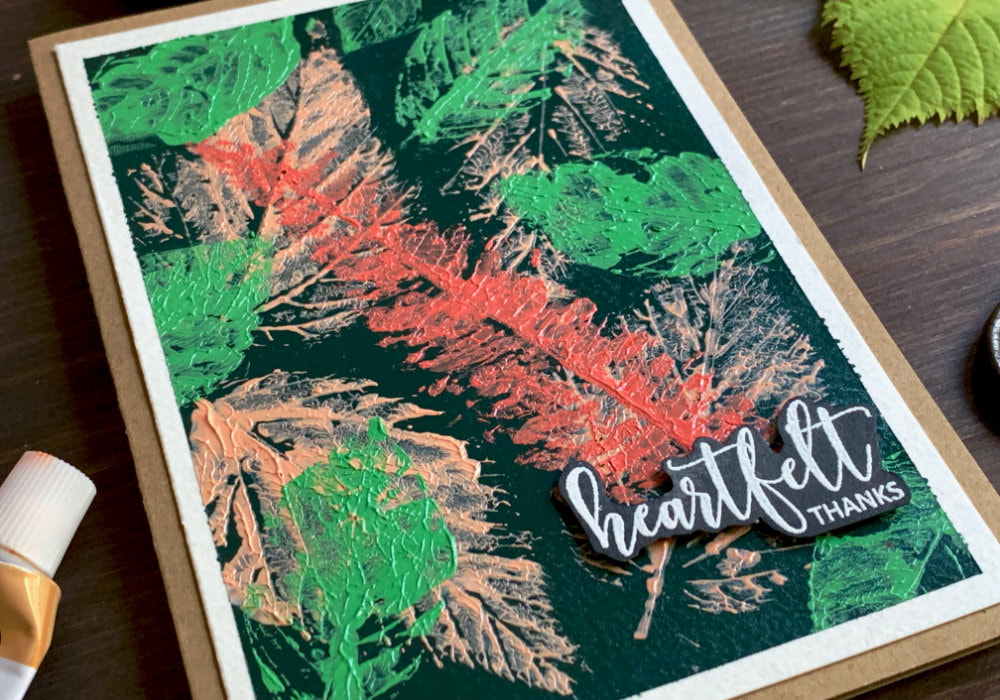 Once the leaf impression was dry, I decided to add one more layer, this one in pastel green. I used only one leaf and stamped it in places where I thought was too much empty-space. STAMPING WITH LEAVES CREATING FAUX HEAT EMBOSSING & COLOURING WITH WATERCOLOURS My next card was pretty much an experiment. I thought - what about stamping with a white acrylic paint to create a faux heat embossed look and then colour it with watercolours. To stamp the leaves I did exactly the same thing as on the previous card. I spread the paint all over the back of the leaf, I flipped it over and pressed it onto the watercolour card stock. I used multiple leaves and I repeated this process for each of them. Here I used a white acrylic paint, but you could try gold or silver 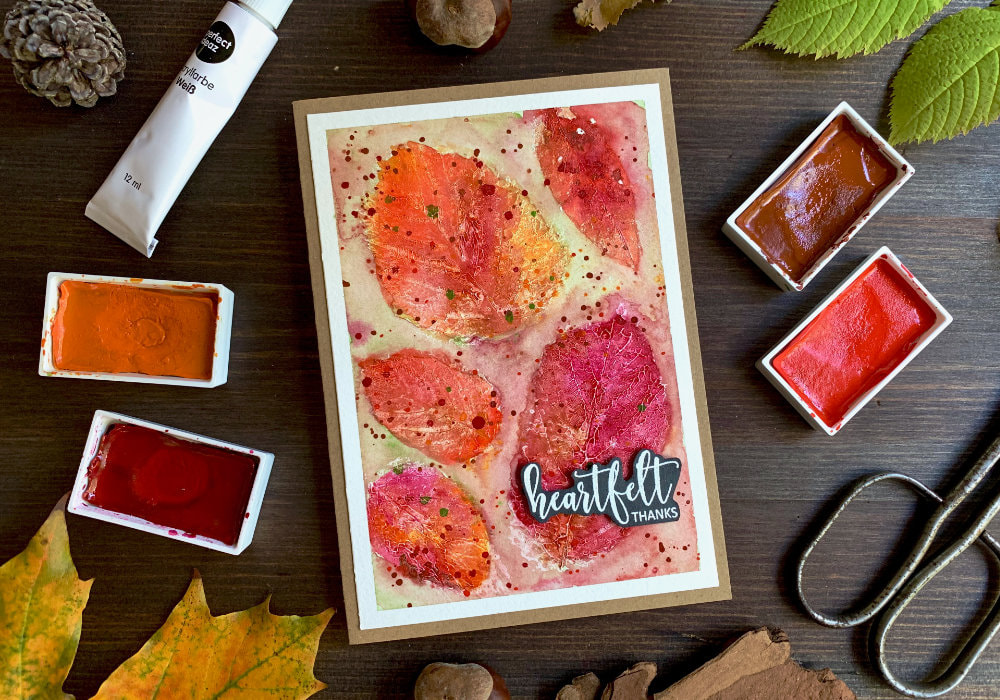 After the paint was dry I started watercolouring. For all of the watercolouring I did the wet on wet technique. First I painted the background, which is optional, you don't have to do that. I applied clean water over the background - only the space around the leaves, the leaves I left intact. I picked a green which on my swatch looked nice, but after I painted the background, it was too bright. Especially for an autumnal card. But I let it dry and kept going. I painted the leaves, the colours I picked were orange, orange-brown, red and magenta. I applied clean water over the leaf and then I added the colour. I played with the colours, I added them randomly, mixed them up to create more natural look. If the colours are not vivid enough after they dry, try re-applying the colour. 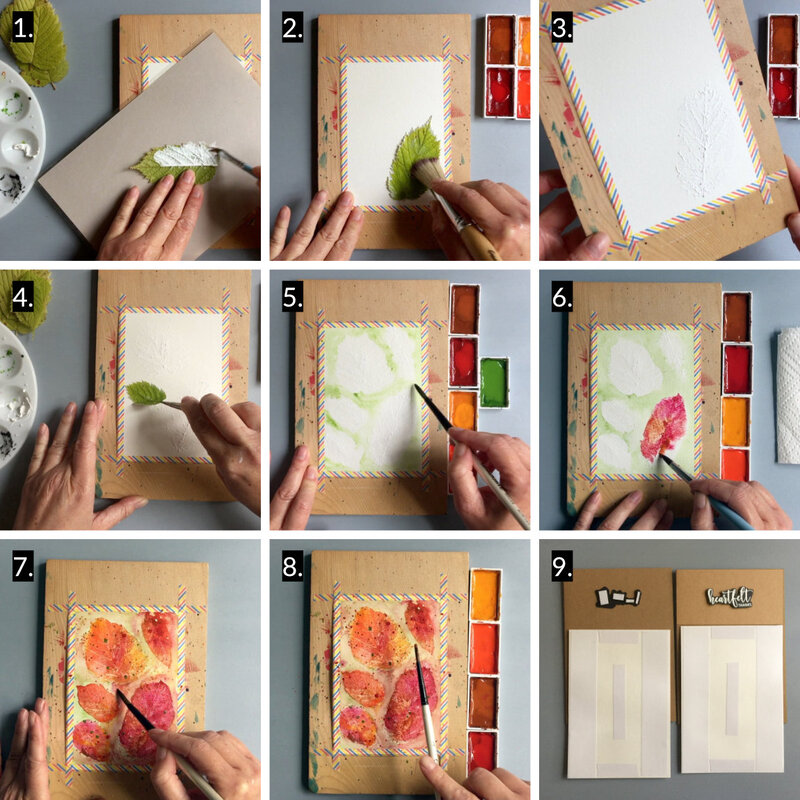 Once I was done with the leaves, the background looked even worse and it didn't compliment the leaves as all. I tried adding some splatter, because splatter can change or enhance the look sometimes, but not this time. My thoughts were - I have to re-do it. However, I didn't want to give up yet, it cannot get worse. I decided to use a clean damp brush and go around the background. This reactivated the splatter and a little bit the paint on the edges of the leaves. It mixed with the green and created this muddy pink colour, which is great for an autumnal look. Definitely better than the green. Phew! My card was saved! If I were to re-do the card, I would use different shade of green - something darker and less bright, maybe a little bit of brown and magenta. Or I would do a messy watercolouring, using the colours on the leaves. 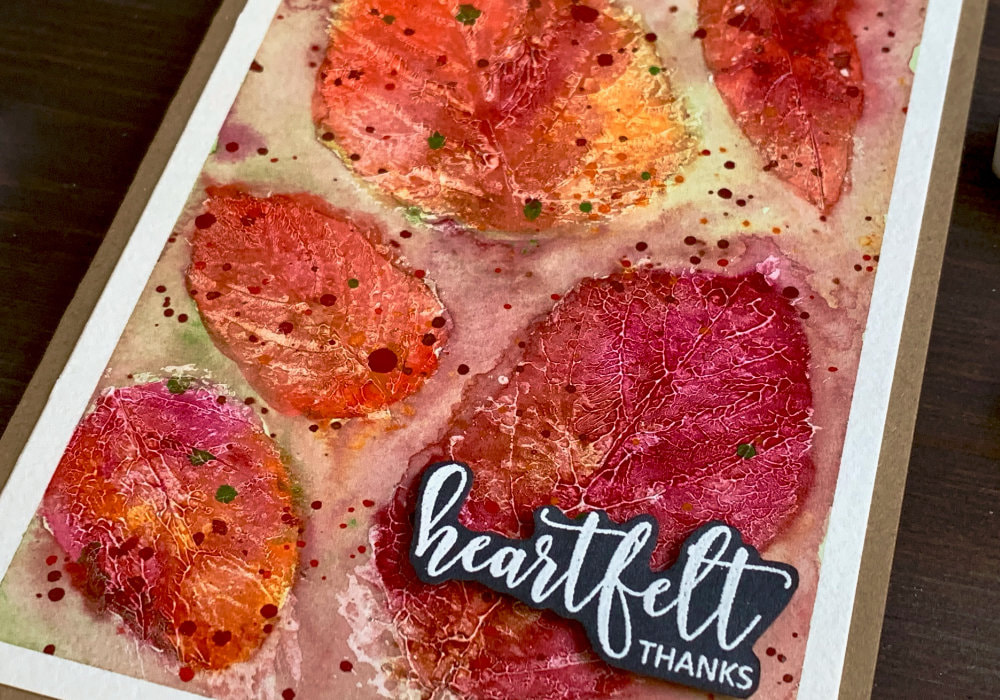 ASSEMBLING THE CARDS I adhered the panels on top of a card base using a simple double-sided tape. The card base I made out of a craft card stock. The greeting says Heartfelt Thanks and it is heat embossed in white on a black card stock. I have a few of these greetings pre-made. I adhered it at the bottom right corner using a foam tape. Please note, the greeting is completely optional, if you do not have any stamps, just leave it without the greeting. LEAVES, TOOLS AND OTHER TIPS When it comes to the leaves, first of all I would recommend picking them from trees that are near by, because if you are missing a few, you can just pop out and collect more. I actually did that when I was making the second card, I was missing smaller leaves. I would also recommend picking them on the day when you want to craft, if you do not manage, put them into a book, because they might curl up and get dry. 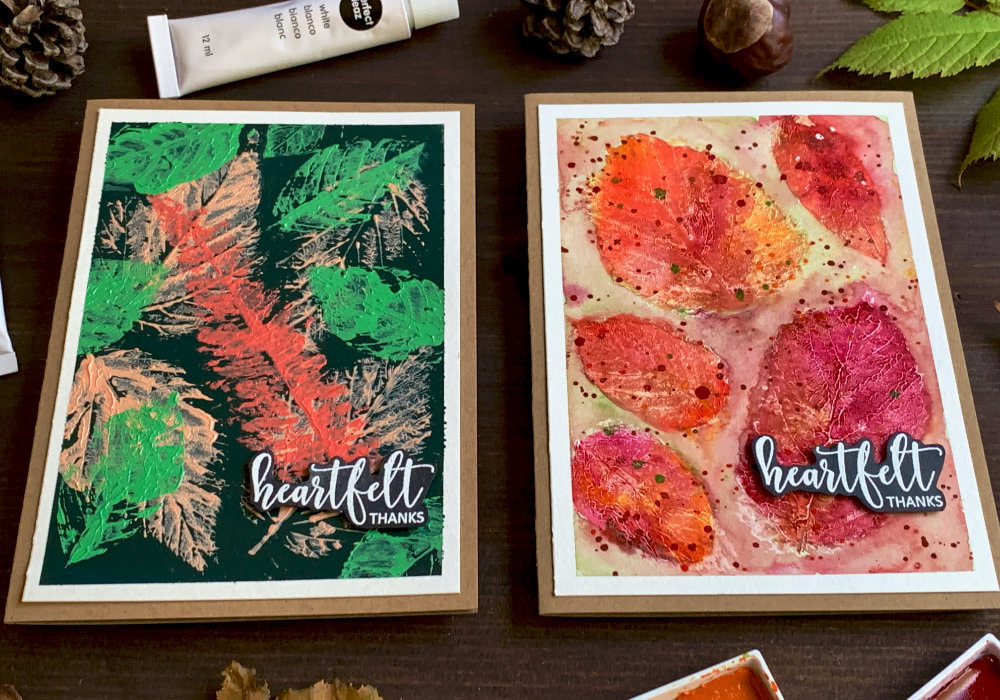 For these cards I used fresh leaves, but I also made a card where I used a leaf that was drying for a few days, pressed in a book. In a video I saw on YouTube, the person recommend soaking the leaves in hot water. I tried that and it worked. I did not try what happens, when you use a dry leaf yet, something I might test next week. Btw. when I say dry leaf, I mean a leaf that was drying pressed in a book for one or two weeks, not those supper dry leaves. When it comes to a few useful tools, not to get my desk dirty, I used a laminated card stock. You can also use a scrap paper or a newspaper, which might be better idea, to avoid constant cleaning as the paint dries quickly. After I pressed the leaf, I not only used my fingers to get a good impression, but I also used a brush with stiff bristles. Makeup sponge or brayer, might work great as well. If you do not want to get your fingers dirty, when applying the paint, you can use a needle or toothpick. I used a piercing tool. 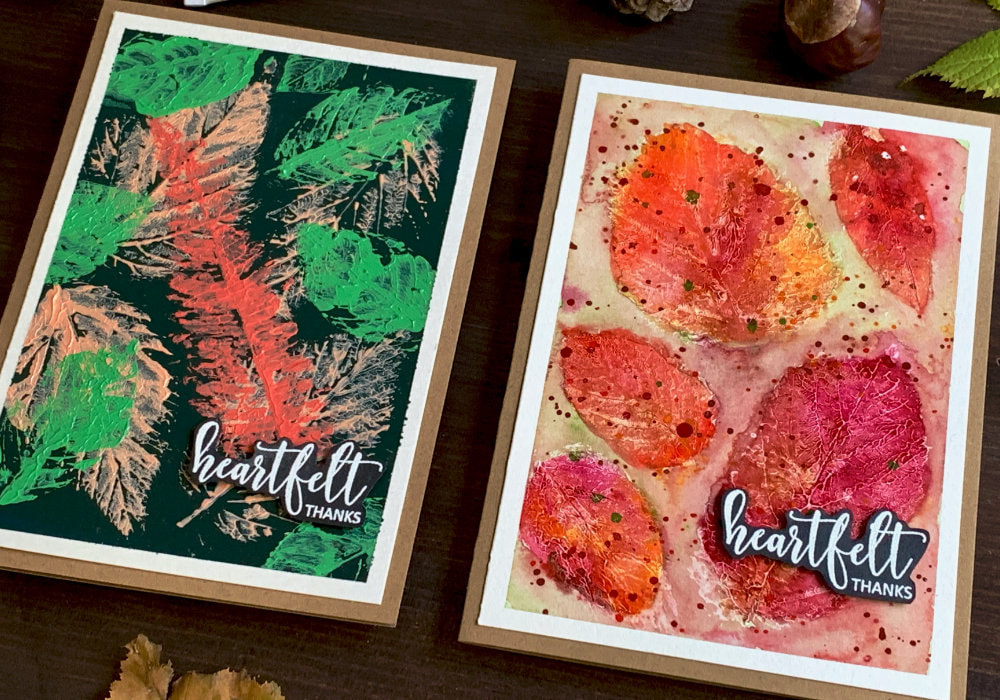 And lastly if you accidentally get paint on the background painted with acrylics, use a baby wipe to remove it. Acrylic paints are plastic, they will not reactivate once dry. So that is all for the cards today. I am really happy with the results and I hope you will try something similar yourself, once I get more paint, I will make more of them for sure. Make sure you check out my video on YouTube and give it a Like as well. The list of product is down below, where you can also find a few blog posts that I think you might enjoy. And if you have any questions, just drop me a line. VIDEO TUTORIALWatch the video below or on my YouTube Channel. PRODUCTS USEDCLICK HERE TO SEE TO THE LIST OF PRODUCTS
Of course you will need leaves
Perfekt Ideaz, Acrylic Paints, Set Of 24 AmazonDE | AmazonUK Kuretake, Gansai Tambi, Watercolour Paints 36 Set AmazonDE | AmazonUK Canson XL, Watercolour Cardstock , 300gsm/140lb AmazonDE | AmazonUK Canson XL, Mix Media Cardstock, 300gsm/140lb AmazonDE | AmazonUK Blue Squid Brush Set AmazonDE | AmazonUK Decoupage Brush SøstreneGrene Joy Crafts, Kraft Paper,A4 300gsm/140lb (card base) KreativbuntDE | AmazonUK Absofine, A4 Recycled Kraft Paper 320gsm (card base) AmazonDE | AmazonUK Sellotape Double Sided Tape AmazonDE | AmazonUK Dovecraft, Foam Squares AmazonDE | AmazonUK Fiscars, Guillotine A5 AmazonDE | AmazonUK Tonic Studios, Guillotine A4 AmazonDE | AmazonUK Crafting Mat, Black AmazonDE | AmazonUK Disclaimer: Here you can find the products I used to make this card. Please note that the products are just a guide, you don't need the exact products or brands. For most of the products I include links to the shops where you can purchase these items if available. As I live in Europe, I provide links to UK and German stores. These are not affiliate links and every products I used for this card I purchased myself. YOU MIGHT ALSO LIKEPIN MEDid you like the card? I would love, if you pinned it to your board on Pinterest! 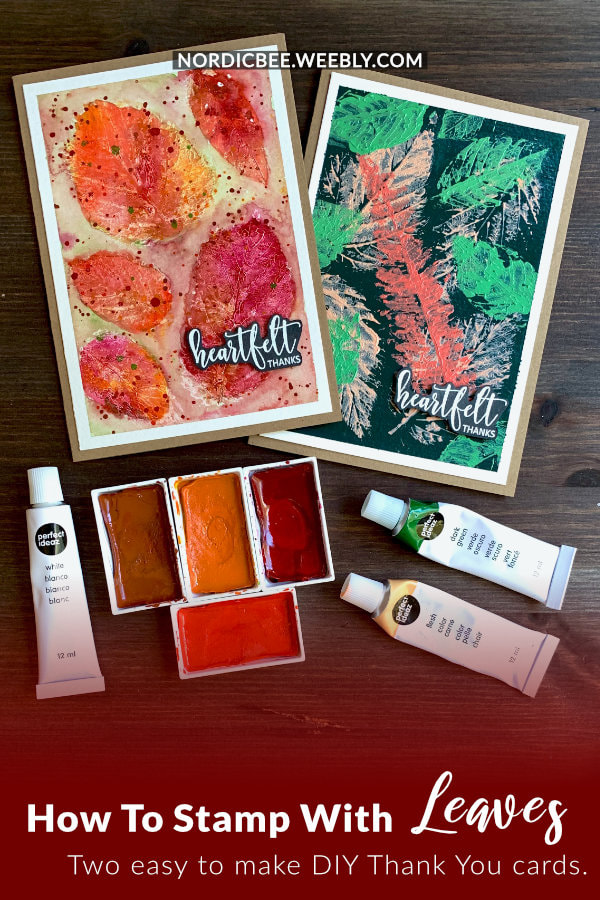
0 Comments
Leave a Reply. |
FOLLOW ME
SEE MORE


CATEGORIES
All
Stamping Die Cutting Using Stencil Heat Embossing Embossing or Texture Paste Distress Inks Nuvo Products Stamping & Colouring Stamping With Solid Stamps Watercolouring Watercolour Pencils Waterbased Markers Pencil Colouring Alcohol Markers Altenew Markers Zig Brush Markers Easy Backgrounds Stamped Backgrounds Small Stamp Ideas Simple Cards Complex Cards Cardmaking For Beginners All
Painting With Acrylics Painting With Gouache Painting With Watercolours Drawing With Fineliner Minimal Supplies Cards Christmas & Holiday
Love & Valentine Mother's Day Father's Day Halloween Spring Cards Summer Cards Autumn/Fall Cards Winter Cards Cards For Children Cards For Women Cards For Men Thank You Cards Sympathy Cards Get Well Soon Cards Floral & Leav Cards Rainbow Colours Messy Watercolouring Modern Art Inspirations Geometric Patterns Landscape Painting Acrylics
Gouache Watercolours Watercolour Pencils Waterbased Markers Distress Inks Alcohol Markers Colouring Pencils No Stamps No Dies Cards
Cardmaking On A Budget Let’s Colour Quick Cards Fun Masculine Cards Background Ideas Distress Ink Combinations |

 RSS Feed
