
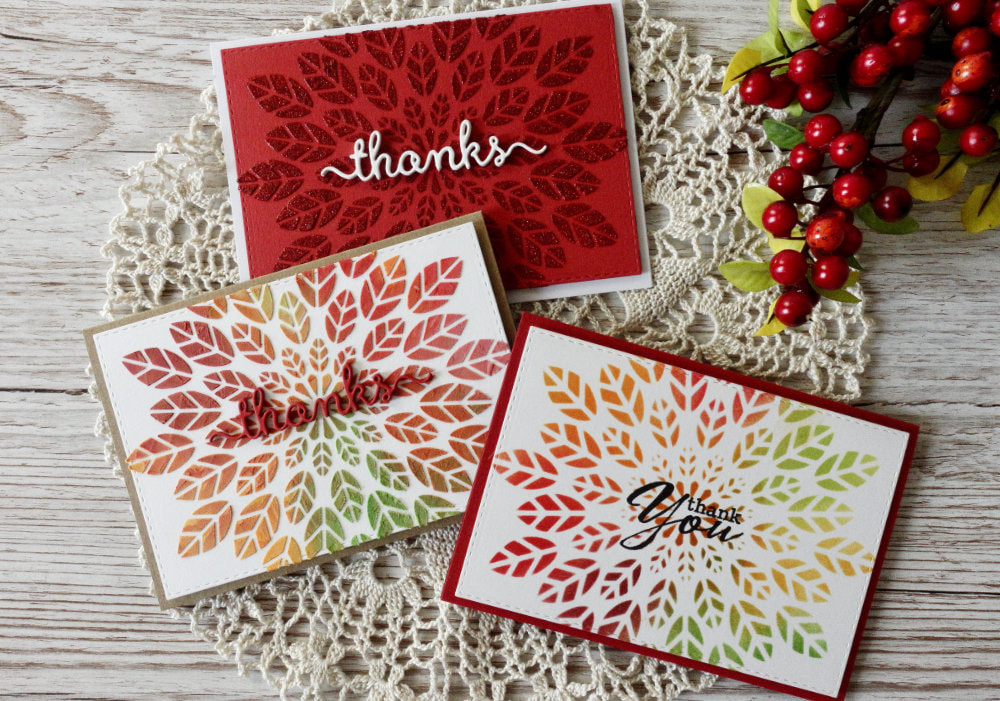
I love autumn, despite of the grey and gloomy weather, seeing the trees to change their colours from green to yellow, reds and brown, just makes me happy. Therefore it’s the best time to make few autumnal cards.
For the cards today, I will be showing you three ways of using a stencil and I'm going to be using here Distress inks, Texture paste and Glimmer paste from Nuvo. The stencil I’m using is the Leaf Burst stencil from Altenew. I used a card stock from Papermilldirect in plain white for the first two cards and red colour for the last one. For the ink blending you need a card stock that is smooth, in order to be able to blend the colours well, but for the other two techniques, any heavier card stock will do. All cards I die-cut using the stitched rectangular die from Create A Smile. I did this first, before doing any ink blending or applying the paste. It’s difficult to die-cut once the paste is applied and you might even mess up your card. 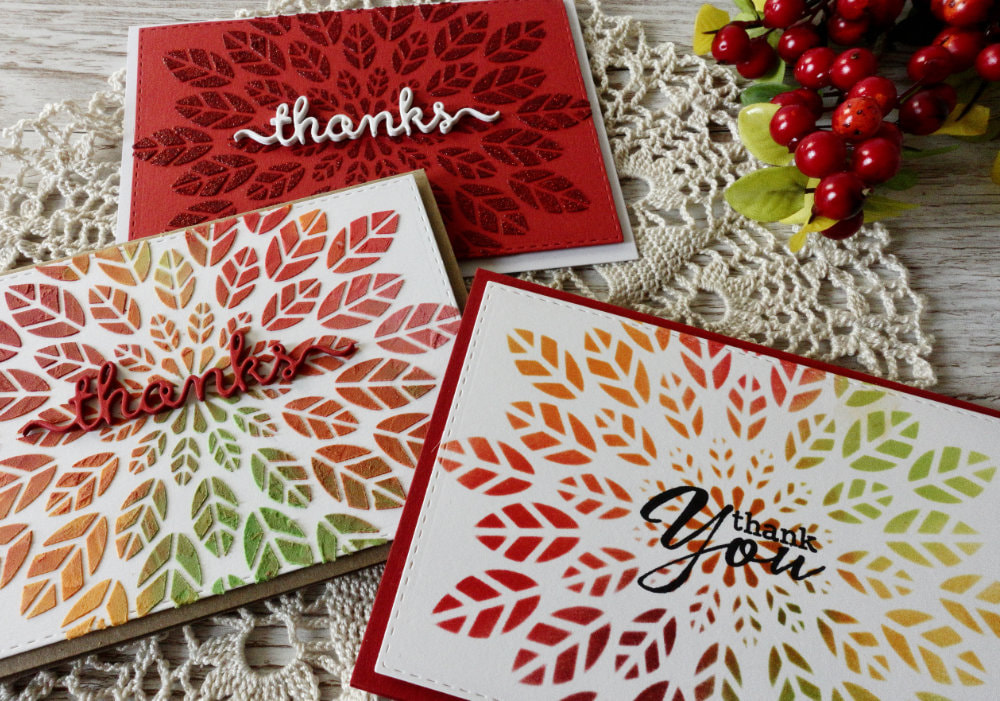
QUICK TIP: It is important to clean the stencil after every use. With the distress inks it will only stain your stencil, but if you use any type of a paste and let it dry, it might ruin the stencil. It took me about seven minutes to finish the application of the embossing paste that means, you have little bit of time before the paste dries. If you do not have the time to wash it right away, then put it into a bowl of water and wash it later.
STENCIL & INK BLENDING
This is the easiest thing you can do with a stencil. I used Distress inks for this, but if you have other inks that blend well, you can use those.
When blending with inks I like to use something with a slick, smooth surface underneath my card stock. I find that it helps the blending tool to glide better. In this case, I took a laminated card stock, I attached the card stock on top of it using a non-permanent adhesive, just to make sure it doesn’t move. And on top of the card stock I placed the stencil and secured it with washi tape. I picked four colours of Distress inks in autumnal colours: Candied Apple for the red, Curved Pumpkin for the orange, Mowed Lawn for the green and Mustard Seed for the yellow. 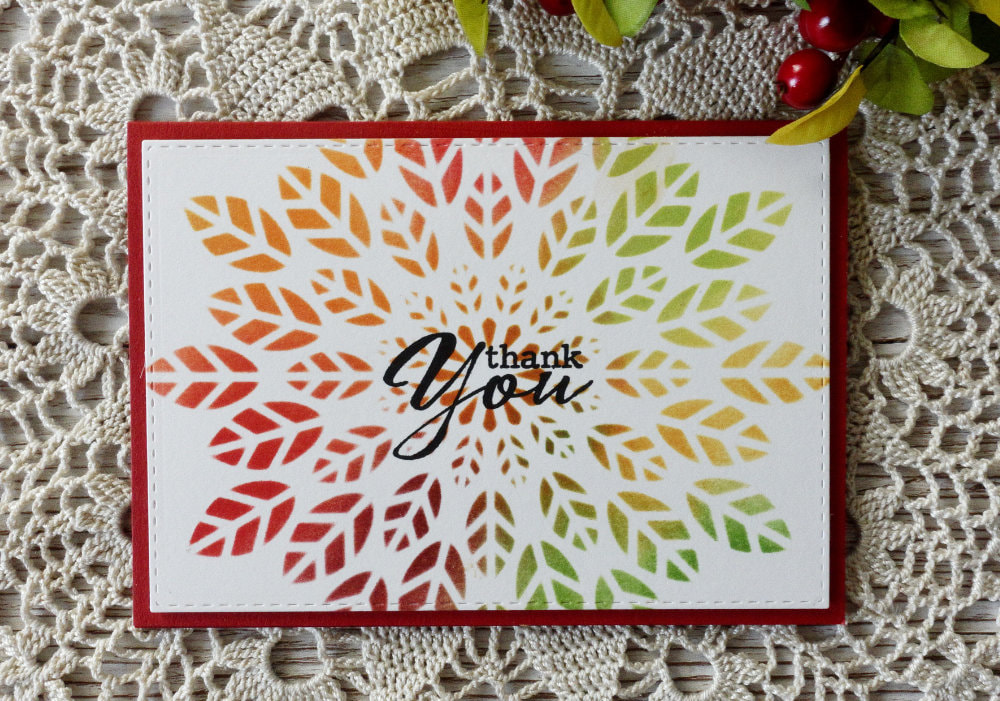
I took my blending tool and applied the colours randomly across the stencil. To apply the colours evenly, I usually try to start blending from the edge, making my way in, but I also was able to go in with the blending tool in the middle of the stencil and apply it without any streaks.
Once I was happy with the colour application, I removed the stencil and let the panel dry. Next I stamped the sentiment. I wanted it to be simple, but bold. So I took the "Thank You" sentiment from the Brushed Greetings II, this stamp set is not available anymore, but it was the only stamp set I have that was in the right size. STENCIL & EMBOSSING PASTE
For the second technique I'm using the Texture Paste from Ranger, which is an embossing paste. The paste I have is white, but you can also get them in many colours.
If you only have a white, or a transparent embossing paste you can mix it with inks and create your own colourful paste. This is what I did. Just like with the first card I placed the card stock on to of a laminated card stock, but in this case it didn’t matter, a cork board would have been okay as well. I used another laminated card stock to squish the Distress inks and using a palette knife, I mixed them with the texture paste. 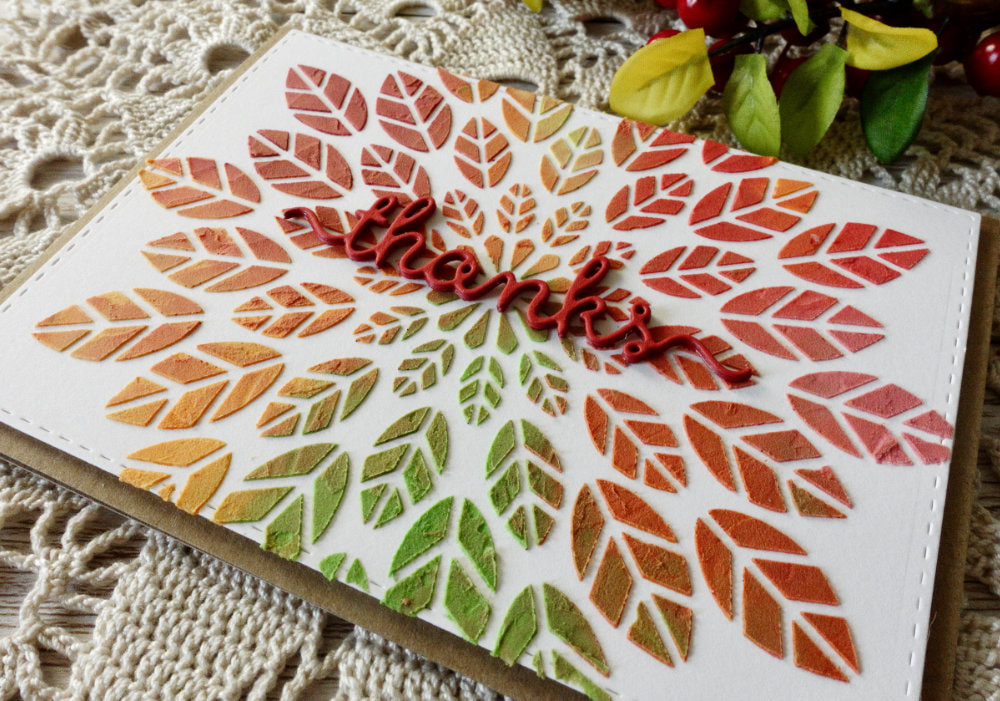
Because the Texture Paste is white, the ink will be much lighter once you blend those together. Therefore I squished the Distress inks few times, to get more colour onto the laminated card stock. But the red was more pink than red, so I picked the Aged Mahogany ink and mixed it with the red I already used.
Once I was happy with the application, I slowly removed the stencil and let the panel dry. Of course I washed the stencil right away. And since I was using a laminated card stock, it was easy to clean, I just wiped away the paste using baby wipes. STENCIL & NUVO GLIMMER PASTE
I bought the Glimmer Paste from Nuvo in the colour Garnet Red for Christmas cards, but since this an autumnal colour as well, I decided to try it out.
The main difference between the Texture Paste and the Glimmer Paste is that the Texture Paste is more dry and more firm when you apply it, while the Glimmer Paste, except of having a lot of glitter in it, is more fluid. It is not watery, but it has more fluid, rather than a solid texture, when applying. Once it's dry it's solid. 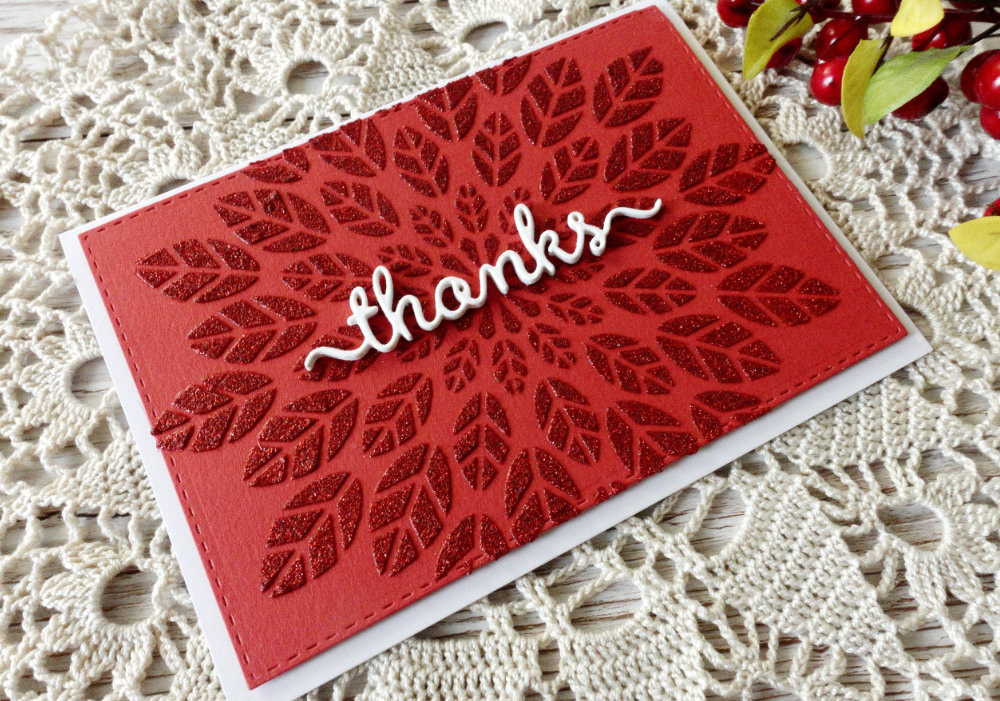
Again, I did the same as with the other cards, I secured the panel and the stencil and applied the Glimmer Paste. This time I decided to use a red card stock, just to be little bit different.
It's supper easy to apply it and once I was happy with the application, I removed the stencil and let it dry. The washing of the stencil was little bit more difficult, because of the glitter. I could not get it off 100%, but I made multiple cards after that and the glitter didn't transfer to a new project. For the two last panels I did the same thing with the sentiment. I used a "thanks" die from Clearly Besotted. This one is also not available anymore, but I would not recommend it anyway, because it has a flaw. There is a part on one of the letters that would not cut and I had to use a craft knife to cut it out. This is not a huge problem, but I needed eight die-cuts all together and this made the job unnecessarily longer. I die-cut four thanks sentiments for each card and I glued them together using the 2 Way Glue Pen from Zig. This is a great glue to adhere small die cuts, it's easy to apply and you still have a wiggle room before it dries. 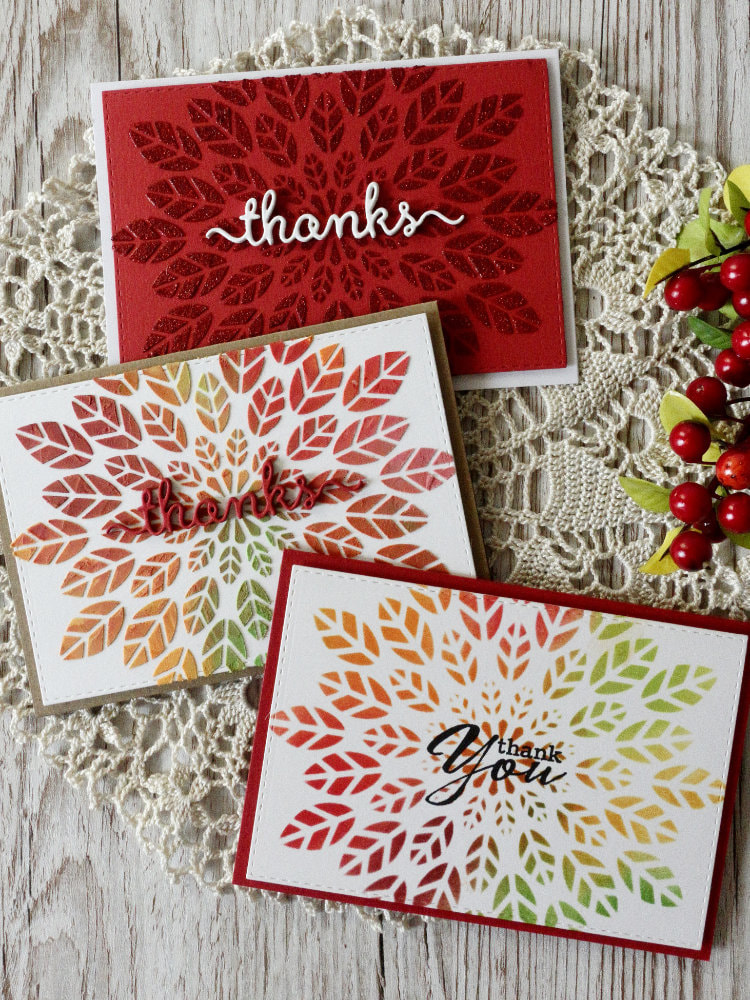
I used two different colours of the card stock for the sentiment. For the card where I used the Texture paste I used a red card stock and for the card with the Glummer paste I used a white card stock.
To adhere the stack of the sentiments on top of the panels, I decided to use the Multi-Medium Matte adhesive from Ranger. I just think this is much stronger glue and the panel with the Glimmer Paste has a slick surface and I wanted to make sure it stays attached. Lastly, I adhered all the panels on top of a card base using a foam tape. For the first two panels I used a kraft card stock for the card base and for the card base of the last panel I used a white card stock.. This finishes the card, hope you liked it. Thank you for visiting, have a wonderful day and happy crafting! VIDEO TUTORIAL
Watch the video below or on my YouTube Channel.
PRODUCTS USED
Disclaimer: I’m currently not using any affiliate links. These links are just to help you find the products. The list includes alternatives to what I was using and while I haven't used some of them, I only recommend brands I trust.
Altenew, Leaf Burst Stencil
StampCornerDE | SevenHillsCraftsUK Tim Holtz Distress Mini Ink, Kit 1 (Mustard Seed) AmazonDE | AmazonUK Tim Holtz Distress Mini Ink, Kit 2 (Mowed Lawn) AmazonDE | AmazonUK Tim Holtz Distress Mini Ink, Kit 15 (Carved Pumpkin, Candied Apple) AmazonDE | AmazonUK Tim Holtz Distress Mini Ink, Kit 12 (Aged Mahogany) AmazonDE | AmazonUK Ranger, Texture Paste, Opaque Matte AmazonDE | Amazon UK Tonic Studios, Nuvo Glimmer Paste, Garnet Red AmazonDE | AmazonUK papermilldirect, White Card Plain 250gsm papermilldirectUK papermilldirect, Red Plain Card 290gsm papermilldirectUK Joy Crafts, Kraft Paper,A4 300gsm/140lb (card base) KreativbuntDE | AmazonUK Color Copy , White Paper, A4 300gsm/140lb (card base) AmazonDE | AmazonUK Tsukineko, Versafine Ink pad, Onyx Black | AmazonDE | AmazonUK Clearly Besotted, Brushed Greetings (N.A.) You can find various sentiment stamp sets here: ClearlyBesottedUK | CreateASmileDE | SevenHillsCraftsUK Clearly Besotted, Thanks Die (N.A.) Create A Smile, Double Stitched Rectangles CreateASmile Zig 2-Way Glue Pen AmazonDE | AmazonUK Ranger, Multi Medium Matte Adhesive AmazonDE | AmazonUK Stick It!, Double Sided Foam Tape AmazonDE | AmazonUK Tonic Studios, Guillotine A4 AmazonDE | AmazonUK YOU MIGHT ALSO LIKEPIN ME
Did you like the card? I would love, if you pinned it to your board on Pinterest!

0 Comments
Leave a Reply. |
FOLLOW ME
SEE MORE


CATEGORIES
All
Stamping Die Cutting Using Stencil Heat Embossing Embossing or Texture Paste Distress Inks Nuvo Products Stamping & Colouring Stamping With Solid Stamps Watercolouring Watercolour Pencils Waterbased Markers Pencil Colouring Alcohol Markers Altenew Markers Zig Brush Markers Easy Backgrounds Stamped Backgrounds Small Stamp Ideas Simple Cards Complex Cards Cardmaking For Beginners All
Painting With Acrylics Painting With Gouache Painting With Watercolours Drawing With Fineliner Minimal Supplies Cards Christmas & Holiday
Love & Valentine Mother's Day Father's Day Halloween Spring Cards Summer Cards Autumn/Fall Cards Winter Cards Cards For Children Cards For Women Cards For Men Thank You Cards Sympathy Cards Get Well Soon Cards Floral & Leav Cards Rainbow Colours Messy Watercolouring Modern Art Inspirations Geometric Patterns Landscape Painting Acrylics
Gouache Watercolours Watercolour Pencils Waterbased Markers Distress Inks Alcohol Markers Colouring Pencils No Stamps No Dies Cards
Cardmaking On A Budget Let’s Colour Quick Cards Fun Masculine Cards Background Ideas Distress Ink Combinations |
 RSS Feed
