
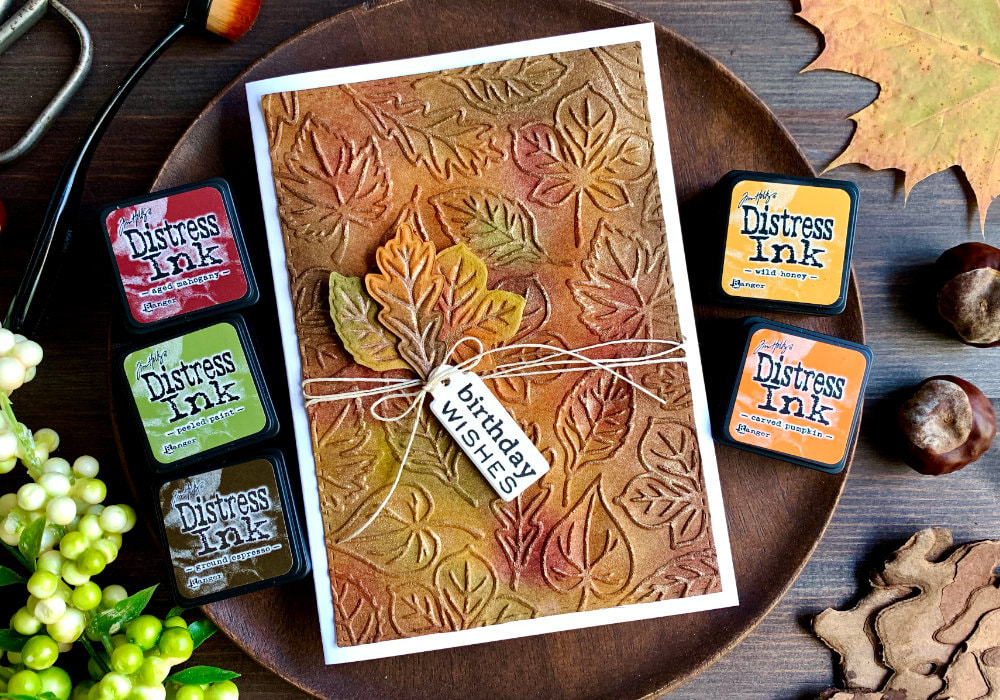
 I don't shop for card making supplies that often, but a few months ago I made a purchase and I bought an embossing folder with leaves to make an autumnal card. And I almost forgot about it. Luckily when I was planning cards for this month, I remembered and that's what I'm using for the card in this blog post - an embossing folder and the Perfect Pearl powder that I also bought to specifically use with embossing folders. NOTE: While I'm making an autumnal card, you can use this technique or idea with different embossing folders as well. I also used the Distress inks to add colour to the background, but in the past I also used watercolours. And if you want to make it less time consuming, you could just use a coloured card stock. The first step is the embossing, but I wanted to have the panel die-cut - just a rectangle with a stitching around it. So I did that first. I used a stitched rectangular die and run it through my die-cutting machine. Just keep in mind, any die-cutting of the panel needs to be done before the dry-embossing. 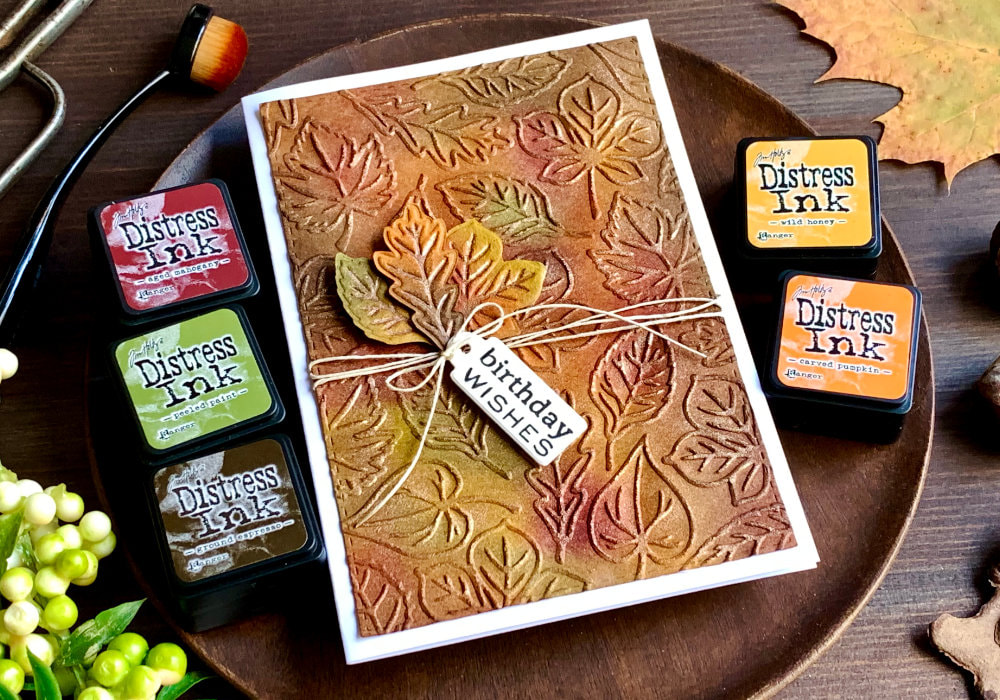 The card stock I used is a craft card stock. This made the colours more subdued, which I thought is perfect for an autumnal card. But this is completely optional, you can use what ever card stock you like for blending. Next I placed the panel into the embossing folder and run it through my die-cutting machine, following the machine instructions for embossing. The panel already looked great and for sure you could use it for a background like that, but I wanted to add some colour and I used the Distress inks for it. You can apply them before you emboss, but I wanted my application to be more intentional, I was adding specific colours to the individual leaves. Although I didn't have any exact way that I followed or colours I used, this was solely based on how it looked to me. 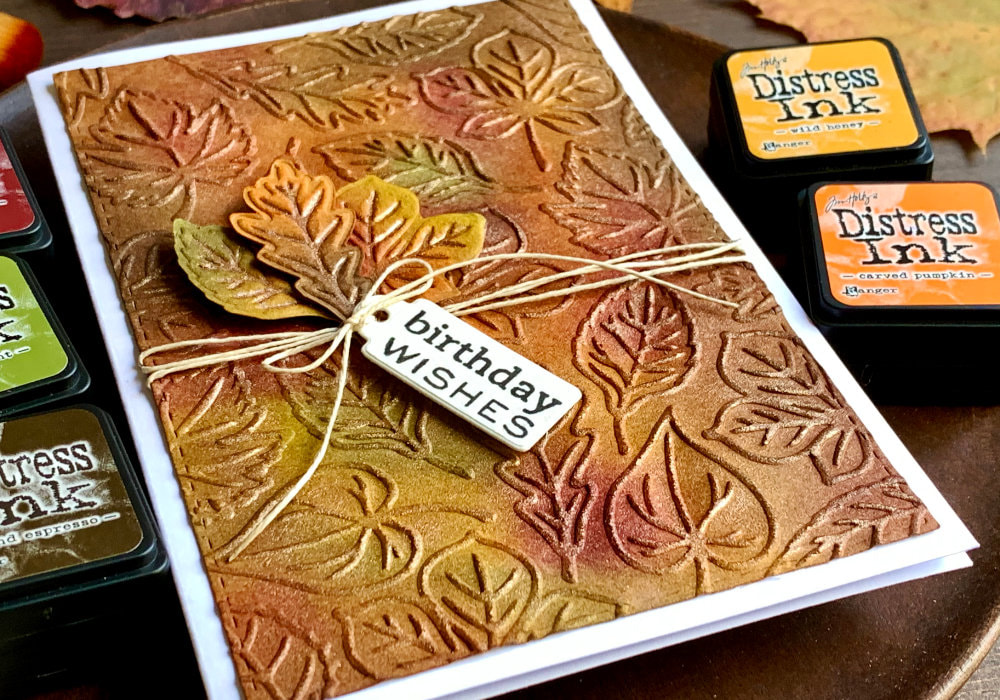 The inks I sued are:
There are other colours you can use, but these were my choices. After I was happy with the application I let it dry and I actually let it dry over the night. This is something I do most of the time, especially when I'm using embossing powders after I blended the inks. Sometimes I let it air dry for a few hours but most of the time it is drying over night, because I usually craft in the afternoon. Why do I do that? I just don't like using the heat tool to dry Distress ink backgrounds, I find it annoying and it takes too long. You could argue that waiting for a few hours takes long, but during that time I can do something else.  Once the panel was dry, I used the Perfect Pearls powder and applied it over the leaves. This is just to add shimmer to the panel. That's why I bought the powder. The colour I have is Perfect Bronze, but gold would work here as well. I actually was deciding between the Perfect Pearls and the pastes from Simon Hurley, so if you have it give it a try. I don't know much about Perfect Pearls. Before bought the bronze one, I only had the shimmer powder and I added it to a spray bottle to add shimmer to my cards. So I had to google to find out how to use it. All people were using it with the combination of embossing ink, the powder and clean water. And that's what I did. I used the Versamark ink pad and dabbed it over the leaves. I was very careful to dabb it only over the raised area and then I applied the powder. I didn't have the specific brushes Ranger sells for the Perfect Pearls. I picked a soft brush to apply the powders and it worked just fine. The lid of the jar had some powder on it and that's where I started, just to get a feel for it. But I used the lid for the rest of the application. I transferred the powder form the jar to the lid using my brush, removing the excess powder. This way I didn't have huge amounts of the powder when applying it over the leaves. 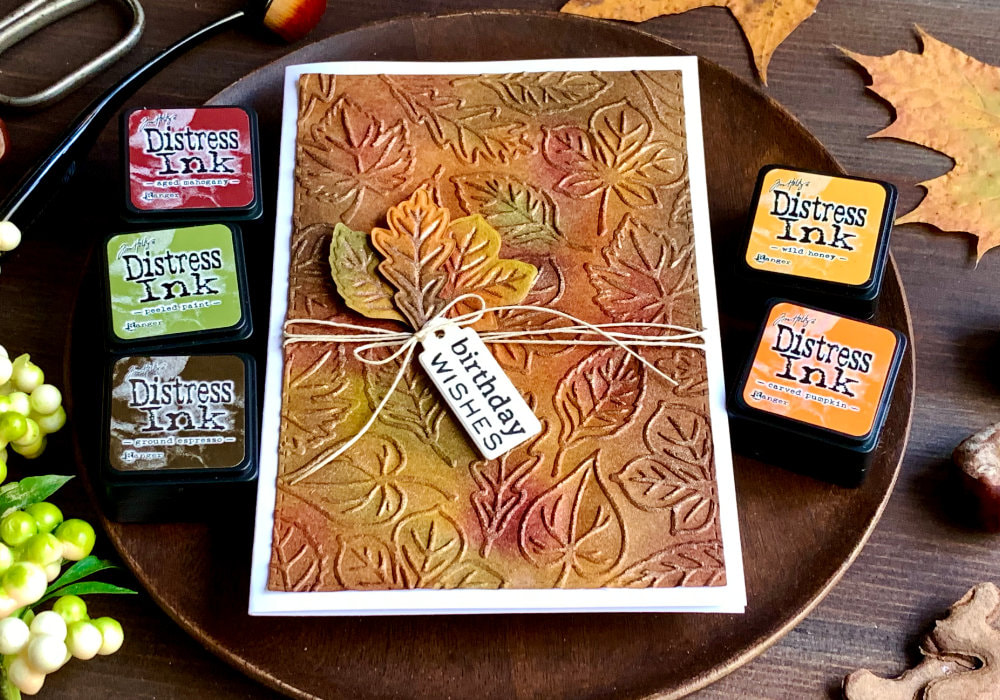 After I was happy with the look, I used a spray bottle and sprayed the panel. This sets the powder. I was a little bit worried that the water will re-activate the Distress inks and create a mess, but this luckily didn't happen. The colours stayed in place. I was originally going to just add a greeting and a bakers twine and that's it. Bakers twine I haven't used for ages and I thought it was perfect for this card. However after I embossed the background and I flipped it, that de-bossed side looked great as well and I wanted to do something with it. And I thought cutting out the individual leaves and adding it together with the greeting and the bakers twine is a good idea. So I embossed one more panel and I cut out a few leaves with my scissors. When I was cutting them out I followed the embossed side as it was easier to cut . I wanted the leaves to match the colours on the background, so I used the Distress inks again.  I also wanted to have the shimmer, but because I was using the de-bossed side, applying the Versamark ink from the pad would have been rather difficult. So instead I picked a few shimmery gel pens. Unfortunately it didn’t work, none of the colours I have matched the Perfect Pearls. I thought I just use the leaves without the shimmer, but then I remembered that when I was shopping I also bought an embossing pen. Funny thing is, when I bought it I didn't really know what project I needed it for. But I knew there were ideas I had where I needed an embossing pen and I knew I will have new ideas and will need them. So true! I used the clear pen, I also have black and I just went over the de-bossed lines. Then I used a very small brush, size 0 and I applied the powder to those lines. Then I sprayed the leaf with clean water to set the powder. 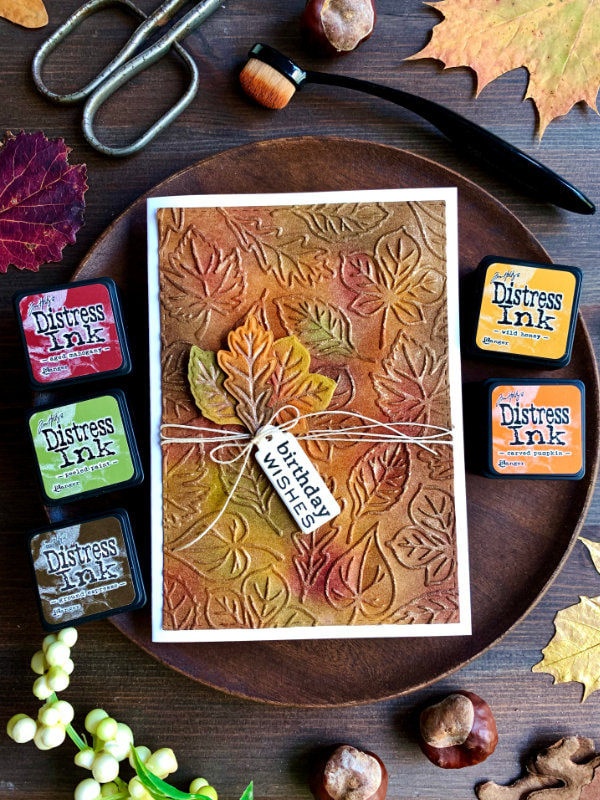 To assemble the card I first tied the backers twine around the panel and I tied a knot to hold it in place. Then I adhered tree leaves. Two of them I attached using a foam tape. For the one that was overlapping I only used the tape for half of the leaf. And the last leaf I adhered using a liquid glue. I also made sure that the stems are together, so I can tie the bakers twine around them. For the greeting I used a small tag that I die-cut using a tag from a die set from Sizzix and then I found a stamp in my stash with a sentiment that fits the size of the tag. To attach it to the twine. I put one of the strings through the loop on the tag. I tied a knot first and then I made a bow. And lastly I adhered the panel on top of a white card base using a liquid glue. 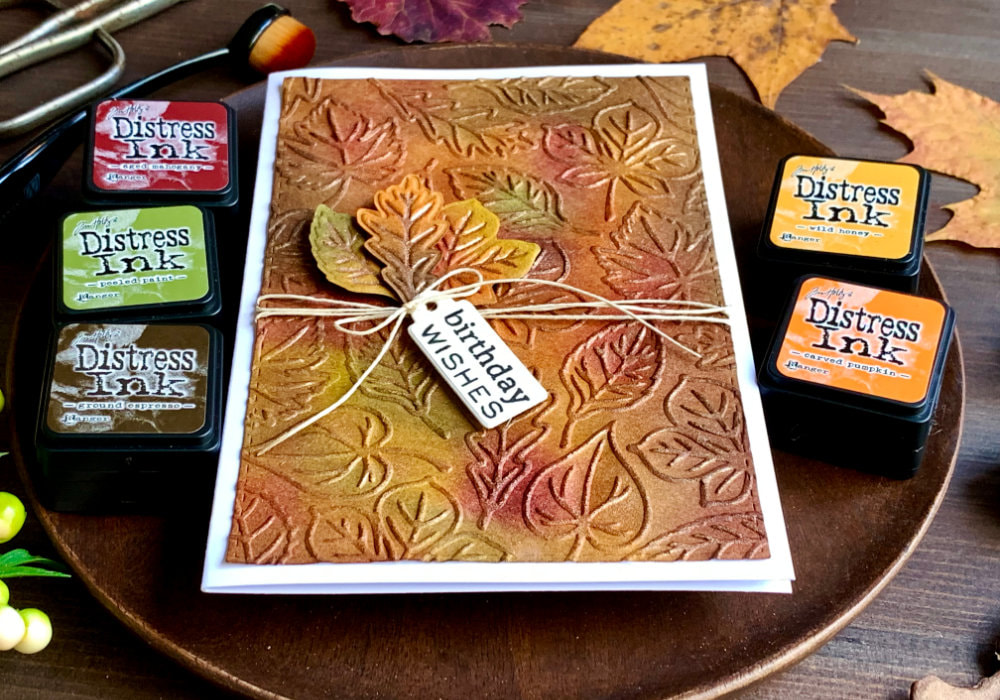 This was a very fun project and I hope you will try making this card yourself. I actually made one more card with a simpler design, but this blog post is already too long, so I will keep it for another time. Make sure you check out my video on YouTube and give it a Like as well. The list of product is down below, where you can also find a few blog posts that I think you might enjoy. And if you have any questions, just drop me a line. VIDEO TUTORIALWatch the video below or on my YouTube Channel. PRODUCTS USEDCLICK HERE TO SEE TO THE LIST OF PRODUCTS
Stationery Place, Brown Recycled Natural Kraft Cardstock
AmazonUK Vaessen Creative, Foliage Leaves Embossing Folder SarisStampingStudioSE Perfect Pearls, Perfect Bronze AmazonDE | AmazonUK | SarisStampingStudioSE Tsukineko Versamark Watermark Ink Pad AmazonDE | AmazonUK Daler Rowney Watercolour Brushes 4, 6, 10 AmazonDE | AmazonUK Daler Rowney Small Watercolour Brushes 1, 3, 10/0, 3/0 AmazonDE | AmazonUK Tim Holtz Distress Mini Ink, Kit 1 (Mustard Seed, Spiced Marmalade) AmazonDE | AmazonUK Tim Holtz Distress Mini Ink, Kit 5 (Peeled Paint) DaniPeussDE | CraftStashUK Tim Holtz Distress Mini Ink, Kit 7 (Wild Honey) danipeussDE | CraftStashUK Tim Holtz Distress Mini Ink, Kit 12 (Aged Mahogany) danipeussDE | CraftStashUK Tim Holtz Distress Mini Ink, Kit 14 (Ground Espresso) danipeussDE | CraftStashUK Sizzix Framelits Tag Dies, Set of 8 AmazonDE | AmazonUK Color Copy , White Paper, A4 300gsm/140lb (card base) AmazonDE | AmazonUK Papermania, A6 Card Bases + Envelopes, White AmazonDE | AmazonUK Stick It!, Double Sided Foam Tape AmazonDE | AmazonUK UHU, Liquid Glue AmazonDE | AmazonUK Ranger, Glossy Accents AmazonDE | AmazonUK Fiscars, Guillotine A5 AmazonDE | AmazonUK Tonic Studios, Guillotine A4 AmazonDE | AmazonUK EK Success, Scissors AmazonDE | AmazonUK My Sweet Petunia, Mini MISTI Stamping Tool StempelmühleDE | BumbleberrysUK Papermania, Stamp Block AmazonDE | AmazonUK Crafting Mat, Black AmazonDE | AmazonUK Disclaimer: Here you can find the products I used to make this card. Please note that the products are just a guide, you don't need the exact products or brands. If available I include links to the stores where you can find the products. As I live in Europe, I provide links to UK and German stores. These are not affiliate links and every product I used for this card, I purchased myself. YOU MIGHT ALSO LIKEPIN MEDid you like the card? I would love, if you pinned it to your board on Pinterest! 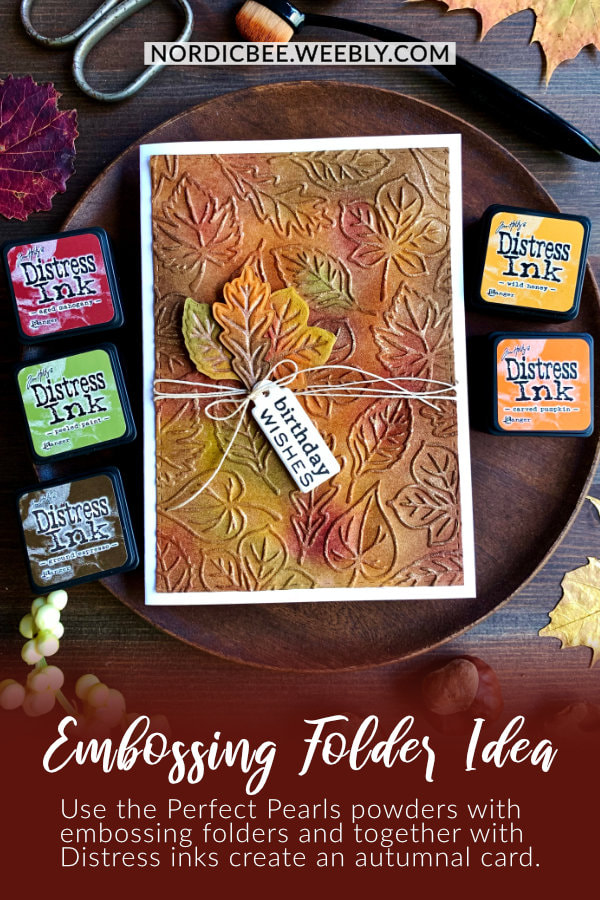
0 Comments
Leave a Reply. |
FOLLOW ME
SEE MORE


CATEGORIES
All
Stamping Die Cutting Using Stencil Heat Embossing Embossing or Texture Paste Distress Inks Nuvo Products Stamping & Colouring Stamping With Solid Stamps Watercolouring Watercolour Pencils Waterbased Markers Pencil Colouring Alcohol Markers Altenew Markers Zig Brush Markers Easy Backgrounds Stamped Backgrounds Small Stamp Ideas Simple Cards Complex Cards Cardmaking For Beginners All
Painting With Acrylics Painting With Gouache Painting With Watercolours Drawing With Fineliner Minimal Supplies Cards Christmas & Holiday
Love & Valentine Mother's Day Father's Day Halloween Spring Cards Summer Cards Autumn/Fall Cards Winter Cards Cards For Children Cards For Women Cards For Men Thank You Cards Sympathy Cards Get Well Soon Cards Floral & Leav Cards Rainbow Colours Messy Watercolouring Modern Art Inspirations Geometric Patterns Landscape Painting Acrylics
Gouache Watercolours Watercolour Pencils Waterbased Markers Distress Inks Alcohol Markers Colouring Pencils No Stamps No Dies Cards
Cardmaking On A Budget Let’s Colour Quick Cards Fun Masculine Cards Background Ideas Distress Ink Combinations |
 RSS Feed
